Dead Hand: Difference between revisions
(disambiguation link cleanup) |
(replaced brs w/List) Tags: Mobile edit Mobile web edit |
||
| (89 intermediate revisions by 37 users not shown) | |||
| Line 1: | Line 1: | ||
{{Boss | {{Infobox Boss | ||
|image= | |image= | ||
| | {{Media | ||
| | |Model OoT = File:OoT Dead Hand Model.png | ||
|Model OoT3D = File:OoT3D Dead Hand Model.png | |||
}} | }} | ||
|caption= | |||
|pronunciation= | |||
|title= | |||
|race= | |||
|gender= Male<ref name="E 173">{{Cite Book|quote= |book= E |publisher= |page= 173}}</ref> | |||
|game= OoT | |||
|other= | |||
|dungeon= | |||
{{List| | |||
{{Term|OoT3D|Bottom of the Well|link}}, | |||
{{Term|OoT3D|Shadow Temple|link}}, | |||
{{Term|OoT3D|Ganon's Castle|link}}{{Exp|Master Quest}}, | |||
}} | |||
|habitat= | |||
|health= {{HP|OoT|10}} | |||
|weakness= | |||
{{List| | |||
{{Term|OoT3D|Sword|link}}, | |||
{{Plural|OoT3D|Bomb|link}}, | |||
}} | |||
|reward= | |||
{{List| | |||
{{Term|OoT3D|Lens of Truth|link}}, | |||
{{Term|OoT3D|Hover Boots|link}}, | |||
}} | |||
|exp= | |||
|theme= | |||
|strategy= | |||
|voiceactor= | |||
|attack= | |||
{{List| | |||
Burrow/Emerge {{Small|(1/4 Heart)}}, | |||
Bite {{Small|(1/2 Heart)}}, | |||
}} | |||
}} | |||
{{Term/Store|Dead Hand|Dead Hands|Series, OoT, OoT3D|plural}} are {{Plural|OoT3D|Sub-Boss|link}} in {{OoT}}.<ref name="E 173"/> | |||
==Characteristics== | |||
{{Navi | |||
|quote1= {{Color|OoT White|Dead Hand}}<br/>Watch out for its infinite hands! Aim for its head! | |||
}} | |||
{{ | {{Term|OoT3D|Dead Hand}} has a zombie-like head with a large jaw. Its blood is a green color, and red blotches, thought to be bloodstains, cover its body.<ref name="E 173"/> Multiple seemingly disembodied hands, usually four to six, circle the chamber in which {{Term|OoT3D|Dead Hand}} resides. The creature uses these hands to snag prey, at which point its main body emerges from the ground to consume the captured meal. | ||
The Dead Hand | The {{Term|OoT3D|Dead Hand}} at the {{Term|OoT3D|Bottom of the Well|link}} can be overcome by intentionally letting oneself be grabbed by the hands, then breaking free and slashing the {{Term|OoT3D|Dead Hand}} in the face when it appears. The hands can also be destroyed, and although they regenerate after about 20 seconds, destroying enough of them inevitably forces the {{Term|OoT3D|Dead Hand}} to emerge, giving {{Term|OoT3D|Link|link}} an opportunity to strike without leaving himself vulnerable. Once the {{Term|OoT3D|Dead Hand}} has been defeated, it collapses and {{Term|OoT3D|Link}} is rewarded with the {{Term|OoT3D|Lens of Truth|link}}. | ||
The same strategy can be used for the Dead Hand in the Shadow Temple (multiple Dead | The same strategy can be used for the {{Term|OoT3D|Dead Hand}} in the {{Term|OoT3D|Shadow Temple}} (multiple {{Plural|OoT3D|Dead Hand}} in {{MQ}}), but there is an easier method in which {{Term|OoT3D|Link}} can use the {{Term|OoT3D|Lens of Truth}}, acquired from the {{Term|OoT3D|Bottom of the Well}}, to look on the ground for the shadow of the {{Term|OoT3D|Dead Hand}} moving about underground, and place a {{Term|OoT3D|Bomb|link}} on top of it. Once the {{Term|OoT3D|Bomb}} explodes, {{Term|OoT3D|Dead Hand}} proceeds to come out to attack {{Term|OoT3D|Link}}. The wave of earth created by a {{Term|OoT3D|Dead Hand}}'s emergence or burrowing can injure {{Term|OoT3D|Link}}. If {{Term|OoT3D|Dead Hand}} is unsuccessful in retaining {{Term|OoT3D|Link}} with one of its hands, it will bury itself again. Upon the monster's defeat, {{Term|OoT3D|Link}} acquires the sacred {{Term|OoT3D|Hover Boots|link}} as a reward. | ||
==Nomenclature== | |||
{{Nomenclature}} | |||
==Gallery== | |||
<gallery> | |||
File:OoT Dead Hand Model 2.png|{{Term|OoT|Dead Hand}} extending its mouth to attack {{Term|OoT|Link}} from {{OoT|-}} | |||
File:OoT Dead Hand Attacking Link.png|{{Term|OoT|Dead Hand}} restricting {{Term|OoT|Link}}'s movements from {{OoT|-}} | |||
File:OoT3D Dead Hand Navi.jpg|{{Term|OoT3D|Dead Hand}} from {{OoT3D|-}} | |||
</gallery> | |||
==See Also== | ==See Also== | ||
* | * {{Term|Series|Dead Hand's Hand|link}} | ||
{{Ref}} | |||
{{Bosses|OoT}} | |||
{{Categories | |||
|Hand Enemies, Undead Enemies | |||
|sub-bosses= OoT, OoT3D | |||
}} | |||
Latest revision as of 20:59, 26 February 2024
Dead Hands are Sub-Bosses in Ocarina of Time.[1]
Characteristics

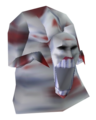
Dead Hand has a zombie-like head with a large jaw. Its blood is a green color, and red blotches, thought to be bloodstains, cover its body.[1] Multiple seemingly disembodied hands, usually four to six, circle the chamber in which Dead Hand resides. The creature uses these hands to snag prey, at which point its main body emerges from the ground to consume the captured meal.
The Dead Hand at the Bottom of the Well can be overcome by intentionally letting oneself be grabbed by the hands, then breaking free and slashing the Dead Hand in the face when it appears. The hands can also be destroyed, and although they regenerate after about 20 seconds, destroying enough of them inevitably forces the Dead Hand to emerge, giving Link an opportunity to strike without leaving himself vulnerable. Once the Dead Hand has been defeated, it collapses and Link is rewarded with the Lens of Truth.
The same strategy can be used for the Dead Hand in the Shadow Temple (multiple Dead Hands in Master Quest), but there is an easier method in which Link can use the Lens of Truth, acquired from the Bottom of the Well, to look on the ground for the shadow of the Dead Hand moving about underground, and place a Bomb on top of it. Once the Bomb explodes, Dead Hand proceeds to come out to attack Link. The wave of earth created by a Dead Hand's emergence or burrowing can injure Link. If Dead Hand is unsuccessful in retaining Link with one of its hands, it will bury itself again. Upon the monster's defeat, Link acquires the sacred Hover Boots as a reward.
Nomenclature
| Language | Names | Meanings |
|---|---|---|
Japanese | デドハンド (Dedo Hando) (OoT)[4] | Same as English. |
FrenchEU | Poignant (OoT3D)[5] | Gripping |
Italian | Smaniosso (OoT | OoT3D)[2][3] | Portmanteau of smanioso (eager) and osso (bone) |
| This table was generated using translation pages. To request an addition, please contact a staff member with a reference. | ||
Gallery
-
Dead Hand extending its mouth to attack Link from Ocarina of Time
-
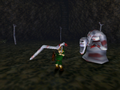
Dead Hand restricting Link's movements from Ocarina of Time
-
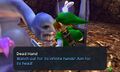
Dead Hand from Ocarina of Time 3D


See Also
References
- ↑ 1.0 1.1 1.2 Encyclopedia, Dark Horse Books, pg. 173
- ↑ Enciclopedia di Hyrule, Magazzini Salani, pg. 173
- ↑ "Smaniosso" — Navi (Ocarina of Time 3D, Italian localization)
- ↑ Nintendo Official Guidebook—The Legend of Zelda: Ocarina of Time, Shogakukan, pg. 145
- ↑ "Poignant
Prends garde aux mains infinies !
Vise la tête... ça l'arrêtera net !" — Navi (Ocarina of Time 3D)
Mazura • Jermafenser • Rebonack • Carock • Gooma • Barba • Thunderbird • Link's Shadow
Ball and Chain Trooper • Armos Knights • Lanmolas • Moldorm • Agahnim
Helmasaur King • Arrghus • Mothula • Blind the Thief • Kholdstare • Vitreous • Trinexx • Ganon
Moldorm • Genie • Slime Eye • Angler Fish • Slime Eel • Facade • Evil Eagle • Hot Head • Shadow Nightmares
Spike Roller • Moblin Chief • Hinox • Dodongo Snakes • Lanmola • Hydrosoar
Master Stalfos • Gohma • Armos Knight • Rover • Grim Creeper • Turtle Rock • Blaino
Gohma • King Dodongo • Barinade • Phantom Ganon • Volvagia • Morpha • Bongo Bongo • Twinrova • Ganon
Lizalfos • Big Octo • Stalfos • Meg • Flare Dancer • White Wolfos • Dark Link • Dead Hand • Gerudo Thief • Iron Knuckle
Odolwa • Goht • Gyorg • Twinmold • Majora's Mask
Dinolfos • Gekko • Wizzrobe • Gerudo Pirate • Wart • Gekko and Mad Jelly
Captain Keeta • Iron Knuckle • Sharp • Igos du Ikana • Garo Master • Gomess • Eyegore
Aquamentus • Dodongo • Mothula • Gohma • Digdogger • Manhandla • Gleeok • Medusa Head • General Onox
Twinrova • Ganon
Brother Goriyas • Facade • Omuai • Agunima • Great Moblin • Syger • Vire • Poe Sisters • Frypolar
Pumpkin Head • Head Thwomp • Shadow Hag • Eyesoar • Smog • Octogon • Possessed Nayru • Plasmarine • Ramrock • Veran
Twinrova • Ganon
Giant Ghini • Swoop • Subterror • Armos Warrior • Great Moblin • Smasher • Vire • Angler Fish • Blue Stalfos
Gohma • Kalle Demos • Gohdan • Helmaroc King • Jalhalla • Molgera • Puppet Ganon • Ganondorf
Mothula • Darknut • Phantom Ganon • Stalfos • Wizzrobe • Mighty Darknut • Big Octo![]()
Phantom Ganon • Stone Arrghus • Helmaroc King • Big Poe • Big Moldorm • Frostare • Vaati • Ganon
Chief Soldier • Shadow Link • Manhandla • Dodongos • Big Dark Stalfos • Gohma • Big Dodongo
Big Green Chuchu • Gleerok • Mazaal • Big Octorok • Gyorg Pair • Vaati
Madderpillar • Dark Nut • Big Blue Chuchu • Red Dark Nut • Black Knight
Diababa • Fyrus • Morpheel • Stallord • Blizzeta • Armogohma • Argorok • Zant • Puppet Zelda • Ganon
Ook • King Bulblin • Dangoro • Twilit Carrier Kargarok • Twilit Bloat
Deku Toad • Death Sword • Darkhammer • Darknut • Aeralfos • Phantom Zant
Stagnox • Fraaz • Phytops • Cragma • Byrne • Skeldritch • Demon Train • Chancellor Cole • Malladus
Mothula • Snapper • Heatoise • Big Blin • Rocktite • Geozard Chief • Dark Link![]()
Ghirahim • Scaldera • Moldarach • The Imprisoned • Koloktos • Tentalus • Levias • Bilocyte • Demise
Stalfos • Lizalfos • Stalmaster • Moldarach • LD-002G Scervo • Dark Lizalfos • Magmanos • Moldorm • LD-003D Dreadfuse
Yuga • Moldorm • Margomill • Gemesaur King • Arrghus • Knucklemaster • Stalblind • Zaganaga • Dharkstare • Grinexx • Yuga Ganon
Armos • Red Stalfos • Heedles • Green & Red Goriyas • Gigabari • Gibdos & Purple Mini-Moldorms • Red Eyegores • Flying Tiles & Devalants • Big Pengator & Pengators • Fire Gimos • Moldorm • Lorule Ball and Chain Soldier • Arrghus
Margoma • Arrghus • Moldorm • Blizzagia • The Lady's Pets • Stalchampion • Prismantus • The Lady • Shadow Links
Electric Blob King • Electric Blob Queen • Hinox Brothers • Freezlord • Vulture Vizier • Grim Repoe • Gigaleon
Windblight Ganon • Fireblight Ganon • Thunderblight Ganon • Waterblight Ganon • Monk Maz Koshia(TCB) • Calamity Ganon • Dark Beast Ganon
Stone Talus • Stone Talus (Luminous) • Stone Talus (Rare) • Igneo Talus • Frost Talus • Igneo Talus Titan(TCB) • Molduga • Molduking(TCB) • Hinox • Blue Hinox • Black Hinox • Master Kohga
Bosses in Tears of the Kingdom
Colgera • Yunobo • Moragia • Marbled Gohma • Sludge Like • Mucktorok • Queen Gibdo • Seized Construct • Phantom Ganon • Demon King's Army • Demon King Ganondorf • Demon Dragon