Possessed Zelda: Difference between revisions
PhantomCaleb (talk | contribs) m (Text replacement - "Exp Game2" to "Exp Game") |
m (→Nomenclature) |
||
| (18 intermediate revisions by 11 users not shown) | |||
| Line 1: | Line 1: | ||
{{Boss | {{Infobox Boss | ||
|type= | |type= | ||
|image= | |image= | ||
{{Media | {{Media | ||
|Render TP= File:TP Possessed Zelda Render.png | |Render TP= File:TP Possessed Zelda Render.png | ||
|Model TP= File:TP Possessed Zelda Model.png | |||
|Model TPHD= File:TPHD Possessed Zelda Model.png | |||
|Model ST= File:ST Possessed Zelda Model.png | |Model ST= File:ST Possessed Zelda Model.png | ||
}} | }} | ||
|imageback= | |imageback= | ||
|title= | |title= | ||
{{Infobox Game Blocks | |||
|TP= Ganon's Puppet | |||
}} | |||
|race= [[Hylian]] | |race= [[Hylian]] | ||
|game= | |game= TP, ST | ||
| | |dungeon= | ||
| | {{Infobox Game Blocks | ||
|TP= [[Hyrule Castle]] | |||
|ST= [[Dark Realm]] | |||
}} | |||
|weakness= | |||
{{Infobox Game Blocks | |||
|TP= [[Master Sword]], [[Dead Man's Volley|Own magic]] | |||
|ST= [[Light Arrow]] | |||
}} | |||
|reward= | |reward= | ||
|strategy= | |strategy= | ||
| Line 18: | Line 31: | ||
{{Term/Store|Possessed Zelda||Series, TP, TPHD}} is a recurring [[Boss]] in {{TLoZ|Series}}.<ref>{{Cite Book|quote= |book= A&A |publisher= |page= 274 {{Exp Game|TP}}}}</ref> | {{Term/Store|Possessed Zelda||Series, TP, TPHD}} is a recurring [[Boss]] in {{TLoZ|Series}}.<ref>{{Cite Book|quote= |book= A&A |publisher= |page= 274 {{Exp Game|TP}}}}</ref> | ||
== | ==Characteristics== | ||
==={{TP|-}}=== | ==={{TP|-}}=== | ||
'''Ganon's Puppet Zelda''' is one of the final bosses | '''Ganon's Puppet Zelda''' is one of the final bosses in {{TP|-}}. {{Term|TPHD|Ganondorf|link}} possesses {{Term|TPHD|Princess Zelda|link}} in order to fight {{Term|TPHD|Link|link}} when the two meet at {{Term|TPHD|Hyrule Castle (Twilight Princess)|link}}. | ||
She has three core attacks: | She has three core attacks which she randomly uses in cycles: | ||
*She will dive at | *She will dive at {{Term|TPHD|Link}} with her sword extended. This attack can be either blocked with the {{Term|TPHD|Shield|link}} or dodged using strategic rolls, jumps, or strafing techniques. | ||
*Secondly, she will make a triangle of light appear on the floor. Link should quickly leave its area of influence the moment it materializes to avoid damage. | *Secondly, she will make a large triangle of light appear on the floor. Link should quickly leave its area of influence the moment it materializes to avoid damage. | ||
*Finally, her third and main attack consists of an energy ball which she will fire at Link. This attack is the only way Link can | *Finally, her third and main attack consists of an energy ball which she will fire at {{Term|TPHD|Link}}. This attack is the only way that {{Term|TPHD|Link}} can damage her, which he can do by {{Term|TPHD|Dead Man's Volley|link|display=rebounding the energy ball}} back to her by swinging his sword or an {{Term|TPHD|Bottle|link}}. {{Term|TPHD|Possessed Zelda|display=Zelda}} will deflect the ball back towards him, and {{Term|TPHD|Link}} must continue to volley it back until it finally hits her. At least seven attack cycles must elapse before {{Term|TPHD|Possessed Zelda|display=Zelda}} may use this attack for a third time. | ||
There is | There is a strategy that can prevent {{Term|TPHD|Possessed Zelda|display=Puppet Zelda}} from being able to deflect the ball at all. While she is readying it, {{Term|TPHD|Link}} can get underneath her and charge a {{Term|TPHD|Spin Attack|link}} or a {{Term|TPHD|Jump Strike|link}}. If {{Term|TPHD|Link}} releases his attack right as {{Term|TPHD|Possessed Zelda|display=Zelda}} launches the ball, it is hit back to her instantly, giving her no time to deflect it. | ||
After | After being hit three times, {{Term|TPHD|Possessed Zelda|display=Puppet Zelda}} is defeated, and {{Term|TPHD|Midna|link}} returns her to normal with the help of the {{Plural|TPHD|Fused Shadow|link}}. | ||
==={{ST|-}}=== | ==={{ST|-}}=== | ||
| Line 47: | Line 60: | ||
==Nomenclature== | ==Nomenclature== | ||
{{ | {{Nomenclature}} | ||
}} | |||
==Gallery== | ==Gallery== | ||
<gallery> | <gallery> | ||
File:PuppetZelda TP.jpg|Ganon's Puppet | File:PuppetZelda TP.jpg|Ganon's Puppet: Zelda from {{TP|-}} | ||
File:MagicTennisPuppetZelda.jpg|Playing [[Dead Man's Volley]] with | File:MagicTennisPuppetZelda.jpg|Playing [[Dead Man's Volley]] with Possessed Zelda from {{TP|-}} | ||
File: | File:Puppet Zelda Defeated2.jpg|Puppet Zelda defeated by her own energy balls from {{TP|-}} | ||
File: | File:Puppet Zelda Defeated.jpg|Puppet Zelda attempts to catch her breath after being defeated from {{TP|-}} | ||
File:Puppet Zelda.jpg|Zelda just moments before [[Midna]] cleanses her | File:Puppet Zelda.jpg|Zelda just moments before [[Midna]] cleanses her from {{TP|-}} | ||
File:Possessed Zelda ST2.png|Malladus possessing Princess Zelda | File:TPHD Possessed Zelda.png|{{Term|TPHD|Possessed Zelda}} from {{TPHD|-}} | ||
File:Malladus zelda.png|Cole congratulates Malladus for his return | File:Possessed Zelda ST2.png|Malladus possessing Princess Zelda from {{ST}} | ||
File:Possessed Zelda ST.png|Possessed Zelda | File:Malladus zelda.png|Cole congratulates Malladus for his return from {{ST|-}} | ||
File:Possessed Zelda ST.png|Possessed Zelda from {{ST|-}} | |||
</gallery> | </gallery> | ||
==See Also== | ==See Also== | ||
*[[Princess Zelda]] | * [[Princess Zelda]] | ||
*[[False Zelda]] | * [[False Zelda]] | ||
*[[Zelda's Clone]] | * [[Zelda's Clone]] | ||
{{Ref}} | {{Ref}} | ||
{{Bosses|TP}} | {{Bosses|TP}} | ||
{{Categories | {{Categories | ||
|Possessed Beings, Princess Zelda, Swordsmen | |Possessed Beings, Princess Zelda, Swordsmen | ||
|bosses= TP, TPHD | |bosses= TP, TPHD | ||
}} | }} | ||
Revision as of 02:34, 14 April 2024
Possessed Zelda is a recurring Boss in The Legend of Zelda series.[1]
Characteristics
Twilight Princess
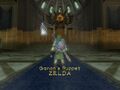
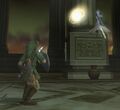
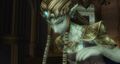
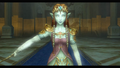
Ganon's Puppet Zelda is one of the final bosses in Twilight Princess. Ganondorf possesses Princess Zelda in order to fight Link when the two meet at Hyrule Castle (Twilight Princess).
She has three core attacks which she randomly uses in cycles:
- She will dive at Link with her sword extended. This attack can be either blocked with the Shield or dodged using strategic rolls, jumps, or strafing techniques.
- Secondly, she will make a large triangle of light appear on the floor. Link should quickly leave its area of influence the moment it materializes to avoid damage.
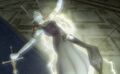
- Finally, her third and main attack consists of an energy ball which she will fire at Link. This attack is the only way that Link can damage her, which he can do by rebounding the energy ball back to her by swinging his sword or an Empty Bottle. Zelda will deflect the ball back towards him, and Link must continue to volley it back until it finally hits her. At least seven attack cycles must elapse before Zelda may use this attack for a third time.
There is a strategy that can prevent Puppet Zelda from being able to deflect the ball at all. While she is readying it, Link can get underneath her and charge a Spin Attack or a Jump Strike. If Link releases his attack right as Zelda launches the ball, it is hit back to her instantly, giving her no time to deflect it.
After being hit three times, Puppet Zelda is defeated, and Midna returns her to normal with the help of the Fused Shadows.
Spirit Tracks

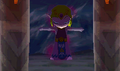
Princess Zelda's body is involved in the second-to-last boss fight of the game as the Possessed Zelda, where the princess's body is inhabited by the essence of Malladus, the Demon King. This fight takes place on the roof of the Demon Train within the Dark Realm as Link and Zelda seek to reclaim her body and stop the plots of Chancellor Cole and Malladus.
In this fight, Cole floats around the roof of the train attempting to take control of Zelda's Phantom body by sending demonic rats to attack her while Malladus awaits at the head of the train, sending lasers streaming toward the pair. To best the evil duo, Zelda, possessing a Phantom, must lead the way as only her armored body is strong enough to repel Malladus's laser attacks. Link must keep Zelda moving toward the head of the train to where her possessed body awaits, all the while protecting her from the demonic rats Cole unleashes as he attempts to prevent Zelda from reaching her body.
In the event of Zelda coming into contact with one of the rats, Link must use the boomerang to cut the evil puppet-strings Cole uses to control her like a puppeteer by sending it flying behind Zelda to cut the strings. Once Zelda comes into contact with her body, she will seize Malladus and the two will float off around the head of the train. Link must then strike Malladus truly with an arrow from the Bow of Light to purge Zelda's true body of Malladus's essence, ending the fight.
Trivia
- While fighting Zelda in Twilight Princess, the "Song of Time" and "Zelda's Lullaby" from Ocarina of Time can both be clearly heard in her battle theme.
- The opening notes of Puppet Zelda's battle music in Twilight Princess are the same as the opening notes of Ganondorf's battle music in Ocarina of Time.
- Puppet Zelda and Blizzeta are the only bosses in Twilight Princess that do not have a Critical Point.
- In Super Smash Bros. Brawl's Subspace Emissary, one of the fights pits the player against a "False" Zelda. This character, unlike the other false characters, has a grayish tone to her skin, similar to Puppet Zelda from Twilight Princess.
Nomenclature
| Language | Names | |
|---|---|---|
| This table was generated using translation pages. To request an addition, please contact a staff member with a reference. | ||
Gallery
-
Ganon's Puppet: Zelda from Twilight Princess
-
Playing Dead Man's Volley with Possessed Zelda from Twilight Princess
-
Puppet Zelda defeated by her own energy balls from Twilight Princess
-
Puppet Zelda attempts to catch her breath after being defeated from Twilight Princess
-

Zelda just moments before Midna cleanses her from Twilight Princess
-
Possessed Zelda from Twilight Princess HD
-
Malladus possessing Princess Zelda from Spirit Tracks
-
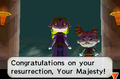
Cole congratulates Malladus for his return from Spirit Tracks
-
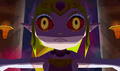
Possessed Zelda from Spirit Tracks


See Also
References
- ↑ Art & Artifacts, Dark Horse Books, pg. 274 (TP)
Mazura • Jermafenser • Rebonack • Carock • Gooma • Barba • Thunderbird • Link's Shadow
Ball and Chain Trooper • Armos Knights • Lanmolas • Moldorm • Agahnim
Helmasaur King • Arrghus • Mothula • Blind the Thief • Kholdstare • Vitreous • Trinexx • Ganon
Moldorm • Genie • Slime Eye • Angler Fish • Slime Eel • Facade • Evil Eagle • Hot Head • Shadow Nightmares
Spike Roller • Moblin Chief • Hinox • Dodongo Snakes • Lanmola • Hydrosoar
Master Stalfos • Gohma • Armos Knight • Rover • Grim Creeper • Turtle Rock • Blaino
Gohma • King Dodongo • Barinade • Phantom Ganon • Volvagia • Morpha • Bongo Bongo • Twinrova • Ganon
Lizalfos • Big Octo • Stalfos • Meg • Flare Dancer • White Wolfos • Dark Link • Dead Hand • Gerudo Thief • Iron Knuckle
Odolwa • Goht • Gyorg • Twinmold • Majora's Mask
Dinolfos • Gekko • Wizzrobe • Gerudo Pirate • Wart • Gekko and Mad Jelly
Captain Keeta • Iron Knuckle • Sharp • Igos du Ikana • Garo Master • Gomess • Eyegore
Aquamentus • Dodongo • Mothula • Gohma • Digdogger • Manhandla • Gleeok • Medusa Head • General Onox
Twinrova • Ganon
Brother Goriyas • Facade • Omuai • Agunima • Great Moblin • Syger • Vire • Poe Sisters • Frypolar
Pumpkin Head • Head Thwomp • Shadow Hag • Eyesoar • Smog • Octogon • Possessed Nayru • Plasmarine • Ramrock • Veran
Twinrova • Ganon
Giant Ghini • Swoop • Subterror • Armos Warrior • Great Moblin • Smasher • Vire • Angler Fish • Blue Stalfos
Gohma • Kalle Demos • Gohdan • Helmaroc King • Jalhalla • Molgera • Puppet Ganon • Ganondorf
Mothula • Darknut • Phantom Ganon • Stalfos • Wizzrobe • Mighty Darknut • Big Octo![]()
Phantom Ganon • Stone Arrghus • Helmaroc King • Big Poe • Big Moldorm • Frostare • Vaati • Ganon
Chief Soldier • Shadow Link • Manhandla • Dodongos • Big Dark Stalfos • Gohma • Big Dodongo
Big Green Chuchu • Gleerok • Mazaal • Big Octorok • Gyorg Pair • Vaati
Madderpillar • Dark Nut • Big Blue Chuchu • Red Dark Nut • Black Knight
Diababa • Fyrus • Morpheel • Stallord • Blizzeta • Armogohma • Argorok • Zant • Puppet Zelda • Ganon
Ook • King Bulblin • Dangoro • Twilit Carrier Kargarok • Twilit Bloat
Deku Toad • Death Sword • Darkhammer • Darknut • Aeralfos • Phantom Zant
Stagnox • Fraaz • Phytops • Cragma • Byrne • Skeldritch • Demon Train • Chancellor Cole • Malladus
Mothula • Snapper • Heatoise • Big Blin • Rocktite • Geozard Chief • Dark Link![]()
Ghirahim • Scaldera • Moldarach • The Imprisoned • Koloktos • Tentalus • Levias • Bilocyte • Demise
Stalfos • Lizalfos • Stalmaster • Moldarach • LD-002G Scervo • Dark Lizalfos • Magmanos • Moldorm • LD-003D Dreadfuse
Yuga • Moldorm • Margomill • Gemesaur King • Arrghus • Knucklemaster • Stalblind • Zaganaga • Dharkstare • Grinexx • Yuga Ganon
Armos • Red Stalfos • Heedles • Green & Red Goriyas • Gigabari • Gibdos & Purple Mini-Moldorms • Red Eyegores • Flying Tiles & Devalants • Big Pengator & Pengators • Fire Gimos • Moldorm • Lorule Ball and Chain Soldier • Arrghus
Margoma • Arrghus • Moldorm • Blizzagia • The Lady's Pets • Stalchampion • Prismantus • The Lady • Shadow Links
Electric Blob King • Electric Blob Queen • Hinox Brothers • Freezlord • Vulture Vizier • Grim Repoe • Gigaleon
Windblight Ganon • Fireblight Ganon • Thunderblight Ganon • Waterblight Ganon • Monk Maz Koshia(TCB) • Calamity Ganon • Dark Beast Ganon
Stone Talus • Stone Talus (Luminous) • Stone Talus (Rare) • Igneo Talus • Frost Talus • Igneo Talus Titan(TCB) • Molduga • Molduking(TCB) • Hinox • Blue Hinox • Black Hinox • Master Kohga
Bosses in Tears of the Kingdom
Colgera • Yunobo • Moragia • Marbled Gohma • Sludge Like • Mucktorok • Queen Gibdo • Seized Construct • Phantom Ganon • Demon King's Army • Demon King Ganondorf • Demon Dragon