Thunderblight Ganon: Difference between revisions
No edit summary |
|||
| (62 intermediate revisions by 26 users not shown) | |||
| Line 1: | Line 1: | ||
{{Boss | {{Infobox Boss | ||
| | |image= | ||
| | {{Media | ||
|title= Scourge of Divine Beast Vah Naboris | |Artwork BotW= File:BotW Thunderblight Ganon Model.png | ||
| | |Model BotW= File:BotW Thunderblight Ganon Model 2.png | ||
|dungeon= | }} | ||
|caption= | |||
|pronunciation= | |||
|plural= | |||
|title= | |||
{{Infobox Game Blocks | |||
|BotW= Scourge of Divine Beast Vah Naboris<ref>{{Cite|Scourge of Divine Beast Vah Naboris<br/>{{Big|'''Thunderblight Ganon'''}}|Game Screen|BotW}}</ref> | |||
|HWAoC= Avatar of the Calamity<ref>{{Cite|{{Big|Avatar of the Calamity: Thunderblight Ganon}}|Story|HWAoC}}</ref>, Shard of Calamity Ganon<ref>{{Cite|Shard of Calamity Ganon<br/>{{Big|'''Thunderblight Ganon'''}}|Game Screen|HWAoC}}</ref> | |||
}} | |||
|alias= | |||
|race= | |||
|gender= | |||
|game= BotW | |||
|other= HWAoC | |||
|dungeon= {{List| | |||
{{Term|BotW|Divine Beast Vah Naboris|link}}, | |||
{{Term|BotW|Illusory Realm|link}}, | |||
{{Term|BotW|Hyrule Castle|link}} {{Note|Only if {{Term|BotW|Link|link}} has not freed {{Term|BotW|Divine Beast Vah Naboris|link}}.}}, | |||
}} | |||
|habitat= | |||
|weakness= | |weakness= | ||
|reward= | |health=800-2000{{Note|The HP depends on when you face it. The first Blight fought in a Divine Beast has 800 HP, the second 1200 HP, the third 1600 HP, the fourth has 2000 HP and refights in the Illusory Realm have 1500 HP. Any Blights fought in the Sanctum always have 2000 HP}} | ||
|reward= {{List|{{Term|BotW|Heart Container|link}}, {{Term|BotW|Urbosa's Fury|link}}}} | |||
|exp= | |||
|theme= | |||
|strategy= | |strategy= | ||
| | |voiceactor= | ||
}} | }} | ||
'''Thunderblight Ganon''' | {{Term/Store|Thunderblight Ganon||Series, BotW, HWAoC}} is a recurring {{Term|BotW|Boss|link}} in {{TLoZ|Series}}.<ref>{{Cite|'''Thunderblight Ganon'''|Hyrule Compendium|BotW}}</ref><ref>{{Cite|{{Big|'''Thunderblight Ganon'''}}|Game Screen|HWAoC}}</ref> | ||
==Characteristics== | |||
==={{BotW|-}}=== | |||
{{Compendium/Extract|Thunderblight Ganon}} | |||
{{Term|BotW|Thunderblight Ganon}} is one of the four {{Plural|BotW|Blight Ganon|link}}, phantoms of {{Term|BotW|Calamity Ganon|link}} that took control of the {{Plural|BotW|Divine Beast|link}}.<ref>{{Cite|This phantom of Ganon attacked the Divine Beast Vah Naboris and was responsible for the demise of the Champion Urbosa.|Hyrule Compendium|BotW}}</ref> It is found either inside the {{Term|BotW|Divine Beast Vah Naboris|link}} or in the center of {{Term|BotW|Hyrule Castle|link}} if it is not already defeated. It is responsible for bringing {{Term|BotW|Urbosa|link}} to her demise.<ref>{{Cite|This formidable adversary was made by Ganon and brought me to a warrior's demise 100 years ago.|Urbosa|BotW}}</ref> | |||
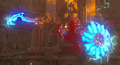
{{Term|BotW|Thunderblight Ganon}}, unlike others are extremely fast while dealing high electricity damage. {{Term|BotW|Link|link}} can use {{Plural|BotW|Food|link}} or {{Plural|BotW|Elixir|link}} with high-level electricity resistance to prevent taking too much damage during the fight. {{Term|BotW|Thunderblight Ganon}} has three phases. In the first phase, {{Term|BotW|Thunderblight Ganon}} will speed towards {{Term|BotW|Link}} and attack him.<ref>{{Cite|This thing is fast! Watch yourself.|Urbosa|BotW}}</ref> {{Term|BotW|Link}} can simply block its oncoming attacks and then retaliate. Once {{Term|BotW|Thunderblight Ganon}}'s health is halfway down, it will change its strategy and stay levitating out of reach. {{Term|BotW|Thunderblight Ganon}} will drop metal pillars all over the room and strike them with electricity. {{Term|BotW|Link}} must use {{Term|BotW|Magnesis|link}} to grab one of the pillars and shock {{Term|BotW|Thunderblight Ganon}} with its own electricity. For the third and final phase, {{Term|BotW|Thunderblight Ganon}} will behave as it did in the first phase but it will attack much more aggressively than before | |||
Once {{Term|BotW|Link}} has defeated it, {{Term|BotW|Thunderblight Ganon}} will explode and {{Term|BotW|Link}} will be rewarded with a {{Term|BotW|Heart Container|link}}. {{Term|BotW|Urbosa}} will thank {{Term|BotW|Link}} for defeating {{Term|BotW|Thunderblight Ganon}} and freeing {{Term|BotW|Divine Beast Vah Naboris}} by gifting him {{Term|BotW|Urbosa's Fury|link}}.<ref>{{Cite|Thanks to your valor and skill, my soul is free and Naboris is ours once again.|Urbosa|BotW}}</ref><ref>{{Cite|Please accept this gift, which has come to be known as Urbosa's Fury.|Urbosa|BotW}}</ref> | |||
== | ==Other Appearances== | ||
Thunderblight Ganon | {{Noncanon|Start}} | ||
==={{HWAoC|-}}=== | |||
{{Stub|HWAoC}} | |||
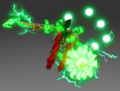
Thunderblight Ganon, along with his brethren, appears in Age of Calamity. He appears in Lightning and Wind, along with Windblight Ganon. Like his betherin, he looks different, probably due to being in his prime. He has electrical orbs behind him, and his weaponry is lime green, the same color the electric element is portrayed as. He duals with Urbosa for control over Vah Naboris and managed to gain an advantage over her and goes in for the kill while she was vulnerable, but a time portal from Terrako opens, bringing forth Riju and Patrica where they ram into Thunderblight before he could reach the Gerudo Champion and is defeated by Link and his friends upon arrival. He also appears in Each Step Like Thunder, where he disrupts electrical equipment Purah was using. You eventually fight him, where he's defeated again. | |||
{{Noncanon|End}} | |||
== | ==Nomenclature== | ||
{{ | {{Nomenclature}} | ||
==Gallery== | ==Gallery== | ||
< | <gallery> | ||
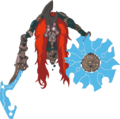
File:BotW Thunderblight Ganon | File:BotW Thunderblight Ganon Model 2.png|{{Term|BotW|Thunderblight Ganon}}'s second phase from {{BotW|-}} | ||
File: | File:BotW Thunderblight Ganon Concept Art.png|Concept art of Thunderblight Ganon from {{BotW|-}} | ||
</ | File:HWAoC Thunderblight Ganon Model.png|{{Term|HWAoC|Thunderblight Ganon}} from {{HWAoC|-}} | ||
File:HWAoC Thunderblight Ganon Introduction.png|{{Term|HWAoC|Thunderblight Ganon}}'s introduction from {{HWAoC|-}} | |||
File:HWAoC Thunderblight Ganon Promotional Screenshot.png|Promotional screenshot of {{Term|HWAoC|Thunderblight Ganon}} and {{Term|HWAoC|Urbosa}} from {{HWAoC|-}} | |||
</gallery> | |||
==See Also== | ==See Also== | ||
* [[ | * [[Calamity Ganon]] | ||
* | * {{Term|BotW|Waterblight Ganon|link}} | ||
* | * {{Term|BotW|Windblight Ganon|link}} | ||
* {{Term|BotW|Fireblight Ganon|link}} | |||
{{Ref}} | {{Ref}} | ||
{{Notes}} | |||
{{Bosses|BotW}} | |||
{{Categories | |||
|Electricity-Related Enemies, Ganon | |||
|bosses= BotW, HWAoC | |||
}} | |||
Latest revision as of 22:33, 13 February 2024
Thunderblight Ganon is a recurring Boss in The Legend of Zelda series.[4][5]
Characteristics
Breath of the Wild
156 (161) Thunderblight Ganon |
Description |
Common Locations | |
Recoverable Materials | |
Thunderblight Ganon is one of the four Blight Ganons, phantoms of Calamity Ganon that took control of the Divine Beasts.[6] It is found either inside the Divine Beast Vah Naboris or in the center of Hyrule Castle if it is not already defeated. It is responsible for bringing Urbosa to her demise.[7]
Thunderblight Ganon, unlike others are extremely fast while dealing high electricity damage. Link can use Foods or Elixirs with high-level electricity resistance to prevent taking too much damage during the fight. Thunderblight Ganon has three phases. In the first phase, Thunderblight Ganon will speed towards Link and attack him.[8] Link can simply block its oncoming attacks and then retaliate. Once Thunderblight Ganon's health is halfway down, it will change its strategy and stay levitating out of reach. Thunderblight Ganon will drop metal pillars all over the room and strike them with electricity. Link must use Magnesis to grab one of the pillars and shock Thunderblight Ganon with its own electricity. For the third and final phase, Thunderblight Ganon will behave as it did in the first phase but it will attack much more aggressively than before
Once Link has defeated it, Thunderblight Ganon will explode and Link will be rewarded with a Heart Container. Urbosa will thank Link for defeating Thunderblight Ganon and freeing Divine Beast Vah Naboris by gifting him Urbosa's Fury.[9][10]
Other Appearances
Hyrule Warriors: Age of Calamity
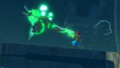
Thunderblight Ganon, along with his brethren, appears in Age of Calamity. He appears in Lightning and Wind, along with Windblight Ganon. Like his betherin, he looks different, probably due to being in his prime. He has electrical orbs behind him, and his weaponry is lime green, the same color the electric element is portrayed as. He duals with Urbosa for control over Vah Naboris and managed to gain an advantage over her and goes in for the kill while she was vulnerable, but a time portal from Terrako opens, bringing forth Riju and Patrica where they ram into Thunderblight before he could reach the Gerudo Champion and is defeated by Link and his friends upon arrival. He also appears in Each Step Like Thunder, where he disrupts electrical equipment Purah was using. You eventually fight him, where he's defeated again.
Nomenclature
| Language | Names | Meanings |
|---|---|---|
Japanese | 雷のカースガノン (Kaminari no Kāsu Ganon) (BotW)[12] | |
ChineseTR | 雷咒加儂 (Léi Zhòu Jiānóng) (BotW) | |
ChineseSI | 雷咒盖侬 (Léi Zhòu Gàinóng) (BotW) | |
Dutch | Ganons bliksemfantoom (BotW | HWAoC)[14] | Ganons lightning phantom |
FrenchCA | Ombre de foudre de Ganon (BotW) | |
FrenchEU | Ombre de foudre de Ganon (BotW)[13] | Ganon's thunder shadow |
German | Ganons Donnerfluch (BotW)[16] | |
Italian | Ira dei fulmini di Ganon (BotW)[11] | |
Korean | 번개의 커스 가논 (Beon-Gaeui Keoseu Ganon) (BotW) | |
Russian | Лже-Ганон Грозы (Lzhe-Ganon Grozy) (BotW)[15] | |
SpanishLA | Ira del rayo de Ganon (BotW)[17] | |
SpanishEU | Ira del rayo de Ganon (BotW) | |
| This table was generated using translation pages. To request an addition, please contact a staff member with a reference. | ||
Gallery
-
Thunderblight Ganon's second phase from Breath of the Wild
-
Concept art of Thunderblight Ganon from Breath of the Wild
-
Thunderblight Ganon from Hyrule Warriors: Age of Calamity
-
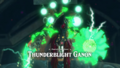
Thunderblight Ganon's introduction from Hyrule Warriors: Age of Calamity
-
Promotional screenshot of Thunderblight Ganon and Urbosa from Hyrule Warriors: Age of Calamity


See Also
References
- ↑ "Scourge of Divine Beast Vah Naboris
Thunderblight Ganon" — Game Screen (Breath of the Wild) - ↑ "Avatar of the Calamity: Thunderblight Ganon" — Story (Hyrule Warriors: Age of Calamity)
- ↑ "Shard of Calamity Ganon
Thunderblight Ganon" — Game Screen (Hyrule Warriors: Age of Calamity) - ↑ "Thunderblight Ganon" — Hyrule Compendium (Breath of the Wild)
- ↑ "Thunderblight Ganon" — Game Screen (Hyrule Warriors: Age of Calamity)
- ↑ "This phantom of Ganon attacked the Divine Beast Vah Naboris and was responsible for the demise of the Champion Urbosa." — Hyrule Compendium (Breath of the Wild)
- ↑ "This formidable adversary was made by Ganon and brought me to a warrior's demise 100 years ago." — Urbosa (Breath of the Wild)
- ↑ "This thing is fast! Watch yourself." — Urbosa (Breath of the Wild)
- ↑ "Thanks to your valor and skill, my soul is free and Naboris is ours once again." — Urbosa (Breath of the Wild)
- ↑ "Please accept this gift, which has come to be known as Urbosa's Fury." — Urbosa (Breath of the Wild)
- ↑ "159 Ira dei fulmini di Ganon" — Hyrule Compendium (Breath of the Wild)
- ↑ "159 雷のカースガノン" — Hyrule Compendium (Breath of the Wild)
- ↑ "159 Ombre de foudre de Ganon" — Hyrule Compendium (Breath of the Wild)
- ↑ "159 Ganons bliksemfantoom" — Hyrule Compendium (Breath of the Wild)
- ↑ "159 Лже-Ганон Грозы" — Hyrule Compendium (Breath of the Wild)
- ↑ "159 Ganons Donnerfluch" — Hyrule Compendium (Breath of the Wild)
- ↑ "159 Ira del rayo de Ganon" — Hyrule Compendium (Breath of the Wild)
Notes
- ↑ Only if Link has not freed Divine Beast Vah Naboris.
- ↑ The HP depends on when you face it. The first Blight fought in a Divine Beast has 800 HP, the second 1200 HP, the third 1600 HP, the fourth has 2000 HP and refights in the Illusory Realm have 1500 HP. Any Blights fought in the Sanctum always have 2000 HP
Mazura • Jermafenser • Rebonack • Carock • Gooma • Barba • Thunderbird • Link's Shadow
Ball and Chain Trooper • Armos Knights • Lanmolas • Moldorm • Agahnim
Helmasaur King • Arrghus • Mothula • Blind the Thief • Kholdstare • Vitreous • Trinexx • Ganon
Moldorm • Genie • Slime Eye • Angler Fish • Slime Eel • Facade • Evil Eagle • Hot Head • Shadow Nightmares
Spike Roller • Moblin Chief • Hinox • Dodongo Snakes • Lanmola • Hydrosoar
Master Stalfos • Gohma • Armos Knight • Rover • Grim Creeper • Turtle Rock • Blaino
Gohma • King Dodongo • Barinade • Phantom Ganon • Volvagia • Morpha • Bongo Bongo • Twinrova • Ganon
Lizalfos • Big Octo • Stalfos • Meg • Flare Dancer • White Wolfos • Dark Link • Dead Hand • Gerudo Thief • Iron Knuckle
Odolwa • Goht • Gyorg • Twinmold • Majora's Mask
Dinolfos • Gekko • Wizzrobe • Gerudo Pirate • Wart • Gekko and Mad Jelly
Captain Keeta • Iron Knuckle • Sharp • Igos du Ikana • Garo Master • Gomess • Eyegore
Aquamentus • Dodongo • Mothula • Gohma • Digdogger • Manhandla • Gleeok • Medusa Head • General Onox
Twinrova • Ganon
Brother Goriyas • Facade • Omuai • Agunima • Great Moblin • Syger • Vire • Poe Sisters • Frypolar
Pumpkin Head • Head Thwomp • Shadow Hag • Eyesoar • Smog • Octogon • Possessed Nayru • Plasmarine • Ramrock • Veran
Twinrova • Ganon
Giant Ghini • Swoop • Subterror • Armos Warrior • Great Moblin • Smasher • Vire • Angler Fish • Blue Stalfos
Gohma • Kalle Demos • Gohdan • Helmaroc King • Jalhalla • Molgera • Puppet Ganon • Ganondorf
Mothula • Darknut • Phantom Ganon • Stalfos • Wizzrobe • Mighty Darknut • Big Octo![]()
Phantom Ganon • Stone Arrghus • Helmaroc King • Big Poe • Big Moldorm • Frostare • Vaati • Ganon
Chief Soldier • Shadow Link • Manhandla • Dodongos • Big Dark Stalfos • Gohma • Big Dodongo
Big Green Chuchu • Gleerok • Mazaal • Big Octorok • Gyorg Pair • Vaati
Madderpillar • Dark Nut • Big Blue Chuchu • Red Dark Nut • Black Knight
Diababa • Fyrus • Morpheel • Stallord • Blizzeta • Armogohma • Argorok • Zant • Puppet Zelda • Ganon
Ook • King Bulblin • Dangoro • Twilit Carrier Kargarok • Twilit Bloat
Deku Toad • Death Sword • Darkhammer • Darknut • Aeralfos • Phantom Zant
Stagnox • Fraaz • Phytops • Cragma • Byrne • Skeldritch • Demon Train • Chancellor Cole • Malladus
Mothula • Snapper • Heatoise • Big Blin • Rocktite • Geozard Chief • Dark Link![]()
Ghirahim • Scaldera • Moldarach • The Imprisoned • Koloktos • Tentalus • Levias • Bilocyte • Demise
Stalfos • Lizalfos • Stalmaster • Moldarach • LD-002G Scervo • Dark Lizalfos • Magmanos • Moldorm • LD-003D Dreadfuse
Yuga • Moldorm • Margomill • Gemesaur King • Arrghus • Knucklemaster • Stalblind • Zaganaga • Dharkstare • Grinexx • Yuga Ganon
Armos • Red Stalfos • Heedles • Green & Red Goriyas • Gigabari • Gibdos & Purple Mini-Moldorms • Red Eyegores • Flying Tiles & Devalants • Big Pengator & Pengators • Fire Gimos • Moldorm • Lorule Ball and Chain Soldier • Arrghus
Margoma • Arrghus • Moldorm • Blizzagia • The Lady's Pets • Stalchampion • Prismantus • The Lady • Shadow Links
Electric Blob King • Electric Blob Queen • Hinox Brothers • Freezlord • Vulture Vizier • Grim Repoe • Gigaleon
Windblight Ganon • Fireblight Ganon • Thunderblight Ganon • Waterblight Ganon • Monk Maz Koshia(TCB) • Calamity Ganon • Dark Beast Ganon
Stone Talus • Stone Talus (Luminous) • Stone Talus (Rare) • Igneo Talus • Frost Talus • Igneo Talus Titan(TCB) • Molduga • Molduking(TCB) • Hinox • Blue Hinox • Black Hinox • Master Kohga
Bosses in Tears of the Kingdom
Colgera • Yunobo • Moragia • Marbled Gohma • Sludge Like • Mucktorok • Queen Gibdo • Seized Construct • Phantom Ganon • Demon King's Army • Demon King Ganondorf • Demon Dragon