Lanmola: Difference between revisions
TriforceTony (talk | contribs) m (Text replacement - "|book= E|publisher=" to "|book= E |publisher=") |
JumbledLimes (talk | contribs) mNo edit summary |
||
| (34 intermediate revisions by 12 users not shown) | |||
| Line 1: | Line 1: | ||
{{Boss | {{Infobox Boss | ||
|type= | |type= | ||
|image= | |image= | ||
{{Media | {{Media | ||
|Artwork TLoZ= File:TLoZ | |Artwork TLoZ= File:TLoZ Lanmola Blue Artwork.png | ||
|Artwork ALttP= File: | |Artwork ALttP= File:ALttP Lanmolas Artwork.png | ||
| | |Model LANS= File:LANS Lanmola Model.png | ||
|Sprite ALttP= File:Lanmola | |Sprite ALttP= File:ALttP Lanmola Sprite.png | ||
|Sprite LA= File:LA Lanmola Sprite.png | |Sprite LA= File:LA Lanmola Sprite.png | ||
|Sprite LADX= File:LADX Lanmola Sprite.png | |Sprite LADX= File:LADX Lanmola Sprite.png | ||
| Line 17: | Line 17: | ||
|race= | |race= | ||
|gender= | |gender= | ||
|game= | |game= TLoZ, ALttP, LA | ||
|other= | |other= ALttP (Ishinomori), LA (Cagiva), CoH | ||
| | |dungeon= | ||
{{Infobox Game Blocks | |||
|TLoZ= {{Term|TLoZ|Level 9|link}} | |||
|ALttP= {{Term|ALttP|Desert Palace|link}} | |||
|LA= {{Term|LA|Yarna Desert|link}} | |||
}} | |||
|habitat= | |habitat= | ||
|health= | |health= | ||
|weakness= | {{Infobox Game Blocks | ||
|reward= | |TLoZ= {{HP|TLoZ|4}} | ||
}} | |||
|weakness= {{List|{{Term|Series|Sword|link}}, {{Plural|Series|Arrow|link}}, {{Term|Series|Ice Rod|link}}}} | |||
|reward= | |||
{{Infobox Game Blocks | |||
|ALttP= {{Term|ALttP|Pendant of Power|link}} | |||
|LA= {{Term|LA|Angler Key|link}} | |||
}} | |||
|exp= | |exp= | ||
|theme | |theme= | ||
|strategy= | |strategy= | ||
| | |voiceactor= | ||
}} | }} | ||
{{Term/Store|Lanmola|Lanmolas|Series, ALttP, LA, LADX, CoH|plural}} | {{Term/Store|Lanmola|Lanmolas|Series, ALttP, LA, LADX, ALttP (Ishinomori), CoH|plural}} are recurring enemies and {{Plural|Series|Sub-Boss|link}} in {{TLoZ|Series}}.{{Exp Game|ALttP, LA, LADX, ALttP (Ishinomori), CoH}}<ref>{{Cite Book|quote= |book= E |publisher= |page= 188 {{Exp Game|TLoZ, ALttP, LA}}}}</ref><ref>{{Cite Book|quote= {{Big|A Lanmola!!}} |character= Link |book= ALttP (Ishinomori) |publisher= |page= 13}}</ref><ref>{{Cite|Defeated By: Lanmola|Game Over|CoH}}</ref>{{Name Ref|AST, LA (Cagiva)}} They are fast and powerful centipedes.<ref>{{Cite Manual|quote=A gigantic centipede. Attacking his head won't work. Boy! Does he move fast!|game= TLoZ|page=36}}</ref> While they were originally normal enemies, they began to serve larger roles in subsequent games in the series, acting as boss or mini-boss. Their first appearance shows them as having an elongated segmented body, with two appendages per segment and a single eye complete with iris; later games show them as clearly having two compound eyes and no appendages, giving them a more worm-like appearance. | ||
==Characteristics== | ==Characteristics== | ||
==={{TLoZ|-}}=== | ==={{TLoZ|-}}=== | ||
{{ | {{Main|Red Lanmola, Blue Lanmola}} | ||
In {{TLoZ}}, Lanmolas are only found in [[Level-9]] in both Quests and are powerful foes. They come in red and blue varieties, with the latter ones being faster. Like the [[Moldorm]]s in the game, the Lanmolas grow shorter by one segment with each blow, but only the tail part of their body is weak at first; the head can only be harmed once the remaining segments have been destroyed. Their fast movement, multiple legs and their weakness in the tail actually makes them more akin to [[Moldorm]]s of later games. When defeated, red Lanmolas may drop either a [[Heart]], a [[Fairy]] or one [[Rupee]], while blue Lanmolas may drop either a Heart, one Rupee, five Rupees, or a [[Clock]].{{Note|If Link defeats 10 enemies without getting hit or teleporting with the Recorder, then the 10th enemy defeated will drop five | {{Manual|TLoZ|Lanmola|A gigantic centipede. Attacking his head won't work. Boy! Does he move fast!}} | ||
In {{TLoZ}}, Lanmolas are only found in [[Level-9]] in both Quests and are powerful foes. They come in red and blue varieties, with the latter ones being faster. Like the [[Moldorm]]s in the game, the Lanmolas grow shorter by one segment with each blow, but only the tail part of their body is weak at first; the head can only be harmed once the remaining segments have been destroyed. Their fast movement, multiple legs and their weakness in the tail actually makes them more akin to [[Moldorm]]s of later games. When defeated, red Lanmolas may drop either a [[Heart]], a [[Fairy]] or one [[Rupee]], while blue Lanmolas may drop either a Heart, one Rupee, five Rupees, or a [[Clock]].{{Note|If {{Term|TLoZ|Link|link}} defeats 10 enemies without getting hit or teleporting with the {{Term|TLoZ|Recorder|link}}, then the 10th enemy defeated will drop five {{Plural|TLoZ|Rupee|link}}. However, if the 10th enemy is defeated with a {{Term|TLoZ|Bomb|link}}, then it will drop four {{Plural|TLoZ|Bomb}}. If {{Term|TLoZ|Link}} defeats 16 enemies without getting hit or teleporting, then the 16th enemy will drop a {{Term|TLoZ|Fairy|link}}. After the 16th enemy, {{Term|TLoZ|Link}} must get hit and reset the counter to zero in order to achieve this effect again. Defeating {{Plural|TLoZ|Armos|link}}, {{Plural|TLoZ|Like Like|link}}, {{Plural|TLoZ|Keese|link}}, or {{Plural|TLoZ|Gel|link}} will not be counted.<ref>{{Cite Web|quote= |author= n.a. |published= n.d. |retrieved= August 17, 2017 |url= http://redcandle.us/The_Legend_of_Zelda#Forced_drops |title= Forced Drops |site= redcandle.us}}</ref>}} | |||
==={{ALttP|-}}=== | ==={{ALttP|-}}=== | ||
[[File: | [[File:ALttP Lanmolas Sprite.png|left|112px]] | ||
A group of three Lanmolas are the bosses of the | A group of three Lanmolas are the bosses of the {{Term|ALttP|Desert Palace|link}} in {{ALttP}}. In this game, they hide underground and occasionally surface to attack, then return to the underground. When they burrow out of the ground, they send bits of rock flying in several directions. The sword is the most common method of dealing with them; however, [[arrow]]s and the [[Ice Rod]] are both effective as well. After two are defeated, the last one will begin to move faster, and creates more bits of rock upon surfacing. Once the final one has been taken care of, [[Link]] gets the Pendant of Power and a [[Heart Container]]. | ||
Another group of three Lanmolas later return in [[Ganon's Tower (A Link to the Past)|Ganon's Tower]] as a mini-boss, where they are fought the same way as before. This time, however, there is a [[Stone Statue]] in the room that will occasionally fire beams at Link. | Another group of three Lanmolas later return in [[Ganon's Tower (A Link to the Past)|Ganon's Tower]] as a mini-boss, where they are fought the same way as before. This time, however, there is a [[Stone Statue]] in the room that will occasionally fire beams at Link. | ||
| Line 50: | Line 63: | ||
==Other Appearances== | ==Other Appearances== | ||
==={{AST|-}}=== | ==={{AST|-}}=== | ||
{{ | {{Noncanon|Start}} | ||
Three Lanmolas also appear as the boss of Level 5 in Week 3 of {{AST}}. Unlike {{ALttP|-}}, the it is possible to obtain the Level 3 Sword in the dungeon before fighting them. | Three Lanmolas also appear as the boss of Level 5 in Week 3 of {{AST}}. Unlike {{ALttP|-}}, the it is possible to obtain the Level 3 Sword in the dungeon before fighting them. | ||
{{ | {{Noncanon|End}} | ||
==={{ALttP|-}} (Ishinomori)=== | |||
{{Noncanon|Start}} | {{Noncanon|Start}} | ||
In the {{ALttP|Ishinomori}}, a Lanmola appears after Link, using the [[Book of Mudora]] in the [[Desert of Mystery]], reveals a scorpion statue that has the [[Pendant of Power]] hanging on it. Before Link can approach it, he sinks into the quicksand and resurfaces on top of a Lanmola. Link tries to attack it with his sword, but its skin is too hard to cause any damage to it.<ref>{{Cite Book|quote=This is hopeless! Its skin is like armor!|book= ALttP (Ishinomori)|publisher= |page=15}}</ref> However, after the Lanmola launches him into the air, he lands on top of the scorpion statue and retrieves the Pendant of Power.<ref>{{Cite Book|quote=Nice move, ugly! But now you're playing with the Pendant of Power!|book= ALttP (Ishinomori)|publisher= |page=16}}</ref> With the pendant's energy in his hand, Link successfully defeats the Lanmola by striking the foe's underbelly with the sword. | |||
In the {{ALttP|Ishinomori}}, a Lanmola appears after Link, using the [[Book of Mudora]] in the [[Desert of Mystery]], reveals a scorpion statue that has the [[Pendant of Power]] hanging on it. Before Link can approach it, he sinks into the quicksand and resurfaces on top of a Lanmola. Link tries to attack it with his sword, but its skin is too hard to cause any damage to it.<ref>{{Cite Book|quote=This is hopeless! Its skin is like armor!|book= | {{Noncanon|End}} | ||
==={{LA|-}} (Cagiva)=== | ==={{LA|-}} (Cagiva)=== | ||
{{ | {{Noncanon|Start}} | ||
In the {{LA|Cagiva}}, a {{Term|LA (Cagiva)|Lanmola}} attacks {{Term|LA (Cagiva)|Link|link}} while exploring {{Term|LA (Cagiva)|Yarna Desert|link}}. Due to the quicksand, {{Term|LA (Cagiva)|Link}} cannot move swiftly, so he tries attacking the {{Term|LA (Cagiva)|Lanmola}} with {{Plural|LA (Cagiva)|Bomb|link}} to no avail. He then decides to remove his {{Term|LA (Cagiva)|Shield|link}} and use it as a foot hold, asking {{Term|LA (Cagiva)|Felicia|link}} to warn him when it appears. When the {{Term|LA (Cagiva)|Lanmola}} emerges from the sand, {{Term|LA (Cagiva)|Link}} evades its attack and counters it with a {{Term|LA (Cagiva)|Spin Attack|link}}. As the {{Term|LA (Cagiva)|Lanmola}} dissolves, the {{Term|LA (Cagiva)|Angler Key|link}} appears from within. | |||
{{Noncanon|End}} | {{Noncanon|End}} | ||
| Line 69: | Line 84: | ||
==Nomenclature== | ==Nomenclature== | ||
{{ | {{Nomenclature}} | ||
===Other Names=== | |||
{{Other Names | |||
|- | |||
| Desert Lanmola<ref>{{Cite Guide|quote= |game= LA|publisher= Nintendo|page= 188}}</ref> | |||
| {{LA}} | |||
| {{Guide|LA|Nintendo}} | |||
| {{E}} | |||
}} | |||
| | |||
| | |||
| | |||
| | |||
| | |||
| | |||
| | |||
| | |||
| | |||
| | |||
| | |||
==Gallery== | ==Gallery== | ||
<gallery> | <gallery> | ||
File:TLoZ Link Fighting Lanmola Artwork.png|Artwork of Link fighting a Lanmola in ''The Legend of Zelda'' | |||
File:TLoZ Link and Zelda Surrounded Artwork.png|A Lanmola, [[Blue Darknut]], two [[Gibdo]]s and several [[Keese]] surrounding Link and Zelda | |||
File:Sand battlefield.png|Link fighting Lanmolas from {{ALttP|-}} | File:Sand battlefield.png|Link fighting Lanmolas from {{ALttP|-}} | ||
File:LADX Lanmola Sprite 2.gif|The Lanmola form of the [[Nightmare]] from {{LA|-}} | File:LADX Lanmola Sprite 2.gif|The Lanmola form of the [[Nightmare]] from {{LA|-}} | ||
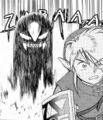
File:Lanmola (comic).png|A Lanmola from {{ALttP|-}} comic | File:Lanmola (comic).png|A Lanmola from the {{ALttP|-}} comic | ||
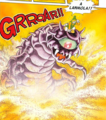
File:LanmolaAST.png|A Lanmola from {{AST|-}} | File:LA (Cagiva) Lanmola.jpg|A {{Term|LA (Cagiva)|Lanmola}} about to attack {{Term|LA (Cagiva)|Link}} from the {{LA|-}} manga by Ataru Cagiva | ||
File:LanmolaAST.png|A Lanmola from {{AST|-}} | |||
</gallery> | </gallery> | ||
==See Also== | ==See Also== | ||
* {{Term|Series|Blue Lanmola|link}} | * {{Term|Series|Blue Lanmola|link}} | ||
* {{Term|Series|Red Lanmola|link}} | |||
{{Notes}} | {{Notes}} | ||
{{Ref}} | {{Ref}} | ||
{{Bosses|ALttP}} | {{Bosses|ALttP}} | ||
{{Categories | {{Categories | ||
|Guardians, Nightmares, Sand-Related Enemies, Shadow Nightmares, Worm-Like Enemies | |||
|bosses= LA, LADX, LANS, AST | |||
|characters= ALttP (Ishinomori) | |characters= ALttP (Ishinomori) | ||
|enemies= ALttP | |||
|enemies= ALttP | |||
|sub-bosses= CoH | |sub-bosses= CoH | ||
}} | }} | ||
Revision as of 02:16, 4 October 2023
Lanmolas are recurring enemies and Sub-Bosses in The Legend of Zelda series.(ALttP | LA | LADX | ALttP (Ishinomori) | CoH)[2][3][4][name references needed] They are fast and powerful centipedes.[5] While they were originally normal enemies, they began to serve larger roles in subsequent games in the series, acting as boss or mini-boss. Their first appearance shows them as having an elongated segmented body, with two appendages per segment and a single eye complete with iris; later games show them as clearly having two compound eyes and no appendages, giving them a more worm-like appearance.
Characteristics
The Legend of Zelda
In The Legend of Zelda, Lanmolas are only found in Level-9 in both Quests and are powerful foes. They come in red and blue varieties, with the latter ones being faster. Like the Moldorms in the game, the Lanmolas grow shorter by one segment with each blow, but only the tail part of their body is weak at first; the head can only be harmed once the remaining segments have been destroyed. Their fast movement, multiple legs and their weakness in the tail actually makes them more akin to Moldorms of later games. When defeated, red Lanmolas may drop either a Heart, a Fairy or one Rupee, while blue Lanmolas may drop either a Heart, one Rupee, five Rupees, or a Clock.[note 1]
A Link to the Past
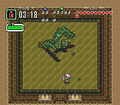
A group of three Lanmolas are the bosses of the Desert Palace in A Link to the Past. In this game, they hide underground and occasionally surface to attack, then return to the underground. When they burrow out of the ground, they send bits of rock flying in several directions. The sword is the most common method of dealing with them; however, arrows and the Ice Rod are both effective as well. After two are defeated, the last one will begin to move faster, and creates more bits of rock upon surfacing. Once the final one has been taken care of, Link gets the Pendant of Power and a Heart Container.
Another group of three Lanmolas later return in Ganon's Tower as a mini-boss, where they are fought the same way as before. This time, however, there is a Stone Statue in the room that will occasionally fire beams at Link.
Link's Awakening
In Link's Awakening, a Lanmola appears as a mini-boss guarding the Angler Key in the Yarna Desert. It attacks in the same fashion as those encountered in A Link to the Past, but this time it fights in a patch of quicksand. If Link sinks into the center of the pit, Link will fall into a cave and, after returning, all damage dealt to the Lanmola will be reversed.
One of the final Nightmare's forms is known as Lanmola, but it is fought very differently. It behaves more akin to the Lanmolas of the original The Legend of Zelda, and must be defeated with a powerful attack to the head, like the Magic Rod.
Other Appearances
Ancient Stone Tablets
Three Lanmolas also appear as the boss of Level 5 in Week 3 of Ancient Stone Tablets. Unlike A Link to the Past, the it is possible to obtain the Level 3 Sword in the dungeon before fighting them.
A Link to the Past (Ishinomori)
In the A Link to the Past comic by Shotaro Ishinomori, a Lanmola appears after Link, using the Book of Mudora in the Desert of Mystery, reveals a scorpion statue that has the Pendant of Power hanging on it. Before Link can approach it, he sinks into the quicksand and resurfaces on top of a Lanmola. Link tries to attack it with his sword, but its skin is too hard to cause any damage to it.[7] However, after the Lanmola launches him into the air, he lands on top of the scorpion statue and retrieves the Pendant of Power.[8] With the pendant's energy in his hand, Link successfully defeats the Lanmola by striking the foe's underbelly with the sword.
Link's Awakening (Cagiva)
In the Link's Awakening manga by Ataru Cagiva, a Lanmola attacks Link while exploring Yarna Desert. Due to the quicksand, Link cannot move swiftly, so he tries attacking the Lanmola with Bombs to no avail. He then decides to remove his Shield and use it as a foot hold, asking Felicia to warn him when it appears. When the Lanmola emerges from the sand, Link evades its attack and counters it with a Spin Attack. As the Lanmola dissolves, the Angler Key appears from within.
Cadence of Hyrule
Lanmola appear in Cadence of Hyrule as minibosses, appearing in either the Desert or inside caves and dungeons like the Gerudo Ruins. They move to the beat of the music, and emerge from underground in order to attack Cadence, Link, Yves, and Zelda. Their heads move on every single beat towards the heroes, with their bodies slowly dragging along behind them. After several beats or if they've sustained enough damage, they will bury themselves underground for a few beats before re-emerging to attack. Once they've been slain, they will drop a random item and if they were in a dungeon, unlock a set of stairs that will lead the heroes into the next dungeon room or floor.
Nomenclature
| Language | Names | |
|---|---|---|
Japanese | ラネモーラ (Ranemōra) (TLoZ | ALttP | LA)[12][13][14] | |
ChineseTR | 拉內莫拉 (Lānèimòlā) (CoH)[21] | |
ChineseSI | ||
Dutch | Ringslang (TLoZ)[15] | |
FrenchCA | Lanmola (CoH)[22] | |
FrenchEU | Lanmola (TLoZ | CoH)[15][16] | |
German | Lanmola (CoH)[20] | |
Italian | Lanmola (TLoZ | ALttP | LA | LADX | CoH)[9][10][11] | |
SpanishLA | Lanmora (CoH)[19] | |
SpanishEU | Lanmora (CoH)[23] | |
| This table was generated using translation pages. To request an addition, please contact a staff member with a reference. | ||
Other Names
| Name | Desert Lanmola[24] |
|---|---|
| Applies to | |
| Source | |
| Superseded by |
| Name | Applies to | Source | Superseded by |
|---|---|---|---|
Desert Lanmola[24] |
Gallery
-

Artwork of Link fighting a Lanmola in The Legend of Zelda
-
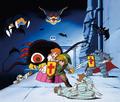
A Lanmola, Blue Darknut, two Gibdos and several Keese surrounding Link and Zelda
-
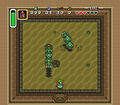
Link fighting Lanmolas from A Link to the Past
-

The Lanmola form of the Nightmare from Link's Awakening
-
A Lanmola from the A Link to the Past comic
-
A Lanmola about to attack Link from the Link's Awakening manga by Ataru Cagiva
-
A Lanmola from Ancient Stone Tablets


.png)
_Lanmola.jpg)

See Also
Notes
- ↑ If Link defeats 10 enemies without getting hit or teleporting with the Flute, then the 10th enemy defeated will drop five Rupees. However, if the 10th enemy is defeated with a Bomb, then it will drop four Bombs. If Link defeats 16 enemies without getting hit or teleporting, then the 16th enemy will drop a Fairy. After the 16th enemy, Link must get hit and reset the counter to zero in order to achieve this effect again. Defeating Armos, Like Likes, Keese, or Gels will not be counted.[6]
References
- ↑ "Using the Power Glove found here, Link moves boulders to reach three burrowing Lanmolas that guard the Pendant of Power." (Encyclopedia, Dark Horse Books, pg. 147)
- ↑ Encyclopedia, Dark Horse Books, pg. 188 (TLoZ | ALttP | LA)
- ↑ "A Lanmola!!" — Link (A Link to the Past manga, VIZ Media, pg. 13)
- ↑ "Defeated By: Lanmola" — Game Over (Cadence of Hyrule)
- ↑ "A gigantic centipede. Attacking his head won't work. Boy! Does he move fast!" (The Legend of Zelda manual, pg. 36)
- ↑ n.a., Forced Drops , redcandle.us, published n.d., retrieved August 17, 2017.
- ↑ "This is hopeless! Its skin is like armor!" (A Link to the Past manga, VIZ Media, pg. 15)
- ↑ "Nice move, ugly! But now you're playing with the Pendant of Power!" (A Link to the Past manga, VIZ Media, pg. 16)
- ↑ L'arte di una leggenda, Magazzini Salani, pg. 120
- ↑ Enciclopedia di Hyrule, Magazzini Salani, pg. 188
- ↑ "Causa della sconfitta: Lanmola" — Game Over (Cadence of Hyrule, Italian localization)
- ↑ Hyrule Encyclopedia, Tokuma Shoten Publishing Co., Ltd., pg. 211
- ↑ Nintendo Official Guidebook: The Legend of Zelda: A Link to the Past Vol. 1, Shogakukan, pg. 132Nintendo Official Guidebook—The Legend of Zelda: A Link to the Past & Four Swords, Shogakukan, pg. 23
- ↑ The Legend of Zelda: Link's Awakening Certain Victory Strategy Guide (1993), Futabasha, pg. 29
- ↑ 15.0 15.1 The Legend of Zelda manual, pg. 36
- ↑ "Défaite causée par: Lanmola" — Game Over (Cadence of Hyrule, European French localization)
- ↑ zhSR= 塞尔达传说:百科全书, New Star Press, pg. 191
- ↑ "败因: 拉内莫拉" — Game Over (Cadence of Hyrule, Simplified Chinese localization)
- ↑ "¡Fin de la partida! Causa: Lanmora" — Game Over (Cadence of Hyrule, Latin American Spanish localization)
- ↑ "Besiegt von: Lanmola" — Game Over (Cadence of Hyrule, German localization)
- ↑ "敗因: 拉內莫拉" — Game Over (Cadence of Hyrule, Traditional Chinese localization)
- ↑ "Défaite causée par: Lanmola" — Game Over (Cadence of Hyrule, Canadian French localization)
- ↑ "¡Fin de la partida! Causa: Lanmora" — Game Over (Cadence of Hyrule, European Spanish localization)
- ↑ The Legend of Zelda: Link's Awakening—Nintendo Player's Guide, Nintendo of America, pg. 188
Mazura • Jermafenser • Rebonack • Carock • Gooma • Barba • Thunderbird • Link's Shadow
Ball and Chain Trooper • Armos Knights • Lanmolas • Moldorm • Agahnim
Helmasaur King • Arrghus • Mothula • Blind the Thief • Kholdstare • Vitreous • Trinexx • Ganon
Moldorm • Genie • Slime Eye • Angler Fish • Slime Eel • Facade • Evil Eagle • Hot Head • Shadow Nightmares
Spike Roller • Moblin Chief • Hinox • Dodongo Snakes • Lanmola • Hydrosoar
Master Stalfos • Gohma • Armos Knight • Rover • Grim Creeper • Turtle Rock • Blaino
Gohma • King Dodongo • Barinade • Phantom Ganon • Volvagia • Morpha • Bongo Bongo • Twinrova • Ganon
Lizalfos • Big Octo • Stalfos • Meg • Flare Dancer • White Wolfos • Dark Link • Dead Hand • Gerudo Thief • Iron Knuckle
Odolwa • Goht • Gyorg • Twinmold • Majora's Mask
Dinolfos • Gekko • Wizzrobe • Gerudo Pirate • Wart • Gekko and Mad Jelly
Captain Keeta • Iron Knuckle • Sharp • Igos du Ikana • Garo Master • Gomess • Eyegore
Aquamentus • Dodongo • Mothula • Gohma • Digdogger • Manhandla • Gleeok • Medusa Head • General Onox
Twinrova • Ganon
Brother Goriyas • Facade • Omuai • Agunima • Great Moblin • Syger • Vire • Poe Sisters • Frypolar
Pumpkin Head • Head Thwomp • Shadow Hag • Eyesoar • Smog • Octogon • Possessed Nayru • Plasmarine • Ramrock • Veran
Twinrova • Ganon
Giant Ghini • Swoop • Subterror • Armos Warrior • Great Moblin • Smasher • Vire • Angler Fish • Blue Stalfos
Gohma • Kalle Demos • Gohdan • Helmaroc King • Jalhalla • Molgera • Puppet Ganon • Ganondorf
Mothula • Darknut • Phantom Ganon • Stalfos • Wizzrobe • Mighty Darknut • Big Octo![]()
Phantom Ganon • Stone Arrghus • Helmaroc King • Big Poe • Big Moldorm • Frostare • Vaati • Ganon
Chief Soldier • Shadow Link • Manhandla • Dodongos • Big Dark Stalfos • Gohma • Big Dodongo
Big Green Chuchu • Gleerok • Mazaal • Big Octorok • Gyorg Pair • Vaati
Madderpillar • Dark Nut • Big Blue Chuchu • Red Dark Nut • Black Knight
Diababa • Fyrus • Morpheel • Stallord • Blizzeta • Armogohma • Argorok • Zant • Puppet Zelda • Ganon
Ook • King Bulblin • Dangoro • Twilit Carrier Kargarok • Twilit Bloat
Deku Toad • Death Sword • Darkhammer • Darknut • Aeralfos • Phantom Zant
Stagnox • Fraaz • Phytops • Cragma • Byrne • Skeldritch • Demon Train • Chancellor Cole • Malladus
Mothula • Snapper • Heatoise • Big Blin • Rocktite • Geozard Chief • Dark Link![]()
Ghirahim • Scaldera • Moldarach • The Imprisoned • Koloktos • Tentalus • Levias • Bilocyte • Demise
Stalfos • Lizalfos • Stalmaster • Moldarach • LD-002G Scervo • Dark Lizalfos • Magmanos • Moldorm • LD-003D Dreadfuse
Yuga • Moldorm • Margomill • Gemesaur King • Arrghus • Knucklemaster • Stalblind • Zaganaga • Dharkstare • Grinexx • Yuga Ganon
Armos • Red Stalfos • Heedles • Green & Red Goriyas • Gigabari • Gibdos & Purple Mini-Moldorms • Red Eyegores • Flying Tiles & Devalants • Big Pengator & Pengators • Fire Gimos • Moldorm • Lorule Ball and Chain Soldier • Arrghus
Margoma • Arrghus • Moldorm • Blizzagia • The Lady's Pets • Stalchampion • Prismantus • The Lady • Shadow Links
Electric Blob King • Electric Blob Queen • Hinox Brothers • Freezlord • Vulture Vizier • Grim Repoe • Gigaleon
Windblight Ganon • Fireblight Ganon • Thunderblight Ganon • Waterblight Ganon • Monk Maz Koshia(TCB) • Calamity Ganon • Dark Beast Ganon
Stone Talus • Stone Talus (Luminous) • Stone Talus (Rare) • Igneo Talus • Frost Talus • Igneo Talus Titan(TCB) • Molduga • Molduking(TCB) • Hinox • Blue Hinox • Black Hinox • Master Kohga
Bosses in Tears of the Kingdom
Colgera • Yunobo • Moragia • Marbled Gohma • Sludge Like • Mucktorok • Queen Gibdo • Seized Construct • Phantom Ganon • Demon King's Army • Demon King Ganondorf • Demon Dragon
- Guardians
- Nightmares
- Sand-Related Enemies
- Shadow Nightmares
- Worm-Like Enemies
- Bosses
- Characters
- Enemies
- Sub-Bosses
- Enemies in A Link to the Past
- Bosses in Link's Awakening
- Bosses in Link's Awakening DX
- Bosses in Link's Awakening (Nintendo Switch)
- Characters in A Link to the Past (Ishinomori)
- Bosses in Ancient Stone Tablets
- Sub-Bosses in Cadence of Hyrule