Moldorm (Boss): Difference between revisions
Htwretched (talk | contribs) (→Gallery: +2 TFH) |
|||
| (37 intermediate revisions by 17 users not shown) | |||
| Line 1: | Line 1: | ||
{{Boss | {{Infobox Boss | ||
|type= | |type= | ||
|image= | |image= | ||
| Line 7: | Line 7: | ||
|Model ALBW= File:ALBW Moldorm Model.png | |Model ALBW= File:ALBW Moldorm Model.png | ||
|Model TFH= File:TFH Moldorm Model.png | |Model TFH= File:TFH Moldorm Model.png | ||
|Sprite ALttP= File:Moldorm.png | |Sprite ALttP= File:ALttP Moldorm Sprite.png | ||
|Sprite LA= File:LA Moldorm Sprite.png | |Sprite LA= File:LA Moldorm Sprite.png | ||
|Sprite LADX= File:LADX Moldorm Sprite.png | |Sprite LADX= File:LADX Moldorm Sprite.png | ||
| Line 18: | Line 18: | ||
|race= | |race= | ||
|gender= | |gender= | ||
|game= | |game= ALttP, LA, ALBW, TFH | ||
|other= | |other= ALttP (Ishinomori), LA (Cagiva), ALttP (Cagiva), BSTLoZ, AST, ALttP4kGB, FS (Himekawa), ALttP (Himekawa) | ||
|dungeon= | |||
{{Infobox Game Blocks | |||
|ALttP= {{Term|ALttP|Tower of Hera|link}}, {{Term|ALttP|Ganon's Tower|link}} | |||
|LA= {{Term|LA|Tail Cave|link}} | |||
|ALBW= {{Term|ALBW|Lorule Castle|link}}, {{Term|ALBW|Treacherous Tower|link}} | |||
|TFH= {{Term|TFH|Fire Temple|link}} | |||
}} | |||
|habitat= | |habitat= | ||
|health= | |health= | ||
|weakness= | {{Infobox Game Blocks | ||
|reward= | |LA= {{HP|LA|4}} | ||
}} | |||
|weakness= {{List|{{Term|Series|Sword|link}}, {{Term|Series|Magic Hammer|link}}}} | |||
|reward= | |||
{{Infobox Game Blocks | |||
|ALttP= {{Term|ALttP|Pendant of Wisdom|link}} | |||
|LA= {{Term|LANS|Full Moon Cello|link}} | |||
|ALBW= {{Term|ALBW|Pendant of Power|link}} | |||
}} | |||
|exp= | |exp= | ||
|theme | |theme= | ||
|strategy= | |strategy= | ||
| | |voiceactor= | ||
|attack= | |||
{{Infobox Game Blocks | |||
|LA= | |||
{{Damage | |||
|attack1= Contact | |||
|damage1= 1.00 | |||
}} | |||
}} | |||
}} | }} | ||
{{Term/Store|Moldorm||Series, ALttP, LA, LADX, ALBW, TFH}} | {{Term/Store|Moldorm|Moldorms|Series, ALttP, LA, LADX, LANS, ALBW, TFH, ALttP (Ishinomori)|plural}} are recurring {{Plural|Series|Boss|link}} and {{Plural|Series|Sub-Boss|link}} in {{TLoZ|Series}}.{{Exp Game|ALttP, LA, LADX, ALBW, TFH, ALttP (Ishinomori)}}<ref>{{Cite Book|quote= |book= E |publisher= |page= 193 {{Exp Game|ALttP, LADX, FSA, ALBW, TFH}}}}</ref><ref>{{Cite Book|quote= The '''Lanmola?''' The '''Moldorm?''' They '''can't''' be '''real!''' I defeated them '''all!''' |character= {{Term|ALttP (Ishinomori)|Link|link}} |book= ALttP (Ishinomori) |publisher= |page= 11}}</ref>{{Name Ref|LANS, ALttP (BBII), FS (Himekawa)}} {{Plural|Series|Moldorm (Boss)}} go unnamed in {{ALttP4kGB}}. They are a much larger version of the common [[Moldorm]]. | ||
==Characteristics== | ==Characteristics== | ||
| Line 38: | Line 60: | ||
To harm the monster, he must strike its vulnerable tail; the very tip has a twirling red weak point that causes damage to the monster when struck. The monster requires just six hits with Link's [[Fighter's Sword]] to destroy, but its erratic movement makes this extremely difficult. Not only that, but when the monster is close to defeat, it will speed up dramatically, making avoiding and striking the monster more a matter of luck than judgment. While falling from the battle will not harm Link, taking hits from the monster will. The floor below contains a large number of [[jar]]s that hold [[Heart]]s, so Link can continue his attempt to destroy Moldorm over and over until he finally succeeds and obtains the [[Pendant of Wisdom]]. | To harm the monster, he must strike its vulnerable tail; the very tip has a twirling red weak point that causes damage to the monster when struck. The monster requires just six hits with Link's [[Fighter's Sword]] to destroy, but its erratic movement makes this extremely difficult. Not only that, but when the monster is close to defeat, it will speed up dramatically, making avoiding and striking the monster more a matter of luck than judgment. While falling from the battle will not harm Link, taking hits from the monster will. The floor below contains a large number of [[jar]]s that hold [[Heart]]s, so Link can continue his attempt to destroy Moldorm over and over until he finally succeeds and obtains the [[Pendant of Wisdom]]. | ||
The Moldorm makes a reappearance in [[ | The Moldorm makes a reappearance in [[Ganon's Tower]] as a {{Term|ALttP|Sub-Boss|link}}, only the battlefield is shaped differently, making it harder to defeat; the floor below contains spikes that Link might fall on to as well. However, if Link has the [[Golden Sword]], he can kill this Moldorm in just two hits. | ||
==={{LA|-}}=== | ==={{LA|-}}=== | ||
In {{LA}}, Moldorm appears as the first of the [[Nightmare]]s that Link must face in his quest to wake the [[Wind Fish]], and resides in the [[Tail Cave]] with many Mini-Moldorms and guards the [[Full Moon Cello]]. Unlike its previous appearance, it has large mandibles and is able to speak, albeit between loud buzzing.<ref>{{Cite|BUZZZZZ! BUZZZZ! OUTZZZIDER! |Moldorm|LADX}}</ref> As one of the Nightmares, its desire is to destroy the outsider, Link. Like its previous appearance, it tries to drive Link off the platform the battle takes place upon. The arena is much smaller than before, and Link has no easy way to heal himself if he takes damage; not only that, but with only three [[Heart Container]]s, Link will be defeated in only three hits. The Moldorm will take less hits than before, but will charge wildly around after being hit with the sword, before slowing down again (unless it's the final hit, where he will continue to move extremely fast until defeated). The best method to defeat the monster is to use the [[Spin Attack|Whirling Blade Technique]]. Only two strikes from this move will defeat the monster. | In {{LA}}, Moldorm appears as the first of the [[Nightmare]]s that Link must face in his quest to wake the [[Wind Fish]], and resides in the [[Tail Cave]] with many Mini-Moldorms and guards the [[Full Moon Cello]]. Unlike its previous appearance, it has large mandibles and is able to speak, albeit between loud buzzing.<ref>{{Cite|BUZZZZZ! BUZZZZ! OUTZZZIDER!|Moldorm|LADX}}</ref> As one of the Nightmares, its desire is to destroy the outsider, Link. Like its previous appearance, it tries to drive Link off the platform the battle takes place upon. The arena is much smaller than before, and Link has no easy way to heal himself if he takes damage; not only that, but with only three [[Heart Container]]s, Link will be defeated in only three hits. The Moldorm will take less hits than before, but will charge wildly around after being hit with the sword, before slowing down again (unless it's the final hit, where he will continue to move extremely fast until defeated). The best method to defeat the monster is to use the [[Spin Attack|Whirling Blade Technique]]. Only two strikes from this move will defeat the monster. | ||
==={{ALBW|-}}=== | ==={{ALBW|-}}=== | ||
[[File:ALBW Moldorm.png|right|thumb|300px|Moldorm from {{ALBW|-}}]] | [[File:ALBW Moldorm.png|right|thumb|300px|Moldorm from {{ALBW|-}}]] | ||
{{Term|ALBW|Moldorm (Boss)}} returns as the {{Term|ALBW|Boss}} of the {{Term|ALBW|Tower of Hera|link}}, but guards the {{Term|ALBW|Pendant of Power|link}} instead of the {{Term|ALttP|Pendant of Wisdom|link}}. It is fought in the same manner as in {{ALttP}}, except that it does not regain its health if {{Term|ALBW|Link}} is knocked off the platform. {{Term|ALBW|Moldorm (Boss)}}'s only attack is to glide around the area in an attempt to bump {{Term|ALBW|Link}} off the platform to the floor below, where a series of {{Plural|ALBW|Blade Trap|link}} guard several recovery {{Plural|ALBW|Heart|link}}. | |||
The {{Term|ALBW|Moldorm (Boss)}} is fought as the final enemy in the {{Term|ALBW|Treacherous Tower|link}}'s Beginner level. It is fought in the same manner as in its {{Term|ALBW|Dungeon}} battle, however, falling off the platforms will cause {{Term|ALBW|Link}} to lose health. | |||
==={{TFH|-}}=== | ==={{TFH|-}}=== | ||
In {{TFH}}, Moldorm appears as the boss of the [[ | In {{TFH}}, Moldorm appears as the boss of the [[Fire Temple]] Level. In a first for the series, this giant Moldorm appears to be mechanical in nature rather than organic—including with bright, colored headlights for eyes and sounding as though it runs on treads. It is fought in a caged enclosure suspended over a pit of lava. Like its other incarnations, it crawls around the area while making sharp turns. Moldorm's eyes will emit green, red, or blue light, and it will pursue the Link whose tunic matches the current color of its eyes. If this Link is hit, Moldorm's will briefly retract its segments and it will follow a differently colored Link. Three lava pillars beneath the platform will also periodically rise through the red, circular grates that appear on the floor of the platform. They will harm any of the Links who come in contact with them. | ||
The Links must avoid both Moldorm and the pillars of lava while aiming for the creature’s glowing tail and striking it with the [[Sword]]. The Link who matches the color of its glowing eyes can lure the Moldorm away, while the other Links aim for its tail. After being struck, its tail will be temporarily encased in a protective shell and it will start to move faster. Eventually Moldorm's tail will glow a bright red and is held higher up, requiring that two of the Links form a [[Totem]] in order to reach and strike it. Eventually after taking enough hits, Moldorm will | The Links must avoid both Moldorm and the pillars of lava while aiming for the creature’s glowing tail and striking it with the [[Sword]]. The Link who matches the color of its glowing eyes can lure the Moldorm away, while the other Links aim for its tail. After being struck, its tail will be temporarily encased in a protective shell and it will start to move faster. Eventually Moldorm's tail will glow a bright red and is held higher up, requiring that two of the Links form a [[Totem]] in order to reach and strike it. Eventually after taking enough hits, Moldorm will go haywire and quickly move about erratically in its enclosure, raising its tail even higher. The Links must then form a Totem of three to strike its tail; this blow will finish the monster off. | ||
==Other Appearances== | ==Other Appearances== | ||
==={{ALttP|-}} (Ishinomori)=== | |||
{{Noncanon|Start}} | |||
[[File:Moldorm (comic).png|right|thumb|x180px|Moldorm from the {{ALttP|-}} comic by Shotaro Ishinomori]] | |||
In the {{ALttP|Ishinomori}}, the Moldorm Link fights in the [[Tower of Hera (A Link to the Past)|Tower of Hera]] appears as a giant spider as opposed to the centipede-like monster fought in the game. When the monster's illusion appears in [[Ganon's Tower (A Link to the Past)|Ganon's Tower]], it is still called a Moldorm.<ref>{{Cite Book|quote=It--It's Agahnim! It '''can't''' be! I '''destroyed''' him! [...] The Lanmola?! The Moldorm?! They can't be real! I defeated them all!|book= ALttP (Ishinomori)|publisher= |page=11}}</ref> | |||
The Moldorm first appears in Chapter 4, where it ambushes the young hero from above. Link strikes it in one of its eyes with his blade, and upon being told that the [[Pendant of Wisdom]] is inside the beast's {{Term|ALttP (Ishinomori)|Eye|link}}, Link reaches for it and takes it, restoring his cursed arm.<ref>{{Cite Book|quote=Link... The pendant is the '''third eye'''...|book= ALttP (Ishinomori)|publisher= |page=12}}</ref> Now with all the [[Pendants of Virtue]] in his hand, the monster tumbles defeated to the bottom of the tower and breaks Link's fall as it hits the ground. | |||
{{Noncanon|End}} | |||
==={{LA|-}} (Cagiva)=== | |||
{{Noncanon|Start}} | |||
In the {{LA|Cagiva}}, {{Term|LA (Cagiva)|Link|link}} fights {{Term|LA (Cagiva)|Moldorm}} at the end of {{Term|LA (Cagiva)|Tail Cave|link}}. After failing to damage its tough body with his {{Term|LA (Cagiva)|Sword|link}}, {{Term|LA (Cagiva)|Link}} is tackled off the platform, saving himself by stabbing his {{Term|LA (Cagiva)|Sword}} on the edge. After pulling himself back up, {{Term|LA (Cagiva)|Link}} uses a {{Term|LA (Cagiva)|Spin Attack|link}} on {{Term|LA (Cagiva)|Moldorm}}'s tail to defeat it, revealing the chamber with the {{Term|LA (Cagiva)|Full Moon Cello|link}}. | |||
{{Noncanon|End}} | |||
==={{BSTLoZ|-}}=== | |||
{{Noncanon|Start}} | |||
{{Stub|BSTLoZ}} | |||
{{Noncanon|End}} | |||
==={{AST|-}}=== | |||
{{Noncanon|Start}} | {{Noncanon|Start}} | ||
{{Stub|AST}} | |||
{{Noncanon|End}} | |||
==={{FS|-}} (Himekawa)=== | |||
{{Noncanon|Start}} | |||
{{Stub|FS (Himekawa)}} | |||
{{Noncanon|End}} | |||
==={{ALttP|-}} (Himekawa)=== | ==={{ALttP|-}} (Himekawa)=== | ||
{{Noncanon|Start}} | |||
The Moldorm briefly appears in the {{ALttP|Himekawa}} as well, this time in a much more accurate depiction. Link is shown fighting off the giant centipede as he runs up the [[Tower of Hera (A Link to the Past)|Tower of Hera]]. He manages to slice through one of its pincers and continue his dash up the winding stairway to the [[Pendant of Wisdom]], hanging from the hand of an elegant statue at the very top. Upon collecting the final [[Pendants of Virtue|Pendant]], he is mysteriously warped to the [[Lost Woods]]. | The Moldorm briefly appears in the {{ALttP|Himekawa}} as well, this time in a much more accurate depiction. Link is shown fighting off the giant centipede as he runs up the [[Tower of Hera (A Link to the Past)|Tower of Hera]]. He manages to slice through one of its pincers and continue his dash up the winding stairway to the [[Pendant of Wisdom]], hanging from the hand of an elegant statue at the very top. Upon collecting the final [[Pendants of Virtue|Pendant]], he is mysteriously warped to the [[Lost Woods]]. | ||
{{Noncanon|End}} | {{Noncanon|End}} | ||
{{ | ==={{ALttP4kGB|-}}=== | ||
==={{ | {{Noncanon|Start}} | ||
{{ | {{Stub|ALttP4kGB}} | ||
{{ | |||
{{Noncanon|End}} | |||
==Nomenclature== | ==Nomenclature== | ||
{{ | {{Nomenclature}} | ||
==Gallery== | ==Gallery== | ||
<gallery> | <gallery> | ||
File:LADX Moldorm Battle.png|{{Term|LADX|Link}} fighting {{Term|LADX|Moldorm}} from {{ | File:LADX Moldorm Battle.png|{{Term|LADX|Link}} fighting {{Term|LADX|Moldorm (Boss)}} from {{LADX|-}} | ||
File:ALBW Moldorm 2.png|A damaged {{Term|ALBW|Moldorm}} from {{ALBW|-}} | File:ALBW Moldorm 2.png|A damaged {{Term|ALBW|Moldorm (Boss)}} from {{ALBW|-}} | ||
File: | File:TFH Moldorm Promotional Screenshot 2.png|The {{Plural|TFH|Links}} battling {{Term|TFH|Moldorm (Boss)}} from {{TFH|-}} | ||
File: | File:TFH Moldorm Battle.png|The {{Plural|TFH|Links}} battling {{Term|TFH|Moldorm (Boss)}} in its final phase from {{TFH|-}} | ||
File: | File:ALttP (BBII) Moldorm Artwork.png|Artwork of {{Term|ALttP (BBII)|Moldorm}} from {{ALttP|BBII|link}} | ||
File:BSTLoZ Moldorm Sprite.png|{{Term|BSTLoZ|Moldorm}} from {{BSTLoZ|-}} | |||
File:LA (Cagiva) Moldorm.jpg|{{Term|LA (Cagiva)|Link}} fighting {{Term|LA (Cagiva)|Moldorm}} from the {{LA|-}} manga by Ataru Cagiva | |||
File:ALttP (Cagiva) Moldorm Artwork.jpg|{{Term|ALttP (Cagiva)|Moldorm}} from {{ALttP|-}} (Caviga) | |||
File:MoldormALttPManga.png|{{Term|ALttP (Himekawa)|Moldorm}} from the {{ALttP|-}} manga by Akira Himekawa | |||
File:LttP Gamebook p195.jpg|Moldorm chasing Link in his rabbit form from the {{ALttP|-}} Gamebook | |||
</gallery> | </gallery> | ||
| Line 127: | Line 139: | ||
* {{Term|Series|Big Moldorm|link}} | * {{Term|Series|Big Moldorm|link}} | ||
* {{Term|Series|The Lady's Pets|link}} | * {{Term|Series|The Lady's Pets|link}} | ||
* {{Term|Series|Mini Moldorm|link}} | * {{Term|Series|Mini-Moldorm|link}} | ||
* {{Term|Series|Moldorm|link}} | * {{Term|Series|Moldorm|link}} | ||
* {{Term|Series|Puppet Ganon|link}} | * {{Term|Series|Puppet Ganon|link}} | ||
* {{Term|Series|Purple Moldorm|link}} | |||
{{Ref}} | {{Ref}} | ||
{{Bosses|ALttP}} | {{Bosses|ALttP}} | ||
{{Categories | {{Categories | ||
|bosses= ALttP, LA, LADX, LANS, ALBW, TFH, AST, | |Moldorms, Nightmares, Spider Enemies, Worm-Like Enemies | ||
|bosses= ALttP, LA, LADX, LANS, ALBW, TFH, BSTLoZ, AST | |||
|sub-bosses= ALttP | |||
|characters= ALttP (Ishinomori), LA (Cagiva), ALttP (Cagiva), FS (Himekawa) | |||
}} | }} | ||
Revision as of 02:46, 23 January 2024
Moldorms are recurring Bosses and Sub-Bosses in The Legend of Zelda series.(ALttP | LA | LADX | ALBW | TFH | ALttP (Ishinomori))[1][2][name references needed] Moldorms go unnamed in A Link to the Past 4-koma Gag Battle. They are a much larger version of the common Moldorm.
Characteristics
A Link to the Past
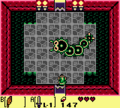
Moldorms made their first appearance as a boss in A Link to the Past. It first appears at the very top of the Tower of Hera and is an infamous boss battle, due to the fact that Link may have to face it many times before he can finally defeat it. The battlefield is unique in the game in that it has no boundaries, meaning that the boss can send Link to lower floors if he is unluckily pushed from the edge by the foe. The Moldorm will actively charge at Link, and has a springy, bouncy body similar to a Hardhat Beetle or a Bumper. Striking it with his sword or getting hit will send Link flying. If Link falls to the lower floor, the entire boss battle will restart; as the boss recover to full health when Link returns.
To harm the monster, he must strike its vulnerable tail; the very tip has a twirling red weak point that causes damage to the monster when struck. The monster requires just six hits with Link's Fighter's Sword to destroy, but its erratic movement makes this extremely difficult. Not only that, but when the monster is close to defeat, it will speed up dramatically, making avoiding and striking the monster more a matter of luck than judgment. While falling from the battle will not harm Link, taking hits from the monster will. The floor below contains a large number of jars that hold Hearts, so Link can continue his attempt to destroy Moldorm over and over until he finally succeeds and obtains the Pendant of Wisdom.
The Moldorm makes a reappearance in Ganon's Tower as a Sub-Boss, only the battlefield is shaped differently, making it harder to defeat; the floor below contains spikes that Link might fall on to as well. However, if Link has the Golden Sword, he can kill this Moldorm in just two hits.
Link's Awakening
In Link's Awakening, Moldorm appears as the first of the Nightmares that Link must face in his quest to wake the Wind Fish, and resides in the Tail Cave with many Mini-Moldorms and guards the Full Moon Cello. Unlike its previous appearance, it has large mandibles and is able to speak, albeit between loud buzzing.[3] As one of the Nightmares, its desire is to destroy the outsider, Link. Like its previous appearance, it tries to drive Link off the platform the battle takes place upon. The arena is much smaller than before, and Link has no easy way to heal himself if he takes damage; not only that, but with only three Heart Containers, Link will be defeated in only three hits. The Moldorm will take less hits than before, but will charge wildly around after being hit with the sword, before slowing down again (unless it's the final hit, where he will continue to move extremely fast until defeated). The best method to defeat the monster is to use the Whirling Blade Technique. Only two strikes from this move will defeat the monster.
A Link Between Worlds

Moldorm returns as the Boss of the Tower of Hera, but guards the Pendant of Power instead of the Pendant of Wisdom. It is fought in the same manner as in A Link to the Past, except that it does not regain its health if Link is knocked off the platform. Moldorm's only attack is to glide around the area in an attempt to bump Link off the platform to the floor below, where a series of Blade Traps guard several recovery Hearts.
The Moldorm is fought as the final enemy in the Treacherous Tower's Beginner level. It is fought in the same manner as in its Dungeon battle, however, falling off the platforms will cause Link to lose health.
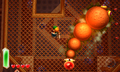
Tri Force Heroes
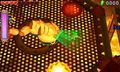
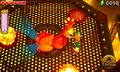
In Tri Force Heroes, Moldorm appears as the boss of the Fire Temple Level. In a first for the series, this giant Moldorm appears to be mechanical in nature rather than organic—including with bright, colored headlights for eyes and sounding as though it runs on treads. It is fought in a caged enclosure suspended over a pit of lava. Like its other incarnations, it crawls around the area while making sharp turns. Moldorm's eyes will emit green, red, or blue light, and it will pursue the Link whose tunic matches the current color of its eyes. If this Link is hit, Moldorm's will briefly retract its segments and it will follow a differently colored Link. Three lava pillars beneath the platform will also periodically rise through the red, circular grates that appear on the floor of the platform. They will harm any of the Links who come in contact with them.
The Links must avoid both Moldorm and the pillars of lava while aiming for the creature’s glowing tail and striking it with the Sword. The Link who matches the color of its glowing eyes can lure the Moldorm away, while the other Links aim for its tail. After being struck, its tail will be temporarily encased in a protective shell and it will start to move faster. Eventually Moldorm's tail will glow a bright red and is held higher up, requiring that two of the Links form a Totem in order to reach and strike it. Eventually after taking enough hits, Moldorm will go haywire and quickly move about erratically in its enclosure, raising its tail even higher. The Links must then form a Totem of three to strike its tail; this blow will finish the monster off.
Other Appearances
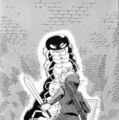
A Link to the Past (Ishinomori)
.png)
In the A Link to the Past comic by Shotaro Ishinomori, the Moldorm Link fights in the Tower of Hera appears as a giant spider as opposed to the centipede-like monster fought in the game. When the monster's illusion appears in Ganon's Tower, it is still called a Moldorm.[4]
The Moldorm first appears in Chapter 4, where it ambushes the young hero from above. Link strikes it in one of its eyes with his blade, and upon being told that the Pendant of Wisdom is inside the beast's Eye, Link reaches for it and takes it, restoring his cursed arm.[5] Now with all the Pendants of Virtue in his hand, the monster tumbles defeated to the bottom of the tower and breaks Link's fall as it hits the ground.
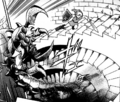
Link's Awakening (Cagiva)
In the Link's Awakening manga by Ataru Cagiva, Link fights Moldorm at the end of Tail Cave. After failing to damage its tough body with his Sword, Link is tackled off the platform, saving himself by stabbing his Sword on the edge. After pulling himself back up, Link uses a Spin Attack on Moldorm's tail to defeat it, revealing the chamber with the Full Moon Cello.
BS The Legend of Zelda
Ancient Stone Tablets
Four Swords (Himekawa)
A Link to the Past (Himekawa)
The Moldorm briefly appears in the A Link to the Past manga by Akira Himekawa as well, this time in a much more accurate depiction. Link is shown fighting off the giant centipede as he runs up the Tower of Hera. He manages to slice through one of its pincers and continue his dash up the winding stairway to the Pendant of Wisdom, hanging from the hand of an elegant statue at the very top. Upon collecting the final Pendant, he is mysteriously warped to the Lost Woods.
A Link to the Past 4-koma Gag Battle
Nomenclature
| Language | Names | Meanings |
|---|---|---|
Japanese | デグテール (Degu Tēru) (ALttP | LA | TFH)[8][9][10] | Degutail |
FrenchCA | Moldorm (TFH) | |
FrenchEU | Gigantehl (TFH)[12] | |
German | Moldorm (LANS | TFH)[11] | |
Italian |
| |
Korean | 거대꼬리리 (Geodaekkolili) (TFH)[13] | Giant Tail |
SpanishLA | Moldorm (TFH) | |
SpanishEU | Degutail (TFH)[14] | |
| This table was generated using translation pages. To request an addition, please contact a staff member with a reference. | ||
Gallery
-
Link fighting Moldorm from Link's Awakening DX
-
A damaged Moldorm from A Link Between Worlds
-
The Links battling Moldorm from Tri Force Heroes
-
The Links battling Moldorm in its final phase from Tri Force Heroes
-

Artwork of Moldorm from A Link to the Past (Barcode Battler II)
-

Moldorm from BS The Legend of Zelda
-
Link fighting Moldorm from the Link's Awakening manga by Ataru Cagiva
-
Moldorm from A Link to the Past (Caviga)
-
Moldorm from the A Link to the Past manga by Akira Himekawa
-
Moldorm chasing Link in his rabbit form from the A Link to the Past Gamebook


_Moldorm_Artwork.png)
_Moldorm.jpg)
_Moldorm_Artwork.jpg)


See Also
References
- ↑ Encyclopedia, Dark Horse Books, pg. 193 (ALttP | LADX | FSA | ALBW | TFH)
- ↑ "The Lanmola? The Moldorm? They can't be real! I defeated them all!" — Link (A Link to the Past manga, VIZ Media, pg. 11)
- ↑ "BUZZZZZ! BUZZZZ! OUTZZZIDER!" — Moldorm (Link's Awakening DX)
- ↑ "It--It's Agahnim! It can't be! I destroyed him! [...] The Lanmola?! The Moldorm?! They can't be real! I defeated them all!" (A Link to the Past manga, VIZ Media, pg. 11)
- ↑ "Link... The pendant is the third eye..." (A Link to the Past manga, VIZ Media, pg. 12)
- ↑ Enciclopedia di Hyrule, Magazzini Salani, pg. 193
- ↑ "Gran Shippo" — N/A (Tri Force Heroes)
- ↑ Nintendo Official Guidebook: The Legend of Zelda: A Link to the Past Vol. 1, Shogakukan, pg. 132
- ↑ The Legend of Zelda: Link's Awakening Certain Victory Strategy Guide (1993), Futabasha, pg. 24
- ↑ "デグテール" — N/A (Tri Force Heroes)
- ↑ "Moldorm" — N/A (Tri Force Heroes)
- ↑ "Gigantehl" — N/A (Tri Force Heroes)
- ↑ "거대꼬리리" — N/A (Tri Force Heroes)
- ↑ "Degutail" — N/A (Tri Force Heroes)
Mazura • Jermafenser • Rebonack • Carock • Gooma • Barba • Thunderbird • Link's Shadow
Ball and Chain Trooper • Armos Knights • Lanmolas • Moldorm • Agahnim
Helmasaur King • Arrghus • Mothula • Blind the Thief • Kholdstare • Vitreous • Trinexx • Ganon
Moldorm • Genie • Slime Eye • Angler Fish • Slime Eel • Facade • Evil Eagle • Hot Head • Shadow Nightmares
Spike Roller • Moblin Chief • Hinox • Dodongo Snakes • Lanmola • Hydrosoar
Master Stalfos • Gohma • Armos Knight • Rover • Grim Creeper • Turtle Rock • Blaino
Gohma • King Dodongo • Barinade • Phantom Ganon • Volvagia • Morpha • Bongo Bongo • Twinrova • Ganon
Lizalfos • Big Octo • Stalfos • Meg • Flare Dancer • White Wolfos • Dark Link • Dead Hand • Gerudo Thief • Iron Knuckle
Odolwa • Goht • Gyorg • Twinmold • Majora's Mask
Dinolfos • Gekko • Wizzrobe • Gerudo Pirate • Wart • Gekko and Mad Jelly
Captain Keeta • Iron Knuckle • Sharp • Igos du Ikana • Garo Master • Gomess • Eyegore
Aquamentus • Dodongo • Mothula • Gohma • Digdogger • Manhandla • Gleeok • Medusa Head • General Onox
Twinrova • Ganon
Brother Goriyas • Facade • Omuai • Agunima • Great Moblin • Syger • Vire • Poe Sisters • Frypolar
Pumpkin Head • Head Thwomp • Shadow Hag • Eyesoar • Smog • Octogon • Possessed Nayru • Plasmarine • Ramrock • Veran
Twinrova • Ganon
Giant Ghini • Swoop • Subterror • Armos Warrior • Great Moblin • Smasher • Vire • Angler Fish • Blue Stalfos
Gohma • Kalle Demos • Gohdan • Helmaroc King • Jalhalla • Molgera • Puppet Ganon • Ganondorf
Mothula • Darknut • Phantom Ganon • Stalfos • Wizzrobe • Mighty Darknut • Big Octo![]()
Phantom Ganon • Stone Arrghus • Helmaroc King • Big Poe • Big Moldorm • Frostare • Vaati • Ganon
Chief Soldier • Shadow Link • Manhandla • Dodongos • Big Dark Stalfos • Gohma • Big Dodongo
Big Green Chuchu • Gleerok • Mazaal • Big Octorok • Gyorg Pair • Vaati
Madderpillar • Dark Nut • Big Blue Chuchu • Red Dark Nut • Black Knight
Diababa • Fyrus • Morpheel • Stallord • Blizzeta • Armogohma • Argorok • Zant • Puppet Zelda • Ganon
Ook • King Bulblin • Dangoro • Twilit Carrier Kargarok • Twilit Bloat
Deku Toad • Death Sword • Darkhammer • Darknut • Aeralfos • Phantom Zant
Stagnox • Fraaz • Phytops • Cragma • Byrne • Skeldritch • Demon Train • Chancellor Cole • Malladus
Mothula • Snapper • Heatoise • Big Blin • Rocktite • Geozard Chief • Dark Link![]()
Ghirahim • Scaldera • Moldarach • The Imprisoned • Koloktos • Tentalus • Levias • Bilocyte • Demise
Stalfos • Lizalfos • Stalmaster • Moldarach • LD-002G Scervo • Dark Lizalfos • Magmanos • Moldorm • LD-003D Dreadfuse
Yuga • Moldorm • Margomill • Gemesaur King • Arrghus • Knucklemaster • Stalblind • Zaganaga • Dharkstare • Grinexx • Yuga Ganon
Armos • Red Stalfos • Heedles • Green & Red Goriyas • Gigabari • Gibdos & Purple Mini-Moldorms • Red Eyegores • Flying Tiles & Devalants • Big Pengator & Pengators • Fire Gimos • Moldorm • Lorule Ball and Chain Soldier • Arrghus
Margoma • Arrghus • Moldorm • Blizzagia • The Lady's Pets • Stalchampion • Prismantus • The Lady • Shadow Links
Electric Blob King • Electric Blob Queen • Hinox Brothers • Freezlord • Vulture Vizier • Grim Repoe • Gigaleon
Windblight Ganon • Fireblight Ganon • Thunderblight Ganon • Waterblight Ganon • Monk Maz Koshia(TCB) • Calamity Ganon • Dark Beast Ganon
Stone Talus • Stone Talus (Luminous) • Stone Talus (Rare) • Igneo Talus • Frost Talus • Igneo Talus Titan(TCB) • Molduga • Molduking(TCB) • Hinox • Blue Hinox • Black Hinox • Master Kohga
Bosses in Tears of the Kingdom
Colgera • Yunobo • Moragia • Marbled Gohma • Sludge Like • Mucktorok • Queen Gibdo • Seized Construct • Phantom Ganon • Demon King's Army • Demon King Ganondorf • Demon Dragon
- Moldorms
- Nightmares
- Spider Enemies
- Worm-Like Enemies
- Bosses
- Characters
- Sub-Bosses
- Bosses in A Link to the Past
- Sub-Bosses in A Link to the Past
- Bosses in Link's Awakening
- Bosses in Link's Awakening DX
- Bosses in Link's Awakening (Nintendo Switch)
- Bosses in A Link Between Worlds
- Bosses in Tri Force Heroes
- Characters in A Link to the Past (Ishinomori)
- Characters in Link's Awakening (Cagiva)
- Characters in A Link to the Past (Cagiva)
- Bosses in BS The Legend of Zelda
- Bosses in Ancient Stone Tablets
- Characters in Four Swords (Himekawa)