Arrghus: Difference between revisions
KrytenKoro (talk | contribs) |
m (→Gallery) |
||
| (99 intermediate revisions by 30 users not shown) | |||
| Line 1: | Line 1: | ||
{{ | {{Infobox Boss | ||
|type= | |||
| | |image= | ||
|image | {{Media | ||
|Artwork ALttP= File:ALttP Arrghus Artwork.png | |||
|Model ALBW= File:ALBW Arrghus Model.png | |||
| | |Model TFH= File:TFH Arrghus Model.png | ||
| | |Sprite ALttP= File:ALttP Arrghus Solo Sprite.png | ||
| | |||
| | |||
}} | }} | ||
|caption= | |||
|pronunciation= | |||
|plural= {{Plural|Series|Arrghus}}<ref>{{Cite Book|quote= |book= E |publisher= |page= 207}}</ref> | |||
|title= | |||
|alias= | |||
|race= | |||
|gender= | |||
|game= ALttP, ALBW, TFH | |||
|other= ALttP (Ishinomori), AST | |||
|dungeon= {{Infobox Game Blocks | |||
|ALttP= {{Term|ALttP|Swamp Palace|link}}, {{Term|ALttP|Palace of the Four Sword|link}} | |||
|ALBW= {{Term|ALBW|Swamp Palace|link}}, {{Term|ALBW|Lorule Castle|link}} | |||
|TFH= {{Term|TFH|Water Temple|link}} | |||
}} | |||
|habitat= | |||
|health= | |||
|weakness= | |||
{{Infobox Game Blocks | |||
|ALttP= {{Term|ALttP|Hookshot|link}}, {{Term|ALttP|Sword|link}} | |||
|ALBW= {{Term|ALBW|Hookshot|link}}, {{Term|ALBW|Sword|link}} | |||
|TFH= {{Term|TFH|Gripshot|link}}, {{Term|TFH|Sword|link}} | |||
}} | |||
|reward= | |||
{{Infobox Game Blocks | |||
|ALttP= {{Term|ALttP|Heart Container|link}}, {{Term|ALttP|Crystal|link}}, {{Term|ALttP|Four Sword|link}} | |||
|ALBW= {{Term|ALBW|Heart Container|link}}, {{Term|ALBW|Oren|link}} | |||
}} | |||
|exp= | |||
|theme= | |||
|strategy= | |||
|voiceactor= | |||
}} | |||
{{Term/Store|Arrghus|Arrghus|Series, ALttP, ALBW, TFH|plural}} are recurring {{Plural|Series|Boss|link}} and {{Plural|Series|Sub-Boss|link}} in {{TLoZ|Series}}.<ref>{{Cite Book|quote= |book= E |publisher= |page= 164 {{Exp Game|ALttP, ALBW, TFH}}}}</ref>{{Name Ref|AST}} {{Plural|Series|Arrghus}} go unnamed in the {{ALttP|Ishinomori}}. They are typically seen as a large, one-eyed jellyfish that are usually surrounded by miniature polyps called {{Plural|Series|Arrgi|link}}. | |||
==Characteristics== | ==Characteristics== | ||
Arrghus is | ==={{ALttP|-}}=== | ||
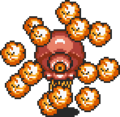
In {{ALttP}}, {{Term|ALttP|Arrghus}} is the {{Term|ALttP|Boss}} of the {{Term|ALttP|Swamp Palace|link}}, where it is the guardian of the second {{Term|ALttP|Crystal|link}}. {{Term|ALttP|Arrghus}} appears densely surrounded by multiple {{Plural|ALttP|Arrgi}}. These {{Plural|ALttP|Arrgi}} and the creature's ability to float make it invulnerable to normal attacks. Its method of attack is to send the {{Plural|ALttP|Arrgi}} swirling outwards. The {{Plural|ALttP|Arrgi}} must be pulled away using the {{Term|ALttP|Hookshot|link}} and then defeated with the {{Term|ALttP|Sword|link}}. When all of the {{Plural|ALttP|Arrgi}} are gone, {{Term|ALttP|Arrghus}} launches itself into the air and attempts to crash straight down upon {{Term|ALttP|Link|link}}, then speeds across the shallow water of the room. It will also shoot needle-thin lasers at the ground, which will create huge explosions, throwing columns of water into the air. In this state, it is unprotected and can be attacked with {{Term|ALttP|Link}}'s {{Term|ALttP|Sword}} or other weapons. After each hit, it attempts to crush {{Term|ALttP|Link}} from above again, or shoots more lasers at him. After its destruction, it leaves behind a {{Term|ALttP|Heart Container|link}} and {{Term|ALttP|Link}} is presented with the second {{Term|ALttP|Crystal}} in which one of the {{Plural|ALttP|Maiden|link|display=Seven Maidens}} is imprisoned. | |||
In {{ALttP&FS}}, an orange {{Term|ALttP|Arrghus}} is the guardian of the green {{Term|ALttP|Four Sword|link}} shard in the {{Term|ALttP|Palace of the Four Sword|link}}. Instead of {{Plural|ALttP|Arrgi}}, {{Term|ALttP|Arrghus}} is surrounded {{Plural|ALttP|Bari|link}}, which will sometimes shock {{Term|ALttP|Link}} when he pulls them away from their host. This {{Term|ALttP|Arrghus}} is also stronger and faster. Once the {{Plural|ALttP|Bari}} are removed, it is able to both change direction while skating around, as well as summon swarms of {{Plural|ALttP|Kyameron|link}}. | |||
==={{ALBW|-}}=== | |||
In {{ALBW}}, an {{Term|ALBW|Arrghus}} is the {{Term|ALBW|Boss}} of the {{Term|ALBW|Swamp Palace|link}}, where it protects the {{Term|ALBW|Painting|link}} of the {{Term|ALBW|Sage|link}} {{Term|ALBW|Oren|link}}. {{Term|ALBW|Arrghus}} is fought much the same way as in {{ALttP|-}}, as {{Term|ALBW|Link}} must pull off the {{Plural|ALBW|Arrgi}} from its body using the {{Term|ALBW|Hookshot}} and defeat them one-by-one. As before, {{Term|ALBW|Arrghus}} will also occasionally send the {{Plural|ALBW|Arrgi}} diving down towards {{Term|ALBW|Link}} in attack. After defeating all the {{Plural|ALBW|Arrgi}}, {{Term|ALBW|Arrghus}}'s eye will open and it will attempt to crash down onto {{Term|ALBW|Link}}, as well as attempt to shoot streams of laser beams that boil the water beneath {{Term|ALBW|Link}}. It can be attacked by any weapon when it lands. After it is defeated, it will leave behind a {{Term|ALBW|Heart Container}} as well as the {{Term|ALBW|Portrait}} holding {{Term|ALBW|Oren}}. | |||
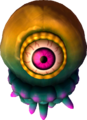
Another {{Term|ALBW|Arrghus}}, colored yellow and blue, appears as a {{Term|ALBW|Sub-Boss}} in {{Term|ALBW|Lorule Castle|link}}. | |||
==={{TFH|-}}=== | |||
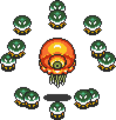
{{ | In {{TFH}}, {{Term|TFH|Arrghus}} appears as the {{Term|TFH|Boss}} of the {{Term|TFH|Water Temple|link}} [[Levels in Tri Force Heroes|Level]]. It appears as a watery, blue jellyfish surrounded by eyeballs protected in water barriers. When the {{Plural|TFH|Links|link}} arrive, eight eyeballs will emerge from the pool in the center of the room. These eyes will attempt to dive at the {{Plural|TFH|Links}}, and will alternate between submerging and surfacing. The submerged eyeballs can be resurfaced with a blast of water from the {{Term|TFH|Water Rod|link}}, which will also stun them. They can also be stunned with the {{Term|TFH|Water Rod}} while diving towards the {{Plural|TFH|Links}}. The surface eyes can be pulled apart with the {{Term|TFH|Gripshot|link}}. Once stunned or pulled away, they can be attacked with the {{Term|TFH|Sword|link}} before trying to reunite with their group. Once all the eyes are defeated, the pool will drain as {{Term|TFH|Arrghus}} reveals itself. | ||
{{Term|TFH|Arrghus}} will float around the room while releasing several of its red eyes at the {{Plural|TFH|Links}} at once. As it is floating too high for the {{Plural|TFH|Links}} to pull off its eyes from the floor, the {{Plural|TFH|Links}} must raise themselves either by using the {{Term|TFH|Water Rod}}'s water pillars or by forming a {{Term|TFH|Totem|link}}, although the {{Term|TFH|Water Rod}} is recommended as it is much faster. The eyes can either be pulled off {{Term|TFH|Arrghus}} with the {{Term|TFH|Gripshot}} or, when they are sent out to attack the {{Plural|TFH|Links}}, stunned briefly with the {{Term|TFH|Water Rod}}. Once all of its eyes are defeated, {{Term|TFH|Arrghus}} will open its real eye and commence its attack by firing blasts of ink around it. If any of the {{Plural|TFH|Links}} are caught in its attack, they will be covered in ink and will be temporarily unable to use their {{Term|TFH|Item}}. The {{Plural|TFH|Links}} must fight it by creating pillars of water with the {{Term|TFH|Water Rod}}, then aim the {{Term|TFH|Gripshot}} at its eye when it is open. This will stun {{Term|TFH|Arrghus}} and allow the {{Plural|TFH|Links}} to strike back with their {{Plural|TFH|Sword}}. After taking enough damage, {{Term|TFH|Arrghus}} will be defeated. | |||
=== | ==Other Appearances== | ||
==={{ALttP|-}} (Ishinomori)=== | |||
Arrghus | {{Noncanon|Start}} | ||
A creature resembling Arrghus is featured in Chapter 9 of the {{ALttP|Ishinomori}}. Fought in the Swamp Palace similarly to the game, the monster is shown as a bright red jellyfish that attacks with tentacles, but no eyeballs are shown. In the comic, as Link makes his way to the imprisoned Maiden, a large, tentacled monster attacks him. He thrusts the [[Master Sword]] into the monster and defeats the creature, which spits out Link from inside and gives him a chance to destroy the floating Crystal where the Maiden is imprisoned. | |||
{{Noncanon|End}} | |||
= | ==={{AST|-}}=== | ||
{{ | {{Noncanon|Start}} | ||
{{Stub|AST}} | |||
{{ | |||
== | {{Noncanon|End}} | ||
==Nomenclature== | |||
The name Arrghus may be a reference to {{Wp|Argus Panoptes}}, an all-seeing, hundred-eyed giant from Greek mythology. | |||
Its Japanese name, {{Romanize|ワート|Wāto}}, translated as Wart, may be in reference to the growths or lumps of creatures that characteristically covers it. It shares this name with {{Term|Series|Wart|link}}. | |||
{{Nomenclature}} | |||
==Gallery== | ==Gallery== | ||
<gallery> | <gallery> | ||
File: | File:ALttP Arrghus Sprite.png|{{Term|ALttP|Arrghus}} from {{ALttP|-}} | ||
File: | File:ALttP Orange Arrghus Sprite.png|The orange {{Term|ALttP|Arrghus}} from the Game Boy Advance version of {{ALttP|-}} | ||
File: | File:ALttP Orange Arrghus Sprite 2.png|The orange {{Term|ALttP|Arrghus}} surrounded by {{Plural|ALttP|Bari}} from the Game Boy Advance version of {{ALttP|-}} | ||
File: | File:ALBW Arrghus Phase2 Model.png|The second phase of the {{Term|ALBW|Swamp Palace}} {{Term|ALBW|Arrghus}} from {{ALBW|-}} | ||
File: | File:ALBW Arrghus Model 2.png|The {{Term|ALBW|Lorule Castle}} {{Term|ALBW|Arrghus}} from {{ALBW|-}} | ||
File:Arrghus ( | File:ALBW Arrghus LC Phase2 Model.png|The second phase of the {{Term|ALBW|Lorule Castle}} {{Term|ALBW|Arrghus}} from {{ALBW|-}} | ||
File: | File:TFH Ending Artwork 6.jpg|Artwork of the {{Plural|TFH|Links}} fighting {{Term|TFH|Arrghus}} from {{TFH|-}} | ||
File:TFH Arrghus Battle.png|The {{Plural|TFH|Links}} battling {{Term|TFH|Arrghus}} (first phase) in {{TFH|-}} | |||
File:TFH Arrghus Battle 2.png|The {{Plural|TFH|Links}} battling {{Term|TFH|Arrghus}} (second phase) in {{TFH|-}} | |||
File:TFH Arrghus Battle 3.png|The {{Plural|TFH|Links}} battling {{Term|TFH|Arrghus}} (third phase) in {{TFH|-}} | |||
File:Arrghus (comic).png|Arrghus from the {{ALttP|-}} comic | |||
</gallery> | </gallery> | ||
==See Also== | ==See Also== | ||
* | * {{Term|Series|Arrgi|link}} | ||
* | * {{Term|Series|Barinade|link}} | ||
* {{Term|Series|Stone Arrghus|link}} | |||
* {{Term|Series|Vitreous|link}} | |||
* {{Term|Series|Wart|link}} | |||
{{ | {{Ref}} | ||
{{Bosses|ALttP}} | |||
{{Categories | |||
|Eye Enemies, Water-Related Enemies | |||
|bosses= ALttP, ALBW, TFH, ALttP (Ishinomori)<!-- Uses Series term -->, AST | |||
| | |sub-bosses= ALttP, ALBW | ||
| | |||
| | |||
}} | }} | ||
Latest revision as of 09:49, 21 April 2024
Arrghus are recurring Bosses and Sub-Bosses in The Legend of Zelda series.[2][name references needed] Arrghus go unnamed in the A Link to the Past comic by Shotaro Ishinomori. They are typically seen as a large, one-eyed jellyfish that are usually surrounded by miniature polyps called Arrgi.
Characteristics
A Link to the Past
In A Link to the Past, Arrghus is the Boss of the Swamp Palace, where it is the guardian of the second Crystal. Arrghus appears densely surrounded by multiple Arrgi. These Arrgi and the creature's ability to float make it invulnerable to normal attacks. Its method of attack is to send the Arrgi swirling outwards. The Arrgi must be pulled away using the Hookshot and then defeated with the Fighter's Sword. When all of the Arrgi are gone, Arrghus launches itself into the air and attempts to crash straight down upon Link, then speeds across the shallow water of the room. It will also shoot needle-thin lasers at the ground, which will create huge explosions, throwing columns of water into the air. In this state, it is unprotected and can be attacked with Link's Fighter's Sword or other weapons. After each hit, it attempts to crush Link from above again, or shoots more lasers at him. After its destruction, it leaves behind a Heart Container and Link is presented with the second Crystal in which one of the Seven Maidens is imprisoned.
In A Link to the Past & Four Swords, an orange Arrghus is the guardian of the green Four Sword shard in the Palace of the Four Sword. Instead of Arrgi, Arrghus is surrounded Bari, which will sometimes shock Link when he pulls them away from their host. This Arrghus is also stronger and faster. Once the Bari are removed, it is able to both change direction while skating around, as well as summon swarms of Kyamerons.
A Link Between Worlds
In A Link Between Worlds, an Arrghus is the Boss of the Swamp Palace, where it protects the Painting of the Sage Oren. Arrghus is fought much the same way as in A Link to the Past, as Link must pull off the Arrgi from its body using the Hookshot and defeat them one-by-one. As before, Arrghus will also occasionally send the Arrgi diving down towards Link in attack. After defeating all the Arrgi, Arrghus's eye will open and it will attempt to crash down onto Link, as well as attempt to shoot streams of laser beams that boil the water beneath Link. It can be attacked by any weapon when it lands. After it is defeated, it will leave behind a Heart Container as well as the Painting holding Oren.
Another Arrghus, colored yellow and blue, appears as a Sub-Boss in Lorule Castle.
Tri Force Heroes
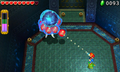
In Tri Force Heroes, Arrghus appears as the Boss of the Water Temple Level. It appears as a watery, blue jellyfish surrounded by eyeballs protected in water barriers. When the Links arrive, eight eyeballs will emerge from the pool in the center of the room. These eyes will attempt to dive at the Links, and will alternate between submerging and surfacing. The submerged eyeballs can be resurfaced with a blast of water from the Water Rod, which will also stun them. They can also be stunned with the Water Rod while diving towards the Links. The surface eyes can be pulled apart with the Gripshot. Once stunned or pulled away, they can be attacked with the Sword before trying to reunite with their group. Once all the eyes are defeated, the pool will drain as Arrghus reveals itself.
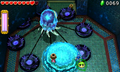
Arrghus will float around the room while releasing several of its red eyes at the Links at once. As it is floating too high for the Links to pull off its eyes from the floor, the Links must raise themselves either by using the Water Rod's water pillars or by forming a Totem, although the Water Rod is recommended as it is much faster. The eyes can either be pulled off Arrghus with the Gripshot or, when they are sent out to attack the Links, stunned briefly with the Water Rod. Once all of its eyes are defeated, Arrghus will open its real eye and commence its attack by firing blasts of ink around it. If any of the Links are caught in its attack, they will be covered in ink and will be temporarily unable to use their Item. The Links must fight it by creating pillars of water with the Water Rod, then aim the Gripshot at its eye when it is open. This will stun Arrghus and allow the Links to strike back with their Swords. After taking enough damage, Arrghus will be defeated.
Other Appearances
A Link to the Past (Ishinomori)
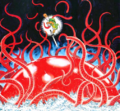
A creature resembling Arrghus is featured in Chapter 9 of the A Link to the Past comic by Shotaro Ishinomori. Fought in the Swamp Palace similarly to the game, the monster is shown as a bright red jellyfish that attacks with tentacles, but no eyeballs are shown. In the comic, as Link makes his way to the imprisoned Maiden, a large, tentacled monster attacks him. He thrusts the Master Sword into the monster and defeats the creature, which spits out Link from inside and gives him a chance to destroy the floating Crystal where the Maiden is imprisoned.
Ancient Stone Tablets
Nomenclature
The name Arrghus may be a reference to Argus Panoptes, an all-seeing, hundred-eyed giant from Greek mythology.
Its Japanese name, ワート (Wāto), translated as Wart, may be in reference to the growths or lumps of creatures that characteristically covers it. It shares this name with Wart.
| Language | Names | Meanings |
|---|---|---|
Japanese | ワート (Wāto) (ALttP | TFH)[6][7] | Wart |
FrenchCA | Méduso (TFH)[11] | |
FrenchEU | Meduso (TFH)[9] | |
German | Argus (TFH)[8] | |
Italian | Arghus (ALttP | ALBW | TFH)[3][4][5] | |
Korean | 워트 (woteu) (TFH)[10] | Wart |
SpanishLA | Arghus (TFH) | |
SpanishEU | Arghus (TFH) | |
| This table was generated using translation pages. To request an addition, please contact a staff member with a reference. | ||
Gallery
-
Arrghus from A Link to the Past
-
The orange Arrghus from the Game Boy Advance version of A Link to the Past
-

The orange Arrghus surrounded by Bari from the Game Boy Advance version of A Link to the Past
-

The second phase of the Swamp Palace Arrghus from A Link Between Worlds
-
The Lorule Castle Arrghus from A Link Between Worlds
-

The second phase of the Lorule Castle Arrghus from A Link Between Worlds
-
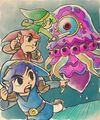
Artwork of the Links fighting Arrghus from Tri Force Heroes
-

The Links battling Arrghus (first phase) in Tri Force Heroes
-
The Links battling Arrghus (second phase) in Tri Force Heroes
-
The Links battling Arrghus (third phase) in Tri Force Heroes
-
Arrghus from the A Link to the Past comic


.png)
See Also
References
- ↑ Encyclopedia, Dark Horse Books, pg. 207
- ↑ Encyclopedia, Dark Horse Books, pg. 164 (ALttP | ALBW | TFH)
- ↑ "Arghus" — Credits (A Link to the Past, Italian localization)
- ↑ Enciclopedia di Hyrule, Magazzini Salani, pg. 164
- ↑ "Arghus" — N/A (Tri Force Heroes)
- ↑ Nintendo Official Guidebook: The Legend of Zelda: A Link to the Past Vol. 1, Shogakukan, pg. 133
- ↑ "ワート" — N/A (Tri Force Heroes)
- ↑ "Argus" — N/A (Tri Force Heroes)
- ↑ "Meduso" — N/A (Tri Force Heroes)
- ↑ "워트" — N/A (Tri Force Heroes)
- ↑ "Méduso" — N/A (Tri Force Heroes)
Mazura • Jermafenser • Rebonack • Carock • Gooma • Barba • Thunderbird • Link's Shadow
Ball and Chain Trooper • Armos Knights • Lanmolas • Moldorm • Agahnim
Helmasaur King • Arrghus • Mothula • Blind the Thief • Kholdstare • Vitreous • Trinexx • Ganon
Moldorm • Genie • Slime Eye • Angler Fish • Slime Eel • Facade • Evil Eagle • Hot Head • Shadow Nightmares
Spike Roller • Moblin Chief • Hinox • Dodongo Snakes • Lanmola • Hydrosoar
Master Stalfos • Gohma • Armos Knight • Rover • Grim Creeper • Turtle Rock • Blaino
Gohma • King Dodongo • Barinade • Phantom Ganon • Volvagia • Morpha • Bongo Bongo • Twinrova • Ganon
Lizalfos • Big Octo • Stalfos • Meg • Flare Dancer • White Wolfos • Dark Link • Dead Hand • Gerudo Thief • Iron Knuckle
Odolwa • Goht • Gyorg • Twinmold • Majora's Mask
Dinolfos • Gekko • Wizzrobe • Gerudo Pirate • Wart • Gekko and Mad Jelly
Captain Keeta • Iron Knuckle • Sharp • Igos du Ikana • Garo Master • Gomess • Eyegore
Aquamentus • Dodongo • Mothula • Gohma • Digdogger • Manhandla • Gleeok • Medusa Head • General Onox
Twinrova • Ganon
Brother Goriyas • Facade • Omuai • Agunima • Great Moblin • Syger • Vire • Poe Sisters • Frypolar
Pumpkin Head • Head Thwomp • Shadow Hag • Eyesoar • Smog • Octogon • Possessed Nayru • Plasmarine • Ramrock • Veran
Twinrova • Ganon
Giant Ghini • Swoop • Subterror • Armos Warrior • Great Moblin • Smasher • Vire • Angler Fish • Blue Stalfos
Gohma • Kalle Demos • Gohdan • Helmaroc King • Jalhalla • Molgera • Puppet Ganon • Ganondorf
Mothula • Darknut • Phantom Ganon • Stalfos • Wizzrobe • Mighty Darknut • Big Octo![]()
Phantom Ganon • Stone Arrghus • Helmaroc King • Big Poe • Big Moldorm • Frostare • Vaati • Ganon
Chief Soldier • Shadow Link • Manhandla • Dodongos • Big Dark Stalfos • Gohma • Big Dodongo
Big Green Chuchu • Gleerok • Mazaal • Big Octorok • Gyorg Pair • Vaati
Madderpillar • Dark Nut • Big Blue Chuchu • Red Dark Nut • Black Knight
Diababa • Fyrus • Morpheel • Stallord • Blizzeta • Armogohma • Argorok • Zant • Puppet Zelda • Ganon
Ook • King Bulblin • Dangoro • Twilit Carrier Kargarok • Twilit Bloat
Deku Toad • Death Sword • Darkhammer • Darknut • Aeralfos • Phantom Zant
Stagnox • Fraaz • Phytops • Cragma • Byrne • Skeldritch • Demon Train • Chancellor Cole • Malladus
Mothula • Snapper • Heatoise • Big Blin • Rocktite • Geozard Chief • Dark Link![]()
Ghirahim • Scaldera • Moldarach • The Imprisoned • Koloktos • Tentalus • Levias • Bilocyte • Demise
Stalfos • Lizalfos • Stalmaster • Moldarach • LD-002G Scervo • Dark Lizalfos • Magmanos • Moldorm • LD-003D Dreadfuse
Yuga • Moldorm • Margomill • Gemesaur King • Arrghus • Knucklemaster • Stalblind • Zaganaga • Dharkstare • Grinexx • Yuga Ganon
Armos • Red Stalfos • Heedles • Green & Red Goriyas • Gigabari • Gibdos & Purple Mini-Moldorms • Red Eyegores • Flying Tiles & Devalants • Big Pengator & Pengators • Fire Gimos • Moldorm • Lorule Ball and Chain Soldier • Arrghus
Margoma • Arrghus • Moldorm • Blizzagia • The Lady's Pets • Stalchampion • Prismantus • The Lady • Shadow Links
Electric Blob King • Electric Blob Queen • Hinox Brothers • Freezlord • Vulture Vizier • Grim Repoe • Gigaleon
Windblight Ganon • Fireblight Ganon • Thunderblight Ganon • Waterblight Ganon • Monk Maz Koshia(TCB) • Calamity Ganon • Dark Beast Ganon
Stone Talus • Stone Talus (Luminous) • Stone Talus (Rare) • Igneo Talus • Frost Talus • Igneo Talus Titan(TCB) • Molduga • Molduking(TCB) • Hinox • Blue Hinox • Black Hinox • Master Kohga
Bosses in Tears of the Kingdom
Colgera • Yunobo • Moragia • Marbled Gohma • Sludge Like • Mucktorok • Queen Gibdo • Seized Construct • Phantom Ganon • Demon King's Army • Demon King Ganondorf • Demon Dragon