Key Cavern: Difference between revisions
MannedTooth (talk | contribs) m (Text replacement - "Key Cavern Map.png" to "LADX Key Cavern Map.png") |
MannedTooth (talk | contribs) (welcome to hell part 2) |
||
| Line 1: | Line 1: | ||
{{Dungeon | {{Dungeon | ||
|name= Key Cavern | |name= {{Term|LADX|Key Cavern}} | ||
|image= | |image= | ||
|location= | {{Media | ||
|Screenshot LA= File:LA Key Cavern.png | |||
|Screenshot LADX= File:LADX Key Cavern.png | |||
}} | |||
|caption= | |||
|location= {{Term|LADX|Ukuku Prairie|link}} | |||
|game= {{LA}} | |game= {{LA}} | ||
|item= | |other= | ||
|mini-boss= | |item= {{Term|LADX|Pegasus Boots|link}} | ||
|boss= | |mini-boss= {{Plural|LADX|Dodongo Snake|link}} | ||
|quest= | |boss= {{Term|LADX|Slime Eye|link}} | ||
|quest= {{Term|LADX|Sea Lily's Bell|link}}<br>{{Term|LADX|Heart Container|link}} | |||
|theme music= [[File:Level 3 - Key Cavern.ogg|noicon]] | |theme music= [[File:Level 3 - Key Cavern.ogg|noicon]] | ||
}} | }} | ||
The | The {{Term/Store|Key Cavern||Series, LA, LADX}} is the third {{Term|LADX|Dungeon|link}} in {{LA}}..<ref>{{Cite Text Dump|LADX|185}}</ref> The {{Term|LADX|Dungeon}}'s entrance is behind a fence of statues resembling {{Term|LADX|Slime Eye|link}}, one of which has the {{Term|LADX|Slime Keyhole|link}}. Despite being called a cavern, this {{Term|LADX|Dungeon}} isn't set inside a cave, but more or less a bricked building. The {{Term|LADX|Slime Key|link}}, which is possessed by {{Term|LADX|Prince Richard|link}}, is required to enter. The mini-boss of this {{Term|LADX|Dungeon}} is a pair of {{Plural|LADX|odongo Snakes|link}}, which require {{Plural|LADX|Bomb|link}} to defeat them. The main tool of this {{Term|LADX|Dungeon}} is the {{Term|LADX|Pegasus Boots|link}}, which is necessary to break away blocks that cannot be bombed as well as used to aid {{Term|LADX|Link|link}} in defeating the {{Term|LADX|Boss|link}}, {{Term|LADX|Slime Eye|link}}, who guards the {{Term|LADX|Sea Lily's Bell|link}}. | ||
==Entrance to the Cavern== | ==Entrance to the Cavern== | ||
When Link enters | When {{Term|LADX|Link|link}} enters {{Term|LADX|Ukuku Prairie|link}} and heads to where {{Term|LADX|Richard's Villa|link}} is located, he passes by the {{Term|LADX|Dungeon|link}}'s entrance which is at first closed and requires the use of the {{Term|LADX|Slime Key|link}} to open. South of the entrance is {{Term|LADX|Richard's Villa}}, where {{Term|LADX|Prince Richard|link}} now resides ever since he had been kicked out of {{Term|LADX|Kanalet Castle|link}}. {{Term|LADX|Prince Richard}} has the {{Term|LADX|Slime Key}} with him but does not let {{Term|LADX|Link}} have it until he fetches all five of {{Term|LADX|Prince Richard}}'s {{Plural|LADX|Golden Leaf|link}} from {{Term|LADX|Kanalet Castle}}.<ref>{{Cite Text Dump|LADX|398}}</ref> After {{Term|LADX|Link}} hands all of them to {{Term|LADX|Prince Richard}}, he will let {{Term|LADX|Link}} into his maze of bushes and hidden pits. {{Term|LADX|Link}} would eventually make his way to an {{Term|LADX|Owl Statue|link}}, in front of which the {{Term|LADX|Slime Key}} was buried.<ref>{{Cite Text Dump|LADX|522}}</ref> {{Term|LADX|Link}} then has to use it in the {{Term|LADX|Slime Keyhole|link}} to open the entrance. To get to the entrance itself, {{Term|LADX|Link}} has to go around {{Term|LADX|Richar's Villa}} and cross a lake using the {{Term|LADX|Roc's Feather|link}}. | ||
==Themes and Navigation== | ==Themes and Navigation== | ||
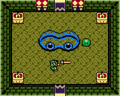
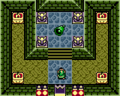
The mini- | The mini-bosses of the {{Term|LADX|Dungeon|link}} are two {{Plural|LADX|Dodongo Snake|link}}, which can be defeated by feeding them {{Plural|LADX|Bomb|link}}. Defeating these opens the way to the {{Term|LADX|Treasure Chest|link}} where the {{Term|LADX|Dungeon}}'s item, the {{Term|LADX|Pegasus Boots|link}}, are hidden. The {{Term|LADX|Pegasus Boots}} allow {{Term|LADX|Link|link}} to perform a running attack when combined with his {{Term|LADX|Sword|link}}, which is necessary for defeating the {{Term|LADX|Boss|link}} of the {{Term|LADX|Dungeon}}, {{Term|LADX|Slime Eye|link}}. This {{Term|LADX|Nightmare|link}} takes the form of a giant eyeball, which hides above {{Term|LADX|Link}} on the ceiling of the room until {{Term|LADX|Link}} runs into the wall with the {{Term|LADX|Pegasus Boots}}, making it fall to the floor.<ref>{{Cite Text Dump|LADX|272}}</ref> It then must be split into two smaller eyes using the running attack before it can be hurt by conventional weapons. | ||
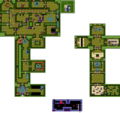
When looked on | When looked on the {{Term|LADX|Dungeon Map|link}}, the first and third floors of this dungeon form the shape of a very large key, while the second and fourth create {{Plural|LADX|Small Key|link}}. The name of this {{Term|LADX|Dungeon}} is thus named after its shape. Fittingly, there is a multitude of {{Plural|LADX|Key}} in this {{Term|LADX|Dungeon}}. There are a few rooms which require a {{Term|LADX|Key}} to enter, but yield only enemies and another {{Term|LADX|Small Key}} when explored. Also, to proceed to the top floor where the {{Term|LADX|Boss}} room is, {{Term|LADX|Link}} must collect four {{Plural|LADX|Small Key}} to open four {{Term|LADX|Key Block}} blocking the way to the staircase. This {{Term|LADX|Dungeon}} additionally appears to be themed on the {{Term|LADX|Boss}} {{Term|LADX|Slime Eye}}, as there are {{Term|LADX|Slime Eye}} statues outside and {{Plural|LADX|Zol|link}} tend to live here. The keyhole to open the {{Term|LADX|Dungeon}} is also called the '{{Term|LADX|Slime Keyhole|link}}'.<ref>{{Cite Text Dump|LADX|638}}</ref> There is also a pattern of eyes above the {{Term|LADX|Dungeon}}'s entrance, as {{Term|LADX|Slime Eye}} is a giant eyeball in its original state. There are also more than average amounts of bombable walls and {{Plural|LADX|Bombite|link}}. | ||
==Enemies and Traps== | ==Enemies and Traps== | ||
<gallery> | <gallery> | ||
File:LADX Bombite Sprite 2.png| | File:LADX Bombite Sprite 2.png|{{Term|LADX|Bombite|link}} | ||
File:LADX Bombite Sprite.png| | File:LADX Bombite Sprite.png|{{Term|LADX|Bombite|link}} | ||
File:LADX Keese Sprite.png| | File:LADX Keese Sprite.png|{{Term|LADX|Keese|link}} | ||
File:LADX Pairodd Sprite.png| | File:LADX Pairodd Sprite.png|{{Term|LADX|Pairodd|link}} | ||
File:LADX Stalfos Green Sprite.png| | File:LADX Stalfos Green Sprite.png|{{Term|LADX|Stalfos|link}} | ||
File:LADX Vacuum Mouth Sprite.gif| | File:LADX Vacuum Mouth Sprite.gif|{{Term|LADX|Vacuum Mouth|link}} | ||
File:LADX Zol Green Sprite.png| | File:LADX Zol Green Sprite.png|{{Term|LADX|Zol|link}} | ||
</gallery> | </gallery> | ||
==Trivia== | ==Trivia== | ||
*Key Cavern contains one more | *{{Term|LADX|Key Cavern}} contains one more {{Term|LADX|Key}} than it does unlockable doors. The final {{Term|LADX|Small Key}} in the {{Term|LADX|Dungeon|link}} drops from above automatically in the final room before the {{Term|LADX|Boss|link}}, when there is no use for it. If {{Term|LADX|Link|link}} has not unlocked the optional rooms in this {{Term|LADX|Dungeon}}, it can be used to unlock them, although since both of them contain {{Plural|LADX|Small Key}} themselves and have no other purpose the end result will always leave {{Term|LADX|Link}} with an extra {{Term|LADX|Small Key}}. | ||
==Nomenclature== | ==Nomenclature== | ||
| Line 72: | Line 78: | ||
==Gallery== | ==Gallery== | ||
<gallery> | <gallery> | ||
File:LADX Key Cavern Map.png| | File:LADX Key Cavern Map.png|Layout of the {{Term|LADX|Dungeon}} | ||
File:LADX Dodongo Snakes.png|Dodongo | File:LADX Dodongo Snakes.png|{{Plural|LADX|Dodongo Snake}}, the {{Term|LADX|Dungeon}}'s mini-boss | ||
File:LADX Slime Eye.png|Slime Eye | File:LADX Slime Eye.png|{{Term|LADX|Slime Eye}} | ||
File:LADX Sea Lily's Bell.png|The Sea Lily's Bell | File:LADX Sea Lily's Bell.png|The {{Term|LADX|Sea Lily's Bell}} | ||
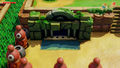
File:LANS Key Cavern.png|A room inside the Key Cavern from {{LA|NS|-}} | File:LANS Key Cavern.png|A room inside the {{Term|LADX|Key Cavern}} from {{LA|NS|-}} | ||
</gallery> | </gallery> | ||
{{Ref}} | {{Ref}} | ||
{{DungeonNav2|LA}} | {{DungeonNav2|LA}} | ||
[[Category:Caverns]] | [[Category:Caverns]] | ||
[[Category:Dungeons in Link's Awakening]] | [[Category:Dungeons in Link's Awakening]] | ||
[[Category:Dungeons in Link's Awakening DX]] | [[Category:Dungeons in Link's Awakening DX]] | ||
[[Category:Dungeons in Link's Awakening (Nintendo Switch)]] | [[Category:Dungeons in Link's Awakening (Nintendo Switch)]] | ||
Revision as of 06:57, 7 April 2019
Template:Dungeon The Key Cavern is the third Dungeon in Link's Awakening..[1] The Dungeon's entrance is behind a fence of statues resembling Slime Eye, one of which has the Slime Keyhole. Despite being called a cavern, this Dungeon isn't set inside a cave, but more or less a bricked building. The Slime Key, which is possessed by Prince Richard, is required to enter. The mini-boss of this Dungeon is a pair of odongo Snakes, which require Bombs to defeat them. The main tool of this Dungeon is the Pegasus Boots, which is necessary to break away blocks that cannot be bombed as well as used to aid Link in defeating the Boss, Slime Eye, who guards the Sea Lily's Bell.
Entrance to the Cavern
When Link enters Ukuku Prairie and heads to where Richard's Villa is located, he passes by the Dungeon's entrance which is at first closed and requires the use of the Slime Key to open. South of the entrance is Richard's Villa, where Prince Richard now resides ever since he had been kicked out of Kanalet Castle. Prince Richard has the Slime Key with him but does not let Link have it until he fetches all five of Prince Richard's Golden Leaves from Kanalet Castle.[2] After Link hands all of them to Prince Richard, he will let Link into his maze of bushes and hidden pits. Link would eventually make his way to an Owl Statue, in front of which the Slime Key was buried.[3] Link then has to use it in the Slime Keyhole to open the entrance. To get to the entrance itself, Link has to go around Richar's Villa and cross a lake using the Roc's Feather.
The mini-bosses of the Dungeon are two Dodongo Snakes, which can be defeated by feeding them Bombs. Defeating these opens the way to the Treasure Chest where the Dungeon's item, the Pegasus Boots, are hidden. The Pegasus Boots allow Link to perform a running attack when combined with his Sword, which is necessary for defeating the Boss of the Dungeon, Slime Eye. This Nightmare takes the form of a giant eyeball, which hides above Link on the ceiling of the room until Link runs into the wall with the Pegasus Boots, making it fall to the floor.[4] It then must be split into two smaller eyes using the running attack before it can be hurt by conventional weapons.
When looked on the Map, the first and third floors of this dungeon form the shape of a very large key, while the second and fourth create Small Keys. The name of this Dungeon is thus named after its shape. Fittingly, there is a multitude of Small Keys in this Dungeon. There are a few rooms which require a Small Key to enter, but yield only enemies and another Small Key when explored. Also, to proceed to the top floor where the Boss room is, Link must collect four Small Keys to open four Locked Block blocking the way to the staircase. This Dungeon additionally appears to be themed on the Boss Slime Eye, as there are Slime Eye statues outside and Zols tend to live here. The keyhole to open the Dungeon is also called the 'Slime Keyhole'.[5] There is also a pattern of eyes above the Dungeon's entrance, as Slime Eye is a giant eyeball in its original state. There are also more than average amounts of bombable walls and Bombites.
Enemies and Traps
Trivia
- Key Cavern contains one more Small Key than it does unlockable doors. The final Small Key in the Dungeon drops from above automatically in the final room before the Boss, when there is no use for it. If Link has not unlocked the optional rooms in this Dungeon, it can be used to unlock them, although since both of them contain Small Keys themselves and have no other purpose the end result will always leave Link with an extra Small Key.
Nomenclature
| Language | Name | Meaning | |
|---|---|---|---|
| Japanese | カギのあなぐら (Kagi no Anagura) | Key Cellar | |
| French | Cave aux Clés | Key Cellar | |
| German | Teufelsvilla | Devil's Mansion | |
Gallery
-
Layout of the Dungeon
-
Dodongo Snakes, the Dungeon's mini-boss
-
Slime Eye
-
The Sea Lily's Bell
-
A room inside the Key Cavern from Link's Awakening for Nintendo Switch


References
Dungeons in The Legend of Zelda
Level 1 • Level 2 • Level 3 • Level 4 • Level 5 • Level 6 • Level 7 • Level 8 • Level 9
Dungeons in The Adventure of Link
Parapa Palace • Midoro Palace • Island Palace • Maze Island Palace • Palace on the Sea • Three-Eye Rock Palace • Great Palace
Dungeons in A Link to the Past
Hyrule Castle • Castle Dungeon • Eastern Palace • Desert Palace • Tower of Hera
Palace of Darkness • Swamp Palace • Skull Woods • Thieves' Town • Ice Palace • Misery Mire • Turtle Rock • Ganon's Tower • Palace of the Four Sword![]()
Tail Cave • Bottle Grotto • Key Cavern • Angler's Tunnel • Catfish's Maw • Face Shrine • Eagle's Tower • Turtle Rock • Wind Fish's Egg
Color Dungeon (LADX | LANS) • Chamber Dungeon (LANS)
Inside the Deku Tree • Dodongo's Cavern • Inside Jabu-Jabu's Belly
Forest Temple • Fire Temple • Water Temple • Shadow Temple • Spirit Temple • Ganon's Castle
Woodfall Temple • Snowhead Temple • Great Bay Temple • Stone Tower Temple
Swamp Spider House • Pirates' Fortress • Oceanside Spider House • Beneath the Well • Ancient Castle of Ikana • Moon Dungeons
Gnarled Root Dungeon • Snake's Remains • Poison Moth's Lair • Dancing Dragon Dungeon • Unicorn's Cave • Ancient Ruins • Explorer's Crypt • Sword & Shield Maze • Onox's Castle • Room of Rites
Spirit's Grave • Wing Dungeon • Moonlit Grotto • Skull Dungeon • Crown Dungeon • Mermaid's Cave • Jabu-Jabu's Belly • Ancient Tomb • Black Tower • Room of Rites
Maku Road • Great Moblin's Keep • Ambi's Palace • Hero's Cave
Chambers of Insight • Sea of Trees • Talus Cave • Death Mountain • Vaati's Palace
Dragon Roost Cavern • Forbidden Woods • Tower of the Gods • Forsaken Fortress • Earth Temple • Wind Temple • Ganon's Castle
Fire Mountain • Ice Ring Isle • Ghost Ship • Savage Labyrinth
Stages in Four Swords Adventures
Whereabouts of the Wind
Lake Hylia • Cave of No Return • Hyrule Castle
Eastern Hyrule
The Coast • Village of the Blue Maiden • Eastern Temple
Death Mountain
Death Mountain Foothills • The Mountain Path • Tower of Flames
Near the Fields
The Field • The Swamp • Infiltration of Hyrule Castle
The Dark World
Lost Woods (Four Swords Adventures) • Kakariko Village (Four Swords Adventures) • Temple of Darkness
The Desert of Doubt
Desert of Doubt • Desert Temple • Pyramid
Frozen Hyrule
Frozen Hyrule • Temple of Ice • Tower of Winds
Realm of the Heavens • The Dark Cloud • Palace of Winds
Deepwood Shrine • Cave of Flames • Fortress of Winds • Temple of Droplets • Palace of Winds • Dark Hyrule Castle
Forest Temple • Goron Mines • Lakebed Temple • Arbiter's Grounds • Snowpeak Ruins • Temple of Time • City in the Sky • Palace of Twilight • Hyrule Castle
Lantern Caverns • Cave of Ordeals • Cave of Shadows (TPHD)
Temple of the Ocean King • Temple of Fire • Temple of Wind • Temple of Courage • Ghost Ship • Goron Temple • Temple of Ice • Mutoh's Temple
Tower of Spirits • Forest Temple • Snow Temple • Ocean Temple • Fire Temple • Sand Temple
Skyview Temple • Earth Temple • Lanayru Mining Facility • Ancient Cistern • Sandship • Fire Sanctuary • Sky Keep
Dungeons in A Link Between Worlds
Eastern Palace • Tower of Hera • House of Gales • Inside Hyrule Castle • Desert Palace
Ice Ruins • Swamp Palace • Thieves' Hideout • Dark Palace • Skull Woods • Turtle Rock • Lorule Castle
Woodlands
Deku Forest • Buzz Blob Cave • Moblin Base • Forest Temple
Riverside
Secret Fortress • Abyss of Agony • Cove of Transition • Water Temple
Volcano
Blazing Trail • Hinox Mine • Den of Flames • Fire Temple
Ice Cavern
Frozen Plateau • Snowball Ravine • Silver Shrine • Ice Temple
Fortress
Sealed Gateway • Bomb Storage • Training Ground • The Lady's Lair
The Dunes
Infinity Dunes • Stone Corridors • Gibdo Mausoleum • Desert Temple
The Ruins
Illusory Mansion • Palace Noir • Lone Labyrinth • Grim Temple
Sky Realm
Floating Garden • Deception Castle • Dragon Citadel • Sky Temple
Forest Zone • Flooded Zone • Scorching Zone • Frozen Zone • Fortified Zone • Desert Zone • Shadow Zone • Baneful Zone
Dungeons in Breath of the Wild
Divine Beast Vah Ruta • Divine Beast Vah Rudania • Divine Beast Vah Medoh • Divine Beast Vah Naboris • Hyrule Castle
Sword Monk's Shrine (TMT) • Final Trial (TCB)
Akh Va'quot • Bareeda Naag • Bosh Kala • Chaas Qeta • Daag Chokah • Dagah Keek • Dah Kaso • Dah Hesho • Daka Tuss • Dako Tah • Daqa Koh • Daqo Chisay • Dila Maag • Dow Na'eh • Dunba Taag • Gee Ha'rah • Goma Asaagh • Gorae Torr • Ha Dahamar • Hawa Koth • Hia Miu • Hila Rao • Ishto Soh • Ja Baij • Jee Noh • Jitan Sa'mi • Joloo Nah • Ka'o Makagh • Kaam Ya'tak • Kah Mael Shrine • Kah Okeo Shrine • Kah Yah Shrine • Kam Urog Shrine • Katah Chuki • Katosa Aug • Kay Noh • Kaya Wan • Kayra Mah • Ke'nai Shakah • Keeha Yoog • Keh Namut • Kema Kosassa • Kema Zoos • Keo Ruug • Ketoh Wawai • Korgu Chideh • Korsh O'hu • Kuh Takkar • Kuhn Sidajj • Lakna Rokee • Lanno Kooh • Maag Halan • Maag No'rah • Maka Rah • Mezza Lo • Mijah Rokee • Mirro Shaz • Misae Suma • Mo'a Keet • Mogg Latan • Monya Toma • Mozo Shenno • Muwo Jeem • Myahm Agana • Namika Ozz • Ne'ez Yohma • Noya Neha • Oman Au • Owa Daim • Pumaag Nitae • Qua Raym • Qaza Tokki • Qukah Nata • Raqa Zunzo • Ree Dahee • Rin Oyaa • Ritaag Zumo • Rok Uwog • Rona Kachta • Rota Ooh • Rucco Maag • Saas Ko'sah • Sah Dahaj • Sasa Kai • Sha Gehma • Sha Warvo • Shada Naw • Shae Katha • Shae Loya • Shae Mo'sah • Shai Utoh • Shai Yota • Shee Vaneer • Shee Venath • Sheem Dagoze • Sheh Rata • Sho Dantu • Shoda Sah • Shoqa Tatone • Shora Hah • Soh Kofi • Suma Sahma • Ta'loh Naeg • Tah Muhl • Tahno O'ah • Tawa Jinn • Tena Ko'sah • Tho Kayu • To Quomo • Toh Yahsa • Toto Sah • Tu Ka'loh • Tutsuwa Nima • Voo Lota • Wahgo Katta • Ya Naga • Yah Rin • Zalta Wa • Ze Kasho • Zuna Kai
Etsu Korima • Kamia Omuna • Kee Dafunia • Keive Tala • Kiah Toza • Kihiro Moh • Mah Eliya • Noe Rajee • Rinu Honika • Rohta Chigah • Ruvo Korbah • Sato Koda • Sharo Lun • Shira Gomar • Takama Shiri • Yowaka Ita
Dungeons in Tears of the Kingdom
Wind Temple • Fire Temple • Water Temple • Lightning Temple • Hyrule Castle • Spirit Temple • Beneath Hyrule Castle
Anedamimik • Apogek • Bamitok • Chichim • Domizuin • Ekochiu • En-oma • Eshos • Eutoum • Ga-ahisas • Ganos • Gasas • Gatakis • Gatanisis • Gemimik • Gikaku • Gutanbac • Igashuk • Igoshon • Ihen-a • Ijo-o • Ikatak • In-isa • Irasak • Ishodag • Ishokin • Isisim • Iun-orok • Jikais • Jinodok • Jiosin • Jiotak • Jirutagumac • Jiukoum • Jochi-ihiga • Jochi-iu • Jochisiu • Jogou • Jojon • Joju-u-u • Joku-u • Joku-usin • Joniu • Jonsau • Josiu • Kadaunar • Kahatanaum • Kamatukis • Kamizun • Karahatag • Kikakin • Kimayat • Kisinona • Kitawak • Kiuyoyou • Kudanisar • Kumamayn • Kurakat • Kyokugon • Kyononis • Makasura • Makurukis • Maoikes • Marakuguc • Marari-in • Mayachideg • Mayachin • Mayahisik • Mayak • Mayam • Mayamats • Mayanas • Mayaotaki • Mayasiar • Mayatat • Mayaumekis • Mayausiy • Minetak • Miryotanog • Mogawak • Mogisari • Momosik • Morok • Moshapin • Motsusis • Musanokir • Nachoyah • Natak • Ninjis • Nouda • O-ogim • Orochium • Oromuwak • Oshozan-u • Otak • Otutsum • Pupunke • Rakakudaj • Rakashog • Rasitakiwak • Rasiwak • Ren-iz • Riogok • Rotsumamu • Runakit • Rutafu-um • Sahirow • Sakunbomar • Sepapa • Serutabomac • Sibajitak • Sifumim • Sihajog • Sikukuu • Simosiwak • Sinakawak • Sinatanika • Sisuran • Sitsum • Siwakama • Sonapan • Soryotanog • Suariwak • Susub • Susuyai • Tadarok • Tajikats • Taki-ihaban • Taninoud • Taunhiy • Tauyosipun • Tenbez • Teniten • Tenmaten • Timawak • Tokiy • Tsutsu-um • Tukarok • Turakamik • Turakawak • Ukoojisi • Ukouh • Usazum • Utojis • Utsushok • Wao-os • Yamiyo • Yansamin • Yomizuk • Zakusu • Zanmik
Dungeons in Freshly-Picked Tingle's Rosy Rupeeland
Hero's Shrine • Pirate Hideaway • Deku Temple • Insect Cavern • Desma's Labyrinth
Stages in Link's Crossbow Training
Level 1
Ordon Target Practice • Gerudo Stalfos: Defender • Arbiter's Grounds: Ranger
Level 2
Goron Target Practice • Zora River: Defender • Skull Shooting
Level 3
Kakariko Target Practice • Fruit Balloons • The Great Bridge: Defender
Level 4
Zora River Target Practice • Hyrule Castle: Defender • Skulltula Woods: Ranger
Level 5
Oocca Target Practice • Gerudo Moldorm: Defender • The Shootout
Level 6
Ordon Target Practice 2 • Bridge of Eldin: Defender • Snowpeak Ruins: Ranger
Level 7
Underground Target Practice • City in the Sky: Defender • Temple of Time: Ranger
Level 8
Horseback Target Practice • Snowpeak Ruins: Defender • Darknut Battle
Ranch Target Practice • Sacred Grove: Defender • Fossil Stallord Battle
Hyrule Field • Eldin Caves • Faron Woods • Valley of Seers • Death Mountain • Lake Hylia • Twilight Field • Palace of Twilight • Skyloft • Sealed Grounds • Temple of the Sacred Sword • Temple of Souls • Gerudo Desert • Ganon's Tower • Forsaken Fortress • Wind and Earth Temples
Frozen Grotto • Gerudo Ruins • Lost Swamp • Temple of Storms • Hyrule Castle • Future World