Bottle Grotto: Difference between revisions
MannedTooth (talk | contribs) m (Text replacement - "LADX Genie.png" to "LADX Link Battling Genie.png") |
m (→Gallery) |
||
| (33 intermediate revisions by 9 users not shown) | |||
| Line 1: | Line 1: | ||
{{Dungeon | {{Infobox Dungeon | ||
| | |image= | ||
| | {{Media | ||
|Screenshot LA= File:LA Bottle Grotto.png | |||
|Screenshot LADX= File:LADX Bottle Grotto.png | |||
|Screenshot LANS= File:LANS Bottle Grotto.png | |||
| | |||
}} | }} | ||
|caption= | |||
' | |location= {{Term|LADX|Goponga Swamp|link}} | ||
|game= LA | |||
|other= LA (Cagiva) | |||
|item= {{Term|LADX|Power Bracelet|link}} | |||
|mini-boss= {{Term|LADX|Hinox|link}} | |||
|boss= {{Term|LADX|Genie|link}} | |||
|quest= {{List|{{Term|LADX|Conch Horn|link}}, {{Term|LADX|Heart Container|link}}}} | |||
|theme= | |||
|strategy= {{StrategyWiki|The Legend of Zelda: Link's Awakening/Bottle Grotto|Bottle Grotto}} | |||
}} | |||
{{Term/Store|Bottle Grotto||Series, LA, LADX}} is the second {{Term|LADX|Dungeon|link}} in {{LA}}.<ref>{{Cite Book|quote= |book= E |publisher= |page= 148}}</ref> It is the resting place of the {{Term|LADX|Conch Horn|link}}, one of the eight {{Plural|LADX|Instrument of the Sirens|link}}. The entrance to this {{Term|LADX|Dungeon}} is located within {{Term|LADX|Goponga Swamp|link}},<ref>{{Cite|Hoot! That is a fearsome looking animal you have there! Do not forget, the next Instrument is in Goponga Swamp!|Owl|LADX}}</ref> north of the {{Term|LADX|Mysterious Forest|link}} and is surrounded by swampy {{Term|LADX|Water|link}} fitting with the {{Term|LADX|Dungeon}} being named a Grotto, which is a cave located near a source of {{Term|LADX|Water}} and is prone to flooding, although no {{Term|LADX|Water}} can actually be found within the {{Term|LADX|Dungeon}}. {{Term|LADX|BowWow|link}} is needed to enter, as the entrance is completely blocked by {{Plural|LADX|Goponga Flower|link}}, which cannot be destroyed by using any of the weapons {{Term|LADX|Link|link}} currently has available to him. The interior of this {{Term|LADX|Dungeon}} is mostly gray flooring and blue walls. The main tool of the {{Term|LADX|Dungeon}} is the {{Term|LADX|Power Bracelet|link}}, which is required to lift the numerous {{Plural|LADX|Vase|link}} and the {{Term|LADX|Genie's Bottle|link}} which the level is named after. The mini-boss is a {{Term|LADX|Hinox|link}}. | |||
==Entrance to the Grotto== | ==Entrance to the Grotto== | ||
After returning from the | After returning from the {{Term|LADX|Tail Cave|link}}, {{Term|LADX|Link|link}} is informed that a group of {{Plural|LADX|Moblin|link}} has kidnapped {{Term|LADX|BowWow|link}}.<ref>{{Cite|AIEEEEEEEE! It's terrrrible! My BowWow was dognapped by... Mo-mo-MOBLINS!! OHHH! AHHHH! Please! Somebody help my poor BowWow!!|Madam MeowMeow|LADX}}</ref> {{Term|LADX|Link}} goes to the {{Term|LADX|Moblin Cave|link}} and rescues {{Term|LADX|BowWow}} from the {{Term|LADX|King Moblin|link}} and his henchmen. {{Term|LADX|Link}} can then return {{Term|LADX|BowWow}} to {{Term|LADX|Madam MeowMeow|link}}, who insists that {{Term|LADX|Link}} take him for a walk.<ref>{{Cite|Oh thank you! I'm so happy you brought my baby back! Now, would you be a dear and take him for a walk? It would really help me out a lot! You will?! Thanks!|Madam MeowMeow|LADX}}</ref> This is fortunate, as letting {{Term|LADX|BowWow}} eat the {{Plural|LADX|Goponga Flower|link}} blocking the entrance is the only way at this point in the game that {{Term|LADX|Link}} can clear them away and access the {{Term|LADX|Bottle Grotto}}. {{Term|LADX|BowWow}} does not follow {{Term|LADX|Link}} inside, but will immediately rejoin {{Term|LADX|Link}} if he leaves the {{Term|LADX|Dungeon|link}}. | ||
==Themes and Navigation== | ==Themes and Navigation== | ||
The mini-boss of the | The mini-boss of the {{Term|LADX|Dungeon|link}} is a {{Term|LADX|Hinox|link}}, who attacks {{Term|LADX|Link|link}} by picking him up and throwing him across the room. The edges of the room are cracked and can collapse easily. The main tool in this {{Term|LADX|Dungeon}} is the {{Term|LADX|Power Bracelet|link}}, which is necessary to pick up the {{Plural|LADX|Vase|link}} that block {{Term|LADX|Link}}'s way, as well as defeat the {{Term|LADX|Boss|link}}. The {{Term|LADX|Boss}} of the {{Term|LADX|Dungeon}} is the {{Term|LADX|Genie|link}} who guards the {{Term|LADX|Conch Horn|link}},<ref>{{Cite|HO HO HO! I'm your bad guy this time!! HO HO HO!|Genie|LADX}}</ref> the second of the eight {{Plural|LADX|Instrument of the Sirens|link}}. | ||
When looked at on the | When looked at on the {{Term|LADX|Dungeon Map|link}}, the {{Term|LADX|Dungeon}} is in the shape of a large {{Term|LADX|Vase}}. Likewise, this {{Term|LADX|Dungeon}} houses a lot of {{Plural|LADX|Vase}} and the {{Term|LADX|Genie}} also lives in one, which adds to the overall theme. A few of the rooms are also dark and require {{Term|LADX|Magic Powder|link}} to light the {{Plural|LADX|Torch|link}} within. In addition, the {{Term|LADX|Dungeon}} features the first {{Plural|LADX|Crystal Switch|link}} in the game. | ||
After Link clears this | After {{Term|LADX|Link}} clears this {{Term|LADX|Dungeon}} and obtains the {{Term|LADX|Conch Horn}}, he will then have to return {{Term|LADX|BowWow|link}} to {{Term|LADX|Madam MeowMeow|link}}. Doing so will prevent {{Term|LADX|Link}} from revisiting the {{Term|LADX|Bottle Grotto}} until he acquires the {{Term|LADX|Hookshot|link}}, {{Term|LADX|Boomerang|link}}, or {{Term|LADX|Magic Rod|link}}. | ||
===Minor Enemies and Traps=== | |||
{{Gallery List|Enemies | |||
|LA= Blade Trap, Boo Buddy, Gel, Goomba, Hardhat Beetle, Keese, Mask-Mimic, Piranha Plant, Pols Voice, Shrouded Stalfos, Spark, Spiked Beetle, Stalfos, Stone Elevator, Sword Stalfos, Vacuum Mouth, Zol | |||
|LADX= Blade Trap, Boo Buddy, Gel, Goomba, Green Zol, Hardhat Beetle, Keese, Mask-Mimic, Piranha Plant, Pols Voice, Shrouded Stalfos, Spark, Spiked Beetle, Stalfos [Green], Stone Elevator, Sword Stalfos, Vacuum Mouth | |||
|LANS= Blade Trap, Boo, Gel, Goomba, Green Zol, Hardhat Beetle, Keese, Piranha Plant, Pols Voice, Shrouded Stalfos, Shy Guy, Spark, Spiked Beetle, Stalfos, Stone Elevator, Sword Stalfos, Vacuum Mouth, Yellow Stalfos | |||
}} | |||
== | ==Other Appearances== | ||
{{Noncanon|Start}} | |||
==={{LA|-}} (Cagiva)=== | |||
In the {{LA|Cagiva}}, while {{Term|LA (Cagiva)|Link|link}} traverses {{Term|LA (Cagiva)|Goponga Swamp|link}}, {{Term|LA (Cagiva)|BowWow|link}} finds the hidden entrance to {{Term|LA (Cagiva)|Bottle Grotto}}. While fighting some {{Plural|LA (Cagiva)|Stalfos|link}} inside, {{Term|LA (Cagiva)|Link}} is attacked by a {{Term|LA (Cagiva)|Hinox|link}}. After defeating it with a combination of {{Plural|LA (Cagiva)|Bomb|link}} and his {{Term|LA (Cagiva)|Shield|link}}, {{Term|LA (Cagiva)|Link}} exits the dungeon with the {{Term|LA (Cagiva)|Conch Horn|link}} in hand. | |||
{{Noncanon|End}} | |||
==Nomenclature== | ==Nomenclature== | ||
In the French and Deutsche versions of the game, the Bottle Grotto | In the French and Deutsche versions of the game, the {{Term|LADX|Bottle Grotto}} is named after the {{Term|LADX|Genie|link}}, the {{Term|LADX|Dungeon|link}}'s {{Term|LADX|Boss|link}}. | ||
{{ | {{Nomenclature}} | ||
| | |||
| | |||
| | |||
| | |||
| | |||
| | |||
}} | |||
==Gallery== | ==Gallery== | ||
<gallery> | <gallery> | ||
File:Bottle Grotto Map.png|Map of the Bottle Grotto | File:LA Bottle Grotto Map.png|Map of the {{Term|LA|Bottle Grotto}} from {{LA|-}} | ||
File: | File:LADX Bottle Grotto Map.png|Map of the {{Term|LADX|Bottle Grotto}} from {{LA|DX|-}} | ||
File: | File:LADX Power Bracelet Room.png|The chamber with the {{Term|LADX|Power Bracelet}} from {{LA|DX|-}} | ||
File:LADX Hinox.png|Hinox | File:LADX Hinox.png|{{Term|LADX|Hinox}}'s chamber from {{LA|DX|-}} | ||
File:LADX Link Battling Genie.png| | File:LADX Link Battling Genie.png|{{Term|LADX|Genie}}'s chamber from {{LA|DX|-}} | ||
File:LADX Conch Horn.png| | File:LADX Conch Horn.png|The chamber with the {{Term|LADX|Conch Horn}} from {{LA|DX|-}} | ||
File:LA (Cagiva) Bottle Grotto.jpg|The entrance to {{Term|LA (Cagiva)|Bottle Grotto}} from the {{LA|-}} manga by Ataru Cagiva | |||
</gallery> | </gallery> | ||
{{Ref}} | {{Ref}} | ||
{{DungeonNav2|LA}} | {{DungeonNav2|LA}} | ||
{{Categories | |||
|Koholint Island | |||
|dungeons= LA, LADX, LANS | |||
}} | |||
Latest revision as of 01:09, 13 April 2024
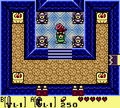
Bottle Grotto is the second Dungeon in Link's Awakening.[1] It is the resting place of the Conch Horn, one of the eight Instruments of the Sirens. The entrance to this Dungeon is located within Goponga Swamp,[2] north of the Mysterious Forest and is surrounded by swampy Water fitting with the Dungeon being named a Grotto, which is a cave located near a source of Water and is prone to flooding, although no Water can actually be found within the Dungeon. BowWow is needed to enter, as the entrance is completely blocked by Goponga Flowers, which cannot be destroyed by using any of the weapons Link currently has available to him. The interior of this Dungeon is mostly gray flooring and blue walls. The main tool of the Dungeon is the Power Bracelet, which is required to lift the numerous Pots and the Genie's Bottle which the level is named after. The mini-boss is a Hinox.
Entrance to the Grotto
After returning from the Tail Cave, Link is informed that a group of Moblins has kidnapped BowWow.[3] Link goes to the Moblin Cave and rescues BowWow from the King Moblin and his henchmen. Link can then return BowWow to Madam MeowMeow, who insists that Link take him for a walk.[4] This is fortunate, as letting BowWow eat the Goponga Flowers blocking the entrance is the only way at this point in the game that Link can clear them away and access the Bottle Grotto. BowWow does not follow Link inside, but will immediately rejoin Link if he leaves the Dungeon.
The mini-boss of the Dungeon is a Hinox, who attacks Link by picking him up and throwing him across the room. The edges of the room are cracked and can collapse easily. The main tool in this Dungeon is the Power Bracelet, which is necessary to pick up the Pots that block Link's way, as well as defeat the Boss. The Boss of the Dungeon is the Genie who guards the Conch Horn,[5] the second of the eight Instruments of the Sirens.
When looked at on the Map, the Dungeon is in the shape of a large Pot. Likewise, this Dungeon houses a lot of Pots and the Genie also lives in one, which adds to the overall theme. A few of the rooms are also dark and require Magic Powder to light the Torches within. In addition, the Dungeon features the first Crystal Switches in the game.
After Link clears this Dungeon and obtains the Conch Horn, he will then have to return BowWow to Madam MeowMeow. Doing so will prevent Link from revisiting the Bottle Grotto until he acquires the Hookshot, Boomerang, or Magical Rod.
Minor Enemies and Traps
Other Appearances
Link's Awakening (Cagiva)
In the Link's Awakening manga by Ataru Cagiva, while Link traverses Goponga Swamp, BowWow finds the hidden entrance to Bottle Grotto. While fighting some Stalfos inside, Link is attacked by a Hinox. After defeating it with a combination of Bombs and his Shield, Link exits the dungeon with the Conch Horn in hand.
Nomenclature
In the French and Deutsche versions of the game, the Bottle Grotto is named after the Genie, the Dungeon's Boss.
| Language | Names | Meanings |
|---|---|---|
| Grotte du Génie (LANS) | Genie's Cave | |
| Grotte du Génie (LA | LADX | LANS)[7] | Genie's Cave | |
|
| |
| This table was generated using translation pages. To request an addition, please contact a staff member with a reference. | ||
Gallery
-
Map of the Bottle Grotto from Link's Awakening
-
Map of the Bottle Grotto from Link's Awakening DX
-
The chamber with the Power Bracelet from Link's Awakening DX
-
Hinox's chamber from Link's Awakening DX
-
Genie's chamber from Link's Awakening DX
-
The chamber with the Conch Horn from Link's Awakening DX
-
The entrance to Bottle Grotto from the Link's Awakening manga by Ataru Cagiva
References
- ↑ Encyclopedia, Dark Horse Books, pg. 148
- ↑ "Hoot! That is a fearsome looking animal you have there! Do not forget, the next Instrument is in Goponga Swamp!" — Owl (Link's Awakening DX)
- ↑ "AIEEEEEEEE! It's terrrrible! My BowWow was dognapped by... Mo-mo-MOBLINS!! OHHH! AHHHH! Please! Somebody help my poor BowWow!!" — Madam MeowMeow (Link's Awakening DX)
- ↑ "Oh thank you! I'm so happy you brought my baby back! Now, would you be a dear and take him for a walk? It would really help me out a lot! You will?! Thanks!" — Madam MeowMeow (Link's Awakening DX)
- ↑ "HO HO HO! I'm your bad guy this time!! HO HO HO!" — Genie (Link's Awakening DX)
- ↑ Enciclopedia di Hyrule, Magazzini Salani, pg. 148
- ↑ Encyclopedia, Les Éditions Soleil, pg. 148


