Catfish's Maw: Difference between revisions
m (→top: Edit made with AWB, replaced: <br/> → , (2)) |
m (→Gallery) |
||
| (8 intermediate revisions by 7 users not shown) | |||
| Line 4: | Line 4: | ||
|Screenshot LA= File:LA Catfish's Maw.png | |Screenshot LA= File:LA Catfish's Maw.png | ||
|Screenshot LADX= File:LADX Catfish's Maw.png | |Screenshot LADX= File:LADX Catfish's Maw.png | ||
|Screenshot LANS= File:LANS Catfish's Maw.png | |||
}} | }} | ||
|caption= | |caption= | ||
| Line 10: | Line 11: | ||
|other= | |other= | ||
|item= {{Term|LADX|Hookshot|link}} | |item= {{Term|LADX|Hookshot|link}} | ||
|quest= {{Term|LADX|Wind Marimba|link}}, {{Term|LADX|Heart Container|link}} | |quest= {{List|{{Term|LADX|Wind Marimba|link}}, {{Term|LADX|Heart Container|link}}}} | ||
|mini-boss= {{Term|LADX|Master Stalfos|link}}, {{Plural|LADX|Gohma|link}} {{Small|(x2)}} | |mini-boss= {{List|{{Term|LADX|Master Stalfos|link}}, {{Plural|LADX|Gohma|link}} {{Small|(x2)}}}} | ||
|boss= {{Term|LADX|Slime Eel|link}} | |boss= {{Term|LADX|Slime Eel|link}} | ||
|theme= | |theme= | ||
|strategy= {{StrategyWiki|The Legend of Zelda: Link's Awakening/Catfish's Maw|Catfish's Maw}} | |strategy= {{StrategyWiki|The Legend of Zelda: Link's Awakening/Catfish's Maw|Catfish's Maw}} | ||
}} | }} | ||
{{Term/Store|Catfish's Maw||Series, LA, LADX}} is the fifth {{Term|LADX|Dungeon|link}} in {{LA}}.<ref>{{Cite Book|quote= |book= E |publisher= |page= 148}}</ref> | {{Term/Store|Catfish's Maw||Series, LA, LADX}} is the fifth {{Term|LADX|Dungeon|link}} in {{LA}}.<ref>{{Cite Book|quote= |book= E |publisher= |page= 148}}</ref> It is the location of the {{Term|LADX|Wind Marimba|link}}. The entrance of this {{Term|LADX|Dungeon}}, which looks like a giant blue catfish, is located within {{Term|LADX|Martha's Bay|link}}. The main tool of this {{Term|LADX|Dungeon}} is the {{Term|LADX|Hookshot|link}}, which is originally located in a {{Term|LADX|Treasure Chest|link}}, but is stolen by {{Term|LADX|Master Stalfos|link}}, after his first battle with {{Term|LADX|Link|link}}. It is obtained after defeating him three additional times. It is necessary to access certain rooms and needed to defeat the {{Term|LADX|Boss|link}}, {{Term|LADX|Slime Eel|link}}. The second mini-boss of the {{Term|LADX|Dungeon}} is a pair of {{Plural|LADX|Gohma|link}}. | ||
==Entrance to the Maw== | ==Entrance to the Maw== | ||
| Line 32: | Line 33: | ||
When looked at on the {{Term|LADX|Dungeon Map}}, the {{Term|LADX|Dungeon}} is in the shape of {{Term|LADX|Slime Eel}}. | When looked at on the {{Term|LADX|Dungeon Map}}, the {{Term|LADX|Dungeon}} is in the shape of {{Term|LADX|Slime Eel}}. | ||
== | ===Minor {{Plural|ALttP|Enemy}}=== | ||
{{Gallery List|Enemies | |||
|LA= Blade Trap, Blooper, Cheep-Cheep, Goomba, Iron Mask, Spark, Stalfos, Star, Water Tektite, Zol | |||
|LADX= Blade Trap, Bloober, Cheep-Cheep, Goomba, Green Zol, Iron Mask, Spark, Stalfos [Green], Stalfos [Yellow], Star, Water Tektite | |||
|LANS= Blade Trap, Bloober, Cheep-Cheep, Goomba, Green Zol, Iron Mask, Spark, Stalfos, Star, Water Tektite | |||
}} | |||
==Trivia== | ==Trivia== | ||
| Line 53: | Line 47: | ||
The name of this {{Term|LADX|Dungeon|link}} is a reference that the entrance is in the shape of a giant catfish with its mouth open. | The name of this {{Term|LADX|Dungeon|link}} is a reference that the entrance is in the shape of a giant catfish with its mouth open. | ||
{{Nomenclature}} | {{Nomenclature}} | ||
===Other Names=== | |||
{{Other Names | |||
|- | |||
| Catfish's Mouth<ref>{{Cite Guide|quote= |game= LA |guide= Nintendo |page= 58}}</ref> | |||
| {{LA}} | |||
| {{Guide|LA|Nintendo}} | |||
| {{E}} | |||
}} | |||
==Gallery== | ==Gallery== | ||
<gallery> | <gallery> | ||
File:LA Catfish's Maw Map.png|Layout of {{Term|LA|Catfish's Maw}} | |||
File:LADX Catfish's Maw Map.png|Layout of {{Term|LADX|Catfish's Maw}} | File:LADX Catfish's Maw Map.png|Layout of {{Term|LADX|Catfish's Maw}} | ||
File:LADX Slime Eel exposed.png|{{Term|LADX|Link}} fighting against {{Term|LADX|Slime Eel}} | File:LADX Slime Eel exposed.png|{{Term|LADX|Link}} fighting against {{Term|LADX|Slime Eel}} | ||
| Line 61: | Line 65: | ||
</gallery> | </gallery> | ||
{{Ref}} | {{Ref}} | ||
{{DungeonNav2|LA}} | {{DungeonNav2|LA}} | ||
{{Categories | {{Categories | ||
Latest revision as of 01:20, 13 April 2024
Catfish's Maw is the fifth Dungeon in Link's Awakening.[1] It is the location of the Wind Marimba. The entrance of this Dungeon, which looks like a giant blue catfish, is located within Martha's Bay. The main tool of this Dungeon is the Hookshot, which is originally located in a Treasure Chest, but is stolen by Master Stalfos, after his first battle with Link. It is obtained after defeating him three additional times. It is necessary to access certain rooms and needed to defeat the Boss, Slime Eel. The second mini-boss of the Dungeon is a pair of Gohmas.
Entrance to the Maw
After Link leaves the Angler's Tunnel, a Ghost begins following him. He cannot enter the Dungeon with the Ghost, and must help it make peace with its death before entering. However, the entire entrance is surrounded by rocks, and thus cannot be accessed by swimming on the surface alone. Link needs to dive down on the left side of the rocks and swim through an underwater tunnel to this Dungeon.[2]
The interior of the Dungeon is mostly sandy floor with brown walls. There also seem to be a lot of purple crystals growing in certain rooms, which can be destroyed by Link's Sword. Despite this Dungeon being in the middle of Martha's Bay, it is actually dry inside, with a few rooms having shallow Water and only three rooms being flooded (two of them being flooded side-view rooms).
This Dungeon has five mini-boss battles. The first mini-boss is Master Stalfos, who steals the Hookshot from a Treasure Chest after his first battle with Link.[3] Once defeated, he moves into another room and must be searched for in order to battle again. All of the rooms in which Link battles him can easily be identified by the skull-shaped tiling on the room's floor. Each of these four rooms also has a number of Blocks corresponding to the number of the battle that takes place in the room. The other mini-bosses are the Gohmas, who can only be reached once Link has the Hookshot and seem to be the true mini-bosses of this Dungeon, as defeating them creates a portal back to the entrance of the Dungeon, unlike Master Stalfos.
The puzzles in this Dungeon often involve using the Hookshot to cross long gaps. A variation on this is the appearance of wooden bridges which can only be extended by using the Hookshot on one side of the gap. The Dungeon also has a hidden room that is not on the Map, next to the Boss room. It can only be accessed by diving underwater[4] in a nearby room to enter a side-scrolling area, where Link can climb up a ladder to get to the hidden room. The room contains the Nightmare Key, vital for getting to the Boss, Slime Eel.
The room where Link fights the Boss is originally a normal room, but since Slime Eel lives in the walls of the Dungeon, it therefore breaks open sections of the walls and floor to attack Link. Its tail comes out of the hole in the floor, and rotates around the room, trying to hit Link. It cannot be harmed. However, Slime Eel's head appears randomly in one of the four holes in the wall at regular intervals. Using the Hookshot, Link can pull Slime Eel's head out and attack his vulnerable midsection.
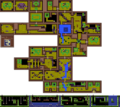
When looked at on the Map, the Dungeon is in the shape of Slime Eel.
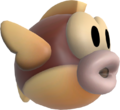
Minor Enemies
Trivia
- The entrance to this Dungeon resembles the giant Catfish who gives Link the Quake Medallion in A Link to the Past. Like the aforementioned character, it also appears in a circle of stones.
- The Ocean Floor entrance in Spirit Tracks is also shaped like a giant catfish.
Nomenclature
The name of this Dungeon is a reference that the entrance is in the shape of a giant catfish with its mouth open.
| Language | Names | Meanings |
|---|---|---|
| Poisson-Chat (LANS) | Catfish | |
| Poisson-Chat (LA | LADX | LANS)[6] | Catfish | |
|
| |
| This table was generated using translation pages. To request an addition, please contact a staff member with a reference. | ||
Other Names
| Name | Catfish's Mouth[7] |
|---|---|
| Applies to | |
| Source | |
| Superseded by |
| Name | Applies to | Source | Superseded by |
|---|---|---|---|
Catfish's Mouth[7] |
Gallery
-
Layout of Catfish's Maw
-
Layout of Catfish's Maw
-
Link fighting against Slime Eel
-
The Wind Marimba
References
- ↑ Encyclopedia, Dark Horse Books, pg. 148
- ↑ "Hoot! It has been some time since our paths crossed, lad. You must dive into the waters of Martha's Bay to enter the Catfish's Maw... The closer you get to the Wind Fish, the more restless he sleeps. Carry onward! Hoot!" — Owl (Link's Awakening DX)
- ↑ "'I've got what was inside this box. Come and get it, if you can!' Master
 " — Master Stalfos (Link's Awakening DX)
- ↑ "Dive under where torchlight beams do cross..." — Owl Statue (Link's Awakening DX)
- ↑ Enciclopedia di Hyrule, Magazzini Salani, pg. 148
- ↑ Encyclopedia, Les Éditions Soleil, pg. 148
- ↑ The Legend of Zelda: Link's Awakening—Nintendo Player's Guide, Nintendo of America, pg. 58


