Tower of Hera: Difference between revisions
PhantomCaleb (talk | contribs) m (Transitioning Template:Exp Game to new format) |
mNo edit summary |
||
| (19 intermediate revisions by 10 users not shown) | |||
| Line 1: | Line 1: | ||
{{Dungeon | {{Improve||ALttP}} | ||
{{Infobox Dungeon | |||
|image= | |image= | ||
{{Media | {{Media | ||
|Artwork ALttP= File:ALttP | |Artwork ALttP= File:ALttP Tower of Hera Artwork.png | ||
|Screenshot ALttP= File:Tower of Hera.png | |Screenshot ALttP= File:ALttP Tower of Hera.png | ||
|Screenshot ALBW= File:Tower | |Screenshot ALBW= File:ALBW Tower of Hera.png | ||
}} | }} | ||
|caption= | |caption= | ||
|location= {{Term|Series|Death Mountain|link}} | |location= {{Term|Series|Death Mountain|link}} | ||
|game= | |game= ALttP, ALBW | ||
|other= | |other= ALttP (Ishinomori) | ||
|item= | |item= | ||
{{Infobox Game Blocks | {{Infobox Game Blocks | ||
|ALttP= [[Moon Pearl]] | |ALttP= [[Moon Pearl]] | ||
}} | }} | ||
|mini-boss= | |mini-boss= | ||
|boss= {{Term|Series|Moldorm (Boss)|link}} | |boss= {{Term|Series|Moldorm (Boss)|link}} | ||
|quest= [[Pendant of Wisdom]] | |quest= | ||
{{Infobox Game Blocks | |||
|ALttP= [[Pendant of Wisdom]], [[Heart Container]] | |||
|ALBW= [[Pendant of Power]], [[Heart Container]] | |||
}} | |||
|strategy= | |||
{{Infobox Game Blocks | |||
|ALttP= {{StrategyWiki|The Legend of Zelda: A Link to the Past/Death Mountain#Tower of Hera|Tower of Hera}} | |||
|ALBW= {{StrategyWiki|The Legend of Zelda: A Link Between Worlds/Tower of Hera|Tower of Hera}} | |||
}} | }} | ||
The {{Term/Store|Tower of Hera||Series, ALttP, ALBW}},{{Exp | }} | ||
The {{Term/Store|Tower of Hera||Series, ALttP, ALBW}},{{Exp Game|ALttP, ALBW}}<ref>{{Cite Book|quote= |book= E |publisher= |page= 147 {{Exp Game|ALttP}} & 158 {{Exp Game|ALBW}}}}</ref> also known as the '''Mountain Tower''',{{Exp Game|ALttP}}<ref>{{Cite|MOUNTAIN TOWER|Quest History|ALttP}}</ref> is a recurring {{Term|Series|Dungeon|link}} in {{TLoZ|Series}}. | |||
==Overview== | ==Overview== | ||
| Line 27: | Line 36: | ||
====Themes and Navigation==== | ====Themes and Navigation==== | ||
The dungeon has many more floors than the previous dungeons encountered in the game, and features a number of new enemies, the most prominent of which are the [[Hardhat Beetle]]s, strong enemies that are most effectively defeated by knocking down the many pitfalls found throughout the journey to the top of the tower. These pitfalls make their debut in the series here, allowing Link to drop from one floor to a lower one without taking damage, though in its initial appearance this results in him losing progress instead. In the same game, their positions will change when | The dungeon has many more floors than the previous dungeons encountered in the game, and features a number of new enemies, the most prominent of which are the [[Hardhat Beetle]]s, strong enemies that are most effectively defeated by knocking down the many pitfalls found throughout the journey to the top of the tower. These pitfalls make their debut in the series here, allowing Link to drop from one floor to a lower one without taking damage, though in its initial appearance this results in him losing progress instead. In the same game, their positions will change when {{Plural|ALttP|Star Tile|link}} are walked on, and utilizing these pits and their changing locations is the only way to obtain the elusive [[Moon Pearl]]. Unlike the previous two dungeons, the treasure in the [[Big Chest]] is not vital to the completion of the dungeon. [[Crystal Switch]]es debut in this dungeon in both of its appearances, which in its original form was first appearance for these objects in the series, and the raising and lowering of the orange/red and blue blocks in conjunction with the placement of the pits is key to progressing through the tower, and accessing [[Jar]]s in the room prior to the boss. The boss is [[Moldorm (Boss)|Moldorm]], which is fought atop a perch surrounded by holes. In {{ALttP|-}}, should Link fall into a hole, he will find himself on the previous floor, and he will have to begin the battle again in. In {{ALBW|-}}, there is no such penalty, and there are hearts for Link to use to heal his injuries, though many [[Blade Trap]]s below the battlefield can damage him if he falls down the center. After defeating this boss, Link receives a [[Heart Container]] and the [[Pendants of Virtue|Pendant of Wisdom]] in {{ALttP|-}} and the [[Pendants of Virtue|Pendant of Power]] in {{ALBW|-}}. | ||
It is also the last of the three "Sanctuary" dungeons that contains the [[Pendants of Virtue]]. The [[Dark World]] equivalent to this tower is | It is also the last of the three "Sanctuary" dungeons that contains the [[Pendants of Virtue]]. The [[Dark World]] equivalent to this tower is {{Term|ALttP|Ganon's Tower|link}}, which is also the penultimate location in that world. | ||
=====Enemies and Traps===== | =====Enemies and Traps===== | ||
{{Gallery List|Enemies | |||
|ALttP= Blue Hardhat Beetle, Blue Stalfos, Bumper, Flying Tile, Guruguru Bar, Mini-Moldorm, Red Hardhat Beetle, Red Kodongo, Red Stalfos, Spark | |||
}} | |||
==={{ALBW|-}}=== | ==={{ALBW|-}}=== | ||
===Areas=== | |||
{{Gallery List|Locations | |||
|ALBW= Tower of Hera 1F, Tower of Hera 2F, Tower of Hera 3F, Tower of Hera 4F, Tower of Hera 5F, Tower of Hera 6F, Tower of Hera 7F, Tower of Hera 8F, Tower of Hera 9F, Tower of Hera 10F, Tower of Hera 11F, Tower of Hera 12F, | |||
}} | |||
====Entrance to the Dungeon==== | ====Entrance to the Dungeon==== | ||
As with many dungeons in the game, the Tower of Hera is not given a certain "set" number. It can be accessed after completing the [[Eastern Palace]], which means it is either the second or third dungeon [[Link]] must complete, before or after the [[House of Gales]]. The Tower of Hera is located after getting through [[Death Mountain#A Link Between Worlds|Death Mountain]], in the northeast of [[Hyrule]]. | As with many dungeons in the game, the Tower of Hera is not given a certain "set" number. It can be accessed after completing the [[Eastern Palace]], which means it is either the second or third dungeon [[Link]] must complete, before or after the [[House of Gales]]. The Tower of Hera is located after getting through [[Death Mountain#A Link Between Worlds|Death Mountain]], in the northeast of [[Hyrule]]. | ||
| Line 55: | Line 60: | ||
=====Enemies and Traps===== | =====Enemies and Traps===== | ||
{{Gallery List|Enemies | |||
|ALBW= Blade Trap, Blue Hardhat Beetle, Bumper, Flying Tile, Mini-Moldorm, Mole, Popo, Red Stalfos, Stalfos, Terrorpin | |||
}} | |||
== | ==Other Appearances== | ||
==={{ALttP|-}} (Ishinomori)=== | |||
{{Noncanon|Start}} | {{Noncanon|Start}} | ||
[[File:Tower of Hera (comic).png|thumb|right|70px|The Tower of Hera in the comic]] | [[File:Tower of Hera (comic).png|thumb|right|70px|The Tower of Hera in the comic]] | ||
In the {{ALttP|Ishinomori}}, Link finds himself in front of the Tower of Hera after waking up from a dream he shared with [[Princess Zelda]].<ref>{{Cite Book|quote='''That''' was a strange dream! But my '''arm'''! Who '''did''' this?! [...] The Tower of Hera!|book= | In the {{ALttP|Ishinomori}}, Link finds himself in front of the Tower of Hera after waking up from a dream he shared with [[Princess Zelda]].<ref>{{Cite Book|quote='''That''' was a strange dream! But my '''arm'''! Who '''did''' this?! [...] The Tower of Hera!|book= ALttP (Ishinomori)|publisher= |page=10}}</ref> Link enters the Tower of Hera and climbs to the top to battle a [[Moldorm (Boss)|Moldorm]], who this time has an appearance of a giant spider. After Sahasrahla informs Link that the Pendant of Wisdom is in the creature's eyes, Link seizes the pendant by pulling it out with his arm.<ref>{{Cite Book|quote=Link... The pendant is the '''third eye'''...|book= ALttP (Ishinomori)|publisher= |page=12}}</ref> Upon grabbing the pendant, his arm, previously wounded is instantly healed,<ref>{{Cite Book|quote=My arm! It's back to normal!|book= ALttP (Ishinomori)|publisher= |page=13}}</ref> and the young hero uses the spider to ride down the tower, defeating Moldorm. | ||
{{Noncanon|End}} | {{Noncanon|End}} | ||
| Line 78: | Line 74: | ||
*The [[Tower of Flames]] from {{FSA}} has a very similar structure and design to the Tower of Hera. The boss of the Tower of Flames is three [[Dodongos]], similar monsters to the [[Kodongo]]s that appear in the Mountain Tower. | *The [[Tower of Flames]] from {{FSA}} has a very similar structure and design to the Tower of Hera. The boss of the Tower of Flames is three [[Dodongos]], similar monsters to the [[Kodongo]]s that appear in the Mountain Tower. | ||
*Footage of the Tower of Hera dungeon was used during the ''[[The Legend of Zelda 25th Anniversary Symphony]]'' during the Selected Shorts Suite when the [[The Legend of Zelda: Sound & Drama|Sanctuary Dungeon]] music is played. | *Footage of the Tower of Hera dungeon was used during the ''[[The Legend of Zelda 25th Anniversary Symphony]]'' during the Selected Shorts Suite when the [[The Legend of Zelda: Sound & Drama|Sanctuary Dungeon]] music is played. | ||
*The Mountain Tower is said to be the place where the {{Term|ALttP|Sage|link|display=Seven Sages}} sealed {{Term|ALttP|Ganon|link}} in the [[Sacred Realm]]. This is why its [[Dark World]] counterpart is [[Ganon’s Tower]].{{fact}} | |||
==Nomenclature== | ==Nomenclature== | ||
The Tower of Hera may be named after the famous ancient Greek Goddess, {{Wp|Hera}}. Hera was the wife of {{Wp|Zeus}}, the King of the Gods, and is rumored that she lived in a beautiful tower or palace, built on the top of {{Wp|Mount Olympus}}, the tallest mountain in Greece. | The Tower of Hera may be named after the famous ancient Greek Goddess, {{Wp|Hera}}. Hera was the wife of {{Wp|Zeus}}, the King of the Gods, and is rumored that she lived in a beautiful tower or palace, built on the top of {{Wp|Mount Olympus}}, the tallest mountain in Greece. | ||
{{ | {{Nomenclature}} | ||
==Gallery== | ==Gallery== | ||
<gallery> | <gallery> | ||
File:ALttP Link Looking at the Tower of Hera Artwork.png|{{Term|ALttP|Link}} looking at the {{Term|ALttP|Tower of Hera}} from {{A&A}} | |||
File:Block-puzzle-TOH.png|Link merging into a moving block from {{ALBW|-}} | File:Block-puzzle-TOH.png|Link merging into a moving block from {{ALBW|-}} | ||
File:Tower-Of-Hera-Mole-Spring.png|Being sprung up by a mole from {{ALBW|-}} | File:Tower-Of-Hera-Mole-Spring.png|Being sprung up by a mole from {{ALBW|-}} | ||
| Line 124: | Line 91: | ||
{{DungeonNav2|ALBW}} | {{DungeonNav2|ALBW}} | ||
{{Categories | {{Categories | ||
|Towers | |Death Mountain, Towers | ||
|dungeons= ALttP, ALBW, ALttP (Ishinomori) | |dungeons= ALttP, ALBW, ALttP (Ishinomori) | ||
}} | }} | ||
Latest revision as of 10:19, 24 April 2024

The Tower of Hera,(ALttP | ALBW)[1] also known as the Mountain Tower,(ALttP)[2] is a recurring Dungeon in The Legend of Zelda series.
Overview
A Link to the Past
Entrance to the Tower
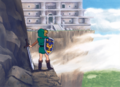
The Tower is located at the top of Death Mountain. In order to climb Death Mountain, and thus gain access to the Tower, Link must use the Power Glove previously obtained from the Desert Palace. In A Link to the Past, Link must also make a brief trip into Dark World and escape using the Magic Mirror he obtained from the Lost Old Man in order to get to the other side of Spectacle Rock, where the tower is located, it is also the last of the Light World dungeons Link must complete. In A Link Between Worlds, the tower is still located on the summit of Death Mountain, however, the Hammer is required to enter the dungeon and to navigate the puzzles inside, and is interchangeably the second or third dungeon with the House of Gales.
The dungeon has many more floors than the previous dungeons encountered in the game, and features a number of new enemies, the most prominent of which are the Hardhat Beetles, strong enemies that are most effectively defeated by knocking down the many pitfalls found throughout the journey to the top of the tower. These pitfalls make their debut in the series here, allowing Link to drop from one floor to a lower one without taking damage, though in its initial appearance this results in him losing progress instead. In the same game, their positions will change when Star Tiles are walked on, and utilizing these pits and their changing locations is the only way to obtain the elusive Moon Pearl. Unlike the previous two dungeons, the treasure in the Big Chest is not vital to the completion of the dungeon. Crystal Switches debut in this dungeon in both of its appearances, which in its original form was first appearance for these objects in the series, and the raising and lowering of the orange/red and blue blocks in conjunction with the placement of the pits is key to progressing through the tower, and accessing Jars in the room prior to the boss. The boss is Moldorm, which is fought atop a perch surrounded by holes. In A Link to the Past, should Link fall into a hole, he will find himself on the previous floor, and he will have to begin the battle again in. In A Link Between Worlds, there is no such penalty, and there are hearts for Link to use to heal his injuries, though many Blade Traps below the battlefield can damage him if he falls down the center. After defeating this boss, Link receives a Heart Container and the Pendant of Wisdom in A Link to the Past and the Pendant of Power in A Link Between Worlds.
It is also the last of the three "Sanctuary" dungeons that contains the Pendants of Virtue. The Dark World equivalent to this tower is Ganon's Tower, which is also the penultimate location in that world.
Enemies and Traps
A Link Between Worlds
Areas
Entrance to the Dungeon
As with many dungeons in the game, the Tower of Hera is not given a certain "set" number. It can be accessed after completing the Eastern Palace, which means it is either the second or third dungeon Link must complete, before or after the House of Gales. The Tower of Hera is located after getting through Death Mountain, in the northeast of Hyrule.
The Tower of Hera has many puzzles involving the Hammer, and includes some switch puzzles. Some also involve Link merging into walls to get to unreachable places. As with its appearance in A Link to the Past, there is extensive use of red and blue barriers that are raised or lowered by switches, with the blue barriers up while the reds are down and vice versa. As in A Link to the Past, at the top of the tower, Link gets the Boss Key to exit the tower and climb up to fight Moldorm.
The Compass can be found in the center of the first floor; it is on a platform that Link can reach by launching himself onto the second floor and then dropping back down in the center opening. The Big Key is on the eastern side of the eleventh floor; Link must launch himself off of a moving platform to reach the chest.
Enemies and Traps


Other Appearances
A Link to the Past (Ishinomori)
.png)
In the A Link to the Past comic by Shotaro Ishinomori, Link finds himself in front of the Tower of Hera after waking up from a dream he shared with Princess Zelda.[3] Link enters the Tower of Hera and climbs to the top to battle a Moldorm, who this time has an appearance of a giant spider. After Sahasrahla informs Link that the Pendant of Wisdom is in the creature's eyes, Link seizes the pendant by pulling it out with his arm.[4] Upon grabbing the pendant, his arm, previously wounded is instantly healed,[5] and the young hero uses the spider to ride down the tower, defeating Moldorm.
Trivia
- The Tower of Flames from Four Swords Adventures has a very similar structure and design to the Tower of Hera. The boss of the Tower of Flames is three Dodongos, similar monsters to the Kodongos that appear in the Mountain Tower.
- Footage of the Tower of Hera dungeon was used during the The Legend of Zelda 25th Anniversary Symphony during the Selected Shorts Suite when the Sanctuary Dungeon music is played.
- The Mountain Tower is said to be the place where the Seven Sages sealed Ganon in the Sacred Realm. This is why its Dark World counterpart is Ganon’s Tower.[citation needed]
Nomenclature
The Tower of Hera may be named after the famous ancient Greek Goddess, Hera. Hera was the wife of Zeus, the King of the Gods, and is rumored that she lived in a beautiful tower or palace, built on the top of Mount Olympus, the tallest mountain in Greece.
| Language | Names | Meanings |
|---|---|---|
Japanese | ヘラの塔 (Hera no Tō) (ALttP | ALBW)[7][8] | Tower of Hera |
FrenchCA | Tour d'Héra (ALBW)[13] | |
FrenchEU | Tour d'Héra (ALBW)[12] | |
German | Heras Turm (ALBW)[9] | |
Italian | Torre di Hera (ALttP | ALBW)[6] | Same as English. |
Korean | 헤라의 탑 (Helaui Tab) (ALBW)[10] | Tower of Hera |
SpanishLA | Torre de Hera (ALBW)[11] | |
SpanishEU | Torre de Hera (ALBW)[14] | |
| This table was generated using translation pages. To request an addition, please contact a staff member with a reference. | ||
Gallery
-
Link looking at the Tower of Hera from Art & Artifacts
-
Link merging into a moving block from A Link Between Worlds
-
Being sprung up by a mole from A Link Between Worlds
-
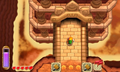
Exterior of the Tower of Hera from A Link Between Worlds


References
- ↑ Encyclopedia, Dark Horse Books, pg. 147 (ALttP) & 158 (ALBW)
- ↑ "MOUNTAIN TOWER" — Quest History (A Link to the Past)
- ↑ "That was a strange dream! But my arm! Who did this?! [...] The Tower of Hera!" (A Link to the Past manga, VIZ Media, pg. 10)
- ↑ "Link... The pendant is the third eye..." (A Link to the Past manga, VIZ Media, pg. 12)
- ↑ "My arm! It's back to normal!" (A Link to the Past manga, VIZ Media, pg. 13)
- ↑ "Torre di Hera" — Weather Vane (A Link Between Worlds, Italian localization)
- ↑ A Link to the Past manual, pg. 2, 3 Nintendo Official Guidebook: The Legend of Zelda: A Link to the Past Vol. 1, Shogakukan, pg. 3
- ↑ "残り二つの証は風の館とヘラの塔に
それぞれ安置されておるはず" — Sahasrahla (A Link Between Worlds) - ↑ "Die verbleibenden zwei Amulette werden im Haus des Windes und in Heras Turm aufbewahrt." — Sahasrahla (A Link Between Worlds)
- ↑ "남은 두 개의 문장은 바람의 관과 헤라의 탑에
각각 안치되어 있을 것이다" — Sahasrahla (A Link Between Worlds) - ↑ "Los otros dos colgantes están custodiados en la Mansión de la Tempestad y en la Torre de Hera." — Sahasrahla (A Link Between Worlds)
- ↑ "Les daux autres pendentifs devraient se trouver dans la demeure des vents et dans la tour d'Héra." — Sahasrahla (A Link Between Worlds)
- ↑ "Les daux autres pendentifs devraient se trouver dans la maison des Bourrasques et dans la tour d'Héra." — Sahasrahla (A Link Between Worlds)
- ↑ "Los otros dos colgantes están custodiados en la Mansión de los Vientos y en la Torre de Hera." — Sahasrahla (A Link Between Worlds)
Dungeons in The Legend of Zelda
Level 1 • Level 2 • Level 3 • Level 4 • Level 5 • Level 6 • Level 7 • Level 8 • Level 9
Dungeons in The Adventure of Link
Parapa Palace • Midoro Palace • Island Palace • Maze Island Palace • Palace on the Sea • Three-Eye Rock Palace • Great Palace
Dungeons in A Link to the Past
Hyrule Castle • Castle Dungeon • Eastern Palace • Desert Palace • Tower of Hera
Palace of Darkness • Swamp Palace • Skull Woods • Thieves' Town • Ice Palace • Misery Mire • Turtle Rock • Ganon's Tower • Palace of the Four Sword![]()
Tail Cave • Bottle Grotto • Key Cavern • Angler's Tunnel • Catfish's Maw • Face Shrine • Eagle's Tower • Turtle Rock • Wind Fish's Egg
Color Dungeon (LADX | LANS) • Chamber Dungeon (LANS)
Inside the Deku Tree • Dodongo's Cavern • Inside Jabu-Jabu's Belly
Forest Temple • Fire Temple • Water Temple • Shadow Temple • Spirit Temple • Ganon's Castle
Woodfall Temple • Snowhead Temple • Great Bay Temple • Stone Tower Temple
Swamp Spider House • Pirates' Fortress • Oceanside Spider House • Beneath the Well • Ancient Castle of Ikana • Moon Dungeons
Gnarled Root Dungeon • Snake's Remains • Poison Moth's Lair • Dancing Dragon Dungeon • Unicorn's Cave • Ancient Ruins • Explorer's Crypt • Sword & Shield Maze • Onox's Castle • Room of Rites
Spirit's Grave • Wing Dungeon • Moonlit Grotto • Skull Dungeon • Crown Dungeon • Mermaid's Cave • Jabu-Jabu's Belly • Ancient Tomb • Black Tower • Room of Rites
Maku Road • Great Moblin's Keep • Ambi's Palace • Hero's Cave
Chambers of Insight • Sea of Trees • Talus Cave • Death Mountain • Vaati's Palace
Dragon Roost Cavern • Forbidden Woods • Tower of the Gods • Forsaken Fortress • Earth Temple • Wind Temple • Ganon's Castle
Fire Mountain • Ice Ring Isle • Ghost Ship • Savage Labyrinth
Stages in Four Swords Adventures
Whereabouts of the Wind
Lake Hylia • Cave of No Return • Hyrule Castle
Eastern Hyrule
The Coast • Village of the Blue Maiden • Eastern Temple
Death Mountain
Death Mountain Foothills • The Mountain Path • Tower of Flames
Near the Fields
The Field • The Swamp • Infiltration of Hyrule Castle
The Dark World
Lost Woods (Four Swords Adventures) • Kakariko Village (Four Swords Adventures) • Temple of Darkness
The Desert of Doubt
Desert of Doubt • Desert Temple • Pyramid
Frozen Hyrule
Frozen Hyrule • Temple of Ice • Tower of Winds
Realm of the Heavens • The Dark Cloud • Palace of Winds
Deepwood Shrine • Cave of Flames • Fortress of Winds • Temple of Droplets • Palace of Winds • Dark Hyrule Castle
Forest Temple • Goron Mines • Lakebed Temple • Arbiter's Grounds • Snowpeak Ruins • Temple of Time • City in the Sky • Palace of Twilight • Hyrule Castle
Lantern Caverns • Cave of Ordeals • Cave of Shadows (TPHD)
Temple of the Ocean King • Temple of Fire • Temple of Wind • Temple of Courage • Ghost Ship • Goron Temple • Temple of Ice • Mutoh's Temple
Tower of Spirits • Forest Temple • Snow Temple • Ocean Temple • Fire Temple • Sand Temple
Skyview Temple • Earth Temple • Lanayru Mining Facility • Ancient Cistern • Sandship • Fire Sanctuary • Sky Keep
Dungeons in A Link Between Worlds
Eastern Palace • Tower of Hera • House of Gales • Inside Hyrule Castle • Desert Palace
Ice Ruins • Swamp Palace • Thieves' Hideout • Dark Palace • Skull Woods • Turtle Rock • Lorule Castle
Woodlands
Deku Forest • Buzz Blob Cave • Moblin Base • Forest Temple
Riverside
Secret Fortress • Abyss of Agony • Cove of Transition • Water Temple
Volcano
Blazing Trail • Hinox Mine • Den of Flames • Fire Temple
Ice Cavern
Frozen Plateau • Snowball Ravine • Silver Shrine • Ice Temple
Fortress
Sealed Gateway • Bomb Storage • Training Ground • The Lady's Lair
The Dunes
Infinity Dunes • Stone Corridors • Gibdo Mausoleum • Desert Temple
The Ruins
Illusory Mansion • Palace Noir • Lone Labyrinth • Grim Temple
Sky Realm
Floating Garden • Deception Castle • Dragon Citadel • Sky Temple
Forest Zone • Flooded Zone • Scorching Zone • Frozen Zone • Fortified Zone • Desert Zone • Shadow Zone • Baneful Zone
Dungeons in Breath of the Wild
Divine Beast Vah Ruta • Divine Beast Vah Rudania • Divine Beast Vah Medoh • Divine Beast Vah Naboris • Hyrule Castle
Sword Monk's Shrine (TMT) • Final Trial (TCB)
Akh Va'quot • Bareeda Naag • Bosh Kala • Chaas Qeta • Daag Chokah • Dagah Keek • Dah Kaso • Dah Hesho • Daka Tuss • Dako Tah • Daqa Koh • Daqo Chisay • Dila Maag • Dow Na'eh • Dunba Taag • Gee Ha'rah • Goma Asaagh • Gorae Torr • Ha Dahamar • Hawa Koth • Hia Miu • Hila Rao • Ishto Soh • Ja Baij • Jee Noh • Jitan Sa'mi • Joloo Nah • Ka'o Makagh • Kaam Ya'tak • Kah Mael Shrine • Kah Okeo Shrine • Kah Yah Shrine • Kam Urog Shrine • Katah Chuki • Katosa Aug • Kay Noh • Kaya Wan • Kayra Mah • Ke'nai Shakah • Keeha Yoog • Keh Namut • Kema Kosassa • Kema Zoos • Keo Ruug • Ketoh Wawai • Korgu Chideh • Korsh O'hu • Kuh Takkar • Kuhn Sidajj • Lakna Rokee • Lanno Kooh • Maag Halan • Maag No'rah • Maka Rah • Mezza Lo • Mijah Rokee • Mirro Shaz • Misae Suma • Mo'a Keet • Mogg Latan • Monya Toma • Mozo Shenno • Muwo Jeem • Myahm Agana • Namika Ozz • Ne'ez Yohma • Noya Neha • Oman Au • Owa Daim • Pumaag Nitae • Qua Raym • Qaza Tokki • Qukah Nata • Raqa Zunzo • Ree Dahee • Rin Oyaa • Ritaag Zumo • Rok Uwog • Rona Kachta • Rota Ooh • Rucco Maag • Saas Ko'sah • Sah Dahaj • Sasa Kai • Sha Gehma • Sha Warvo • Shada Naw • Shae Katha • Shae Loya • Shae Mo'sah • Shai Utoh • Shai Yota • Shee Vaneer • Shee Venath • Sheem Dagoze • Sheh Rata • Sho Dantu • Shoda Sah • Shoqa Tatone • Shora Hah • Soh Kofi • Suma Sahma • Ta'loh Naeg • Tah Muhl • Tahno O'ah • Tawa Jinn • Tena Ko'sah • Tho Kayu • To Quomo • Toh Yahsa • Toto Sah • Tu Ka'loh • Tutsuwa Nima • Voo Lota • Wahgo Katta • Ya Naga • Yah Rin • Zalta Wa • Ze Kasho • Zuna Kai
Etsu Korima • Kamia Omuna • Kee Dafunia • Keive Tala • Kiah Toza • Kihiro Moh • Mah Eliya • Noe Rajee • Rinu Honika • Rohta Chigah • Ruvo Korbah • Sato Koda • Sharo Lun • Shira Gomar • Takama Shiri • Yowaka Ita
Dungeons in Tears of the Kingdom
Wind Temple • Fire Temple • Water Temple • Lightning Temple • Hyrule Castle • Spirit Temple • Beneath Hyrule Castle
Anedamimik • Apogek • Bamitok • Chichim • Domizuin • Ekochiu • En-oma • Eshos • Eutoum • Ga-ahisas • Ganos • Gasas • Gatakis • Gatanisis • Gemimik • Gikaku • Gutanbac • Igashuk • Igoshon • Ihen-a • Ijo-o • Ikatak • In-isa • Irasak • Ishodag • Ishokin • Isisim • Iun-orok • Jikais • Jinodok • Jiosin • Jiotak • Jirutagumac • Jiukoum • Jochi-ihiga • Jochi-iu • Jochisiu • Jogou • Jojon • Joju-u-u • Joku-u • Joku-usin • Joniu • Jonsau • Josiu • Kadaunar • Kahatanaum • Kamatukis • Kamizun • Karahatag • Kikakin • Kimayat • Kisinona • Kitawak • Kiuyoyou • Kudanisar • Kumamayn • Kurakat • Kyokugon • Kyononis • Makasura • Makurukis • Maoikes • Marakuguc • Marari-in • Mayachideg • Mayachin • Mayahisik • Mayak • Mayam • Mayamats • Mayanas • Mayaotaki • Mayasiar • Mayatat • Mayaumekis • Mayausiy • Minetak • Miryotanog • Mogawak • Mogisari • Momosik • Morok • Moshapin • Motsusis • Musanokir • Nachoyah • Natak • Ninjis • Nouda • O-ogim • Orochium • Oromuwak • Oshozan-u • Otak • Otutsum • Pupunke • Rakakudaj • Rakashog • Rasitakiwak • Rasiwak • Ren-iz • Riogok • Rotsumamu • Runakit • Rutafu-um • Sahirow • Sakunbomar • Sepapa • Serutabomac • Sibajitak • Sifumim • Sihajog • Sikukuu • Simosiwak • Sinakawak • Sinatanika • Sisuran • Sitsum • Siwakama • Sonapan • Soryotanog • Suariwak • Susub • Susuyai • Tadarok • Tajikats • Taki-ihaban • Taninoud • Taunhiy • Tauyosipun • Tenbez • Teniten • Tenmaten • Timawak • Tokiy • Tsutsu-um • Tukarok • Turakamik • Turakawak • Ukoojisi • Ukouh • Usazum • Utojis • Utsushok • Wao-os • Yamiyo • Yansamin • Yomizuk • Zakusu • Zanmik
Dungeons in Freshly-Picked Tingle's Rosy Rupeeland
Hero's Shrine • Pirate Hideaway • Deku Temple • Insect Cavern • Desma's Labyrinth
Stages in Link's Crossbow Training
Level 1
Ordon Target Practice • Gerudo Stalfos: Defender • Arbiter's Grounds: Ranger
Level 2
Goron Target Practice • Zora River: Defender • Skull Shooting
Level 3
Kakariko Target Practice • Fruit Balloons • The Great Bridge: Defender
Level 4
Zora River Target Practice • Hyrule Castle: Defender • Skulltula Forest: Ranger
Level 5
Oocca Target Practice • Gerudo Moldorm: Defender • The Shootout
Level 6
Ordon Target Practice 2 • Bridge of Eldin: Defender • Snowpeak Ruins: Ranger
Level 7
Underground Target Practice • City in the Sky: Defender • Temple of Time: Ranger
Level 8
Horseback Target Practice • Snowpeak Ruins: Defender • Darknut Battle
Ranch Target Practice • Sacred Grove: Defender • Fossil Stallord Battle
Hyrule Field • Eldin Caves • Faron Woods • Valley of Seers • Death Mountain • Lake Hylia • Twilight Field • Palace of Twilight • Skyloft • Sealed Grounds • Temple of the Sacred Sword • Temple of Souls • Gerudo Desert • Ganon's Tower • Forsaken Fortress • Wind and Earth Temples
Frozen Grotto • Gerudo Ruins • Lost Swamp • Temple of Storms • Hyrule Castle • Future World