Inside the Deku Tree: Difference between revisions
MannedTooth (talk | contribs) No edit summary |
TriforceTony (talk | contribs) |
||
| (46 intermediate revisions by 13 users not shown) | |||
| Line 1: | Line 1: | ||
{{Dungeon | {{Infobox Dungeon | ||
|image = File:Inside the Deku Tree.png | |image= | ||
| | {{Media | ||
| | |Screenshot OoT= File:OoT Inside the Deku Tree.png | ||
|Screenshot OoT3D= File:OoT3D Inside the Deku Tree.png | |||
| | |Map OoT= File:OoT Inside the Deku Tree Map.jpg | ||
|Map OoT3D= File:OoT3D Inside the Deku Tree Map.png | |||
}} | }} | ||
{{Term/Store|Inside the Deku Tree||Series, OoT, OoT3D}} is the first | |caption= | ||
|location= {{Term|OoT3D|Kokiri Forest|link}} | |||
|game= OoT | |||
|item= | |||
{{List| | |||
{{Term|OoT3D|Fairy Slingshot|link}}, | |||
{{Term|OoT3D|Golden Skull Token|link}} {{Qty|4}} | |||
}} | |||
|boss= {{Term|OoT3D|Gohma|link}} | |||
|quest= | |||
{{List| | |||
{{Term|OoT3D|Kokiri's Emerald|link}}, | |||
{{Term|OoT3D|Heart Container|link}} | |||
}} | |||
|theme music= | |||
|strategy= {{StrategyWiki|The Legend of Zelda: Ocarina of Time/Inside the Deku Tree|Inside the Deku Tree}} | |||
}} | |||
{{Term/Store|Inside the Deku Tree||Series, OoT, OoT3D}} is the first {{Term|OoT3D|Dungeon|link}} of {{OoT}}.<ref>{{Cite Book|quote= |book= E |publisher= |page= 149}}</ref> It is the first {{Term|OoT3D|Dungeon}} in the game. Its {{Term|OoT3D|Dungeon}} {{Term|OoT3D|Item}} is the {{Term|OoT3D|Fairy Slingshot|link}} and its boss is {{Term|OoT3D|Gohma|link}}. | |||
{{OTOC}} | |||
==Features and Overview== | |||
{{Collapsible | |||
|header= Map | |||
|frame= true | |||
|collapse= false | |||
|stretch= false | |||
|content= | |||
{{Tabs | |||
|align= center | |||
|columns= 5 | |||
|position= bottom | |||
|default= 3 | |||
|tab1= B2 | |||
|content1= [[File:OoT3D Inside the Deku Tree B2.png|link=]] | |||
|tab2= B1 | |||
|content2= [[File:OoT3D Inside the Deku Tree B1.png|link=]] | |||
|tab3= F1 | |||
|content3= [[File:OoT3D Inside the Deku Tree 1F.png|link=]] | |||
|tab4= F2 | |||
|content4= [[File:OoT3D Inside the Deku Tree 2F.png|link=]] | |||
|tab5= F3 | |||
|content5= [[File:OoT3D Inside the Deku Tree 3F.png|link=]] | |||
}} | |||
}} | |||
The {{Term|OoT3D|Great Deku Tree|link}} is located inside his {{Term|OoT3D|Great Deku Tree's Meadow|link|display=Meadow}} in {{Term|OoT3D|Kokiri Forest|link}}. The entrance to the {{Term|OoT3D|Great Deku Tree's Meadow}} is blocked by {{Term|OoT3D|Mido|link}}, who refuses entry to anyone without both a {{Term|OoT3D|Sword|link}} and {{Term|OoT3D|Shield|link}}. Once {{Term|OoT3D|Link|link}} equips both the {{Term|OoT3D|Kokiri Sword|link}} and {{Term|OoT3D|Deku Shield|link}}, {{Term|OoT3D|Mido}} will begrudgingly allow him to visit the {{Term|OoT3D|Great Deku Tree}}. Inside the {{Term|OoT3D|Great Deku Tree's Meadow}}, the {{Term|OoT3D|Great Deku Tree}} explains that he has been cursed and requires {{Term|OoT3D|Link}}'s help to break his curse.<ref>{{Cite|Link... Welcome... Listen carefully to what I, the {{Color|OoT3D Red|Deku Tree}}, am about to tell thee... Thy slumber these past moons must have been restless and full of nightmares... As the servants of evil gain strength, a vile climate pervades the land and causes nightmares to those sensitive to it... Verily, thou hast felt it... Link... The time has come to test thy courage...|Great Deku Tree|OoT3D}}<br/>{{Cite|I have been {{Color|OoT3D Red|cursed}}... I need thee to break the curse with thy wisdom and courage. Dost thou have courage enough to undertake this task?|Great Deku Tree|OoT3D}}</ref> If {{Term|OoT3D|Link}} agrees to help, the {{Term|OoT3D|Great Deku Tree}} opens his mouth, granting {{Term|OoT3D|Link}} passage inside.<ref>{{Cite|[{{Color|OoT3D Green|Yes}}] Then enter, brave Link, and thou too, Navi... Navi the fairy... Thou must aid Link... And, Link... When {{Color|OoT3D Light Blue|Navi}} speaks, use {{Icon|OoT3D Navi}} to listen well to her words of wisdom...|Great Deku Tree|OoT3D}}</ref>{{Note|If {{Term|OoT3D|Link}} denies this request, the {{Term|OoT3D|Great Deku Tree}} will tell him to return to the {{Term|OoT3D|Kokiri Forest}} to practice combat before returning.<ref>{{Cite|[{{Color|OoT3D Green|No}}] Perhaps thou dost not yet have confidence in thy abilities... Return to the Kokiri Forest to learn the skills of combat... When thou art ready, return here and speak with me by using {{Icon|OoT3D L}}...|Great Deku Tree|OoT3D}}</ref>}} | |||
[[File:OoT3D Inside the Deku Tree Interior.png|thumb|right|240px|The {{Term|OoT3D|Dungeon}}'s entrance from {{OoT3D|-}}]] | |||
The {{Term|OoT3D|Dungeon|link}} is designed to teach {{Term|OoT3D|Link}} how to navigate in three-dimensional space and how basic {{Plural|OoT3D|Object|link}} like {{Plural|OoT3D|Door|link}},<ref>{{Cite|You can open a {{Color|OoT3D White|door}} by standing in front of it and pressing {{Icon|OoT3D A}}. Pay attention to what the Action Icon says. That's the {{Color|OoT3D White|A Button icon}} on the upper screen!|Navi|OoT3D}}</ref> {{Plural|OoT3D|Ladder|link}} and {{Plural|OoT3D|Vine|link}},<ref>{{Cite|Look at this wall! The vines growing on it give it a rough surface... Maybe you can climb it, Link!|Navi|OoT3D}}</ref> {{Plural|OoT3D|Switch|link}}, and {{Plural|OoT3D|Block|link}} function.<ref>{{Cite|Stand next to this {{Color|OoT3D White|block}} and grab hold of it with {{Icon|OoT3D A}}. While holding {{Icon|OoT3D A}}, you can push or pull it. If you stand next to the {{Color|OoT3D White|block}} and press {{Icon|OoT3D A}} while pressing {{Icon|OoT3D Circle Pad}} toward the {{Color|OoT3D White|block}}, you can climb on top of it. Pay attention to what the {{Color|OoT3D White|Action Icon}} says!|Navi|OoT3D}}</ref> As {{Term|OoT3D|Link}} enters the {{Term|OoT3D|Dungeon}}, the camera shifts to focus on a {{Term|OoT3D|Ladder}}, giving a hint for where {{Term|OoT3D|Link}} must go first. | |||
Most of the {{Plural|OoT3D|Enemy|link}} within the {{Term|OoT3D|Dungeon}} are stationary and will not move around, teaching {{Term|OoT3D|Link}} how to engage {{Plural|OoT3D|Enemy}} in combat. Some {{Plural|OoT3D|Enemy}} cling to the ceiling and will drop down onto {{Term|OoT3D|Link}} if he approaches their positions, encouraging {{Term|OoT3D|Link}} to be aware of his surroundings. {{Term|OoT3D|Inside the Deku Tree}} is a forgiving {{Term|OoT3D|Dungeon}} as a large number of {{Plural|OoT3D|Heart|link}} can be found floating in various parts of it, as well as inside many of its {{Plural|OoT3D|Treasure Chest|link}}. Several patches of {{Term|OoT3D|Grass|link}} grow within the {{Term|OoT3D|Dungeon}} and provide {{Plural|OoT3D|Heart}} as well as {{Plural|OoT3D|Rupee|link}} and {{Plural|OoT3D|Deku Seed|link}} when cut. These patches of {{Term|OoT3D|Grass}} typically regrow after being cut, allowing {{Term|OoT3D|Link}} to retrieve an infinite stock of supplies. | |||
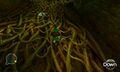
The vertical design of the {{Term|OoT3D|Dungeon}} challenges {{Term|OoT3D|Link}}'s spatial awareness and is also the key to entering the depths of the {{Term|OoT3D|Inside the Deku Tree|display=Deku Tree}}. The first room of the {{Term|OoT3D|Dungeon}} is a large, three-story chamber that branches into various rooms. In the center of the first room there is a large {{Term|OoT3D|Web}} covering a pit leading to the depths of the {{Term|OoT3D|Dungeon}}, though it cannot be bypassed from the first floor. The second floor holds the {{Term|OoT3D|Dungeon}}'s primary {{Term|OoT3D|Item|link}}, the {{Term|OoT3D|Fairy Slingshot|link}}, which gives greater freedom to manipulate {{Plural|OoT3D|Puzzle}} and fight {{Plural|OoT3D|Enemy}} from a safe distance. {{Term|OoT3D|Link}} is taught how to carry {{Term|OoT3D|Fire|link}} from one {{Term|OoT3D|Torch|link}} to another with {{Plural|OoT3D|Deku Stick|link}} and to temporarily manipulate rooms with timed {{Plural|OoT3D|Floor Switch|link}} while ascending the {{Term|OoT3D|Inside the Deku Tree|display=Deku Tree}}. A cowardly {{Term|OoT3D|Deku Scrub}} can also be found on the second floor, who in return for his freedom teaches {{Term|OoT3D|Link}} how to safely land after jumping from high elevations.<ref>{{Cite|Ow-ow-ow! Forgive me, master! If I give you a tip, will you let me go? When you jump off a high cliff, if you hold {{Icon|OoT3D Circle Pad}} forward, you will roll on the ground when you land and won't get hurt from the fall. I can't guarantee it will work, though, if the cliff is really, really high, heh heh! Well, try it if you are feeling bold! Wah ha hah!|Deku Scrub|OoT3D}}</ref> From the third floor, {{Term|OoT3D|Link}} is able to jump down onto the {{Term|OoT3D|Web}} and break it with the force of {{Term|OoT3D|Gravity|link}} to land in a pool of water in the bottom first floor. | |||
A {{Term|OoT3D|Floor Switch}} on the bottom first floor activates a nearby {{Term|OoT3D|Torch}}, which in turn burns the {{Term|OoT3D|Web}} covering it and teaches {{Term|OoT3D|Link}} about the flammability of {{Plural|OoT3D|Web}}. To advance further, {{Term|OoT3D|Link}} must combine this and the knowledge gained on the third floor and carry {{Term|OoT3D|Fire}} to burn the {{Term|OoT3D|Web}} covering a nearby {{Term|OoT3D|Door}}. A second cowardly {{Term|OoT3D|Deku Scrub}} is found after this, who teaches {{Term|OoT3D|Link}} the secret to advancing beyond a group of {{Plural|OoT3D|Deku Scrub}} by defeating them in the proper order.<ref>{{Cite|Please forgive me, master! I'll never do it again! If you spare me, I'll teach you something cool. You will never beat my brothers up ahead unless you punish them in the proper order. The order is...<br/>{{Color|OoT3D Red|2 3 1<br/>Twenty-three is number one!}} Do you think I'm a traitor?|Deku Scrub|OoT3D}}</ref> Another room along this path tests {{Term|OoT3D|Link}}'s ability to pass under a {{Term|OoT3D|Spiketrap|link}}, which can be done by either {{Term|OoT3D|Swimming|link}} and {{Term|OoT3D|Diving|link}} to press an underwater {{Term|OoT3D|Floor Switch}} that lowers the room's water level, or by crouching and holding his {{Term|OoT3D|Deku Shield}} to pass underneath the {{Term|OoT3D|Spiketrap}}. A room along this path features a {{Term|OoT3D|Cracked Wall|link}}, which can only be destroyed with {{Plural|OoT3D|Bomb|link}}, which are obtained in {{Term|OoT3D|Dodongo's Cavern|link}}. At the end of this path is another {{Term|OoT3D|Web}} covering a pit to the bottom second floor where a group of three {{Plural|OoT3D|Deku Scrub}} guard the {{Term|OoT3D|Door}} to the {{Term|OoT3D|Boss|link}}, {{Term|OoT3D|Gohma|link}}. By stunning the middle one first, the right one second, and the left one first, {{Term|OoT3D|Link}} will defeat them and gain entry. Out of frustration, one of the {{Plural|OoT3D|Deku Scrub}} reveals {{Term|OoT3D|Gohma}}'s weakness before disappearing.<ref>{{Cite|How did you know our secret? How irritating! It's so annoying that I'm going to reveal the secret of Queen Gohma to you! In order to administer the coup de grâce to Queen Gohma, strike with your sword {{Color|OoT3D Red|while she's stunned}}. Oh, Queenie... Sorry about that!|Deku Scrub|OoT3D}}</ref> | |||
[[File:OoT3D Gohma Ceiling.png|thumb|right|240px|{{Term|OoT3D|Gohma}} clinging to the ceiling from {{OoT3D|-}}]] | |||
The {{Term|OoT3D|Boss Arena|link}} is a large room with four pillars. When {{Term|OoT3D|Link}} enters, {{Term|OoT3D|Gohma}} can be heard walking along its ceiling. By making eye contact with the {{Term|OoT3D|Boss}}, {{Term|OoT3D|Link}} will begin the fight with her. Upon her defeat, {{Term|OoT3D|Gohma}} will leave behind a {{Term|OoT3D|Heart Container|link}} that increases {{Term|OoT3D|Link}}'s {{Term|OoT3D|Life Gauge|link}} and a {{Term|OoT3D|Warp Point|link}} will appear to take {{Term|OoT3D|Link}} back to the {{Term|OoT3D|Great Deku Tree's Meadow}}. With the curse broken, the {{Term|OoT3D|Great Deku Tree}} congratulates him and shares more information about the origin of his curse.<ref>{{Cite|Well done, Link...|Great Deku Tree|OoT3D}}<br/>{{Cite|Thou has verily demonstrated they courage... I knew that thou wouldst be able to carry out my wishes...|Great Deku Tree|OoT3D}}<br/>{{Cite|Now I have yet more to tell thee, wouldst thou listen...|Great Deku Tree|OoT3D}}</ref> | |||
According to the {{Term|OoT3D|Great Deku Tree}}, he was cursed by an evil sorcerer named {{Term|OoT3D|Ganondorf|link}} who is looking for the entrance to the {{Term|OoT3D|Sacred Realm|link}} that houses the divine {{Term|OoT3D|Triforce|link}}.<ref>{{Cite|Now...listen carefully... A {{Color|OoT3D Red|wicked man of the desert}} cast this dreadful curse upon me...|Great Deku Tree|OoT3D}}<br/>{{Cite|This evil man ceaselessly uses his vile, sorcerous powers in his search for the Sacred Realm that is connected to Hyrule... For it is in that Sacred Realm that one will find the divine relic, the {{Color|OoT3D Red|Triforce}}, which contains the essence of the gods...|Great Deku Tree|OoT3D}}</ref> Because he refused to give one of the keys to the {{Term|OoT3D|Sacred Realm}}, a curse was placed on the {{Term|OoT3D|Great Deku Tree}} to drain his power and ultimately kill him.<ref>{{Cite|Thou must never allow the desert man in black armor to lay his hands on the sacred Triforce... Thou must never suffer that man, with his evil heart, to enter the Sacred Realm of legend... That evil man who cast the death curse upon me and sapped my power... Because of that curse, my end is nigh... Though your valiant efforts to break the curse were successful, I was doomed before you started... Yes, I will pass away soon... But do not grieve for me... I have been able to tell you of these important matters... This is Hyrule's final hope...|Great Deku Tree|OoT3D}}</ref> After giving {{Term|OoT3D|Link}} the {{Term|OoT3D|Spiritual Stone of the Forest|link}}, one of the keys to the {{Term|OoT3D|Sacred Realm}}, the {{Term|OoT3D|Great Deku Tree}} tells him to travel to {{Term|OoT3D|Hyrule Castle|link}} and meet with its {{Term|OoT3D|Princess Zelda|link|display=Princess}}.<ref>{{Cite|Link... Go now to Hyrule Castle... There thou wilt surely meet the {{Color|OoT3D Red|Princess of Destiny}}... Take {{Color|OoT3D Red|this stone}} with thee, the stone that man wanted so much that he cast the curse upon me...|Great Deku Tree|OoT3D}}</ref> With his duty to protect the {{Term|OoT3D|Triforce}} completed, he passes away. | |||
During the {{Term|OoT3D|Child Era|link}}, {{Term|OoT3D|Link}} is still able to enter {{Term|OoT3D|Inside the Deku Tree}}. This passage becomes blocked in the {{Term|OoT3D|Adult Era|link}}. In order to fully explore the {{Term|OoT3D|Dungeon}}, {{Term|OoT3D|Link}} must return with {{Plural|OoT3D|Bomb}} and the {{Term|OoT3D|Boomerang|link}}. | |||
The design of the {{Term|OoT3D|Dungeon}} is altered slightly in {{MQ}}. It features a different array of {{Plural|OoT3D|Monster|link}} such as {{Plural|OoT3D|Big Deku Baba|link}} and {{Plural|OoT3D|Keese|link}}. Different {{Plural|OoT3D|Puzzle}} can be found within, though they largely follow the same concepts such as carrying {{Plural|OoT3D|Fire}}. Unlike in the normal mode, {{Term|OoT3D|Link}} must carry {{Term|OoT3D|Fire}} through one room into another to activate two {{Plural|OoT3D|Torch}} as well as under the {{Term|OoT3D|Spiketrap}} without the use of the underwater {{Term|OoT3D|Floor Switch}} to light a {{Term|OoT3D|Torch}} across the pool of water. The cowardly {{Plural|OoT3D|Deku Scrub}} can no longer be found, though the three guarding the {{Term|OoT3D|Boss Arena}} remain. The locations of {{Plural|OoT3D|Gold Skulltula|link}} and the contents of {{Plural|OoT3D|Treasure Chest}} have also been changed. In order to fully explore the {{Term|OoT3D|Dungeon}}, {{Term|OoT3D|Link}} must have {{Plural|OoT3D|Bombchu|link}}, the {{Term|OoT3D|Boomerang}}, and the "{{Term|OoT3D|Song of Time|link}}". | |||
A {{Term|OoT3D|Business Scrub|link}} appears near the lowest pit selling {{Plural|OoT3D|Deku Shield|link}} to replace {{Term|OoT3D|Link}}'s if his is burned by the {{Plural|OoT3D|Keese}}. However, these cost 10 {{Plural|OoT3D|Rupee}} more than those in the {{Term|OoT3D|Kokiri Shop|link}}. | |||
== | ===Areas=== | ||
===={{Term|OoT3D|Business Scrub}}'s {{Term|OoT3D|Shop}}==== | |||
;{{MQ|-}} only | |||
{{Wares|game= OoT3D | |||
|- | |||
| Deku Shield | |||
| 50 | |||
}} | |||
==={{Plural|OoT3D|Enemy}}=== | |||
{{Gallery List|Enemies | |||
|OoT= | |||
Big Skulltula [Qty:3], | |||
Deku Baba [Qty:9], | |||
Deku Baba [2][Qty:5]{{List Note|Five [[Zelda Wiki:Glossary#Respawn|respawn]] indefinitely.}}, | |||
Deku Scrub [Qty:5]{{List Note|Four do not [[Zelda Wiki:Glossary#Reappear|reappear]].}}, | |||
Gohma Egg [Qty:3], | |||
Gold Skulltula [Qty:4]{{List Note|Four do not [[Zelda Wiki:Glossary#Reappear|reappear]].}}, | |||
Skulltula [Qty:4], | |||
Skullwalltula [Qty:3], | |||
Spiked-Log Trap [Qty:1] | |||
}} | |||
{{List Notes}} | |||
;{{MQ|-}} | |||
{{Gallery List|Enemies | |||
|OoT= | |||
Big Deku Baba [Qty:3], | |||
Business Scrub [Qty:1], | |||
Deku Baba [Qty:7]{{List Note|One does not [[Zelda Wiki:Glossary#Reappear|reappear]].}}, | |||
Deku Baba [2][Qty:5]{{List Note|Five [[Zelda Wiki:Glossary#Respawn|respawn]] indefinitely.}}, | |||
Deku Scrub [Qty:3]{{List Note|Three do not [[Zelda Wiki:Glossary#Reappear|reappear]]. These {{Plural|OoT3D|Deku Scrub}} will not be defeated unless {{Term|OoT3D|Link|link}} defeats them in the inverse order of {{OoT|-}}'s normal mode: 1, 3, 2. Despite the mirroring in {{OoT3D|-}}{{'}}s {{MQ|-}}, the leftmost {{Term|OoT3D|Deku Scrub}} is counted as "1".}}, | |||
Gohma Egg [Qty:26]{{List Note|17 do not [[Zelda Wiki:Glossary#Reappear|reappear]].}}, | |||
Gold Skulltula [Qty:4]{{List Note|Four do not [[Zelda Wiki:Glossary#Reappear|reappear]].}}, | |||
Keese [Qty:6]{{List Note|One does not [[Zelda Wiki:Glossary#Reappear|reappear]].}}, | |||
Mad Scrub [Qty:2]{{List Note|Two do not [[Zelda Wiki:Glossary#Reappear|reappear]].}}, | |||
Skulltula [Qty:2], | |||
Skullwalltula [Qty:3], | |||
Spiked-Log Trap [Qty:1] | |||
}} | |||
{{List Notes}} | |||
== | ===={{Plural|OoT3D|Boss}}==== | ||
< | {{Gallery List|Enemies | ||
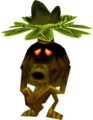
File: | |OoT= Gohma [Qty:1]<br/>''Parasitic Armored Arachnid'' | ||
File: | }} | ||
File: | |||
File: | ==={{Plural|OoT3D|Treasure Chest}}=== | ||
File: | {{Treasure Chests|game= OoT3D | ||
File: | |- | ||
File: | | Treasure Chest [2] | ||
File: | | Dungeon Map | ||
File: | | [[File:OoT3D Inside the Deku Tree Treasure Chest.png|link=]] | ||
File: | | Between the {{Plural|OoT3D|Vine|link}} near the top of the spiral ramp in the first room | ||
File: | |- | ||
File: | | Treasure Chest [2] | ||
| Fairy Slingshot | |||
</ | | [[File:OoT3D Inside the Deku Tree Treasure Chest 2.png|link=]] | ||
| Atop the far ledge in 2F's southwestern room | |||
|- | |||
| Treasure Chest | |||
| Recovery Heart [File:OoT3D Heart Model.png] | |||
| [[File:OoT3D Inside the Deku Tree Treasure Chest 3.png|link=]] | |||
| Atop a ledge accessible by {{Plural|OoT3D|Vine|link}} in 2F's southwestern room | |||
|- | |||
| Treasure Chest [2] | |||
| Compass | |||
| [[File:OoT3D Inside the Deku Tree Treasure Chest 4.png|link=]] | |||
| Atop a ledge in 3F's western room | |||
|- | |||
| Treasure Chest | |||
| Recovery Heart [File:OoT3D Heart Model.png] | |||
| [[File:OoT3D Inside the Deku Tree Treasure Chest 5.png|link=]] | |||
| Atop the ledge along the south wall in 3F's western room | |||
|- | |||
| Treasure Chest | |||
| Recovery Heart [File:OoT3D Heart Model.png] | |||
| [[File:OoT3D Inside the Deku Tree Treasure Chest 6.png|link=]] | |||
| Behind the {{Term|OoT3D|Web|link}} near the {{Term|OoT3D|Torch|link}} in B1's northeastern room | |||
}} | |||
;{{MQ|-}} | |||
{{Hatnote|The directions listed apply for {{OoT3D|-}}{{'}}s {{MQ|-}}. In all versions of {{MQ|-}} prior to {{OoT3D|-}}, east and west are reversed from the directions listed here.}} | |||
{{Treasure Chests|game= OoT3D | |||
|- | |||
| Treasure Chest [2] | |||
| Dungeon Map | |||
| [[File:OoT3D MQ Inside the Deku Tree Treasure Chest.png|link=]] | |||
| Between the {{Plural|OoT3D|Vine|link}} near the top of the spiral ramp in the first room | |||
|- | |||
| Treasure Chest | |||
| Blue Rupee [File:OoT3D Blue Rupee Obtained Model.png] | |||
| [[File:OoT3D MQ Inside the Deku Tree Treasure Chest 2.png|link=]] | |||
| Appears atop a ledge after lighting the {{Term|OoT3D|Torch|link}} in the center of 3F's eastern room | |||
|- | |||
| Treasure Chest [2] | |||
| Fairy Slingshot | |||
| [[File:OoT3D MQ Inside the Deku Tree Treasure Chest 3.png|link=]] | |||
| Appears atop a ledge in 3F's eastern room after all of the {{Plural|OoT3D|Enemy|link}} have been defeated | |||
|- | |||
| Treasure Chest [2] | |||
| Compass | |||
| [[File:OoT3D MQ Inside the Deku Tree Treasure Chest 4.png|link=]] | |||
| Atop the far ledge in 2F's southeastern room | |||
|- | |||
| Treasure Chest | |||
| Blue Rupee [File:OoT3D Blue Rupee Obtained Model.png] | |||
| [[File:OoT3D MQ Inside the Deku Tree Treasure Chest 5.png|link=]] | |||
| Appears in B1's northwestern room after pressing the {{Term|OoT3D|Floor Switch|link}} behind the {{Term|OoT3D|Web|link}} | |||
|- | |||
| Treasure Chest | |||
| Recovery Heart [File:OoT3D Heart Model.png] | |||
| [[File:OoT3D MQ Inside the Deku Tree Treasure Chest 6.png|link=]] | |||
| Beside the entrance in B1's south-central room | |||
}}<!-- | |||
One Treasure Chest is located inside a Time Block | |||
--> | |||
{{List Notes}} | |||
==={{Plural|OoT3D|Golden Skull Token}}=== | |||
{{Gold Skulltulas|game= OoT3D | |||
|- | |||
| Inside the Deku Tree | |||
| On the wall behind the small {{Term|OoT3D|Treasure Chest|link}} in 3F's western room | |||
|- | |||
| Inside the Deku Tree [2] | |||
| Clinging to the {{Plural|OoT3D|Vine}} connecting B1 and 1F | |||
|- | |||
| Inside the Deku Tree [3] | |||
| On the bars in B1's northeastern room | |||
|- | |||
| Inside the Deku Tree [4] | |||
| On the wall in B1's northwestern room<br/>Requires {{Plural|OoT3D|Bomb|link}} and the {{Term|OoT3D|Boomerang|link}} | |||
}} | |||
;{{MQ|-}} | |||
{{Hatnote|The directions listed apply for {{OoT3D|-}}{{'}}s {{MQ|-}}. In all versions of {{MQ|-}} prior to {{OoT3D|-}}, east and west are reversed from the directions listed here.}} | |||
{{Gold Skulltulas|game= OoT3D | |||
|- | |||
| MQ Inside the Deku Tree | |||
| Inside the {{Term|OoT3D|Wooden Box|link}} beside the {{Plural|OoT3D|Vine|link}} near the top of the spiral ramp in the first room | |||
|- | |||
| MQ Inside the Deku Tree [2] | |||
| Behind the {{Plural|OoT3D|Bomb Rock|link}} in 2F's southeastern room<br/>Requires {{Plural|OoT3D|Bombchu|link}} and the {{Term|OoT3D|Boomerang|link}} | |||
|- | |||
| MQ Inside the Deku Tree [3] | |||
| High on the wall in B1's northeastern room<br/>Requires the {{Term|OoT3D|Boomerang|link}} | |||
|- | |||
| MQ Inside the Deku Tree [4] | |||
| On the ceiling in B1's middle-northeastern room<br/>Requires the {{Term|OoT3D|Boomerang|link}} and the "{{Term|OoT3D|Song of Time|link}}" | |||
}} | |||
==Trivia== | ==Trivia== | ||
*The sealed room in | * The sealed room in B1 of the {{Term|OoT|Dungeon|link}} containing the final {{Term|OoT|Gold Skulltula|link}} does not appear on the {{Term|OoT|Map|link}} until it is visited, even after {{Term|OoT|Link|link}} collects the {{Term|OoT|Dungeon Map|link}}. This issue was fixed in {{OoT3D}}. | ||
==Nomenclature== | ==Nomenclature== | ||
{{Names | {{Nomenclature}} | ||
===Other Names=== | |||
{{Other Names | |||
|- | |||
| | | Inside the Great Deku Tree<ref>{{Cite eGuide|game= OoT3D |guide= Prima |page= 23}}</ref> | ||
| | | {{OoT3D}} | ||
| | | {{eGuide|OoT3D|Prima}} | ||
| | | {{E}} | ||
| | |||
| | |||
| | |||
}} | }} | ||
==Gallery== | ==Gallery== | ||
<gallery> | <gallery> | ||
File:1 Deku34 Large.jpg|An | File:1 Deku34 Large.jpg|An {{Term|OoT3D|Eyeball Switch}} {{Term|OoT3D|Inside the Deku Tree}} from {{OoT|-}} | ||
File:1 Deku17 Large.jpg|Activating a | File:1 Deku17 Large.jpg|Activating a {{Term|OoT3D|Floor Switch}} {{Term|OoT3D|Inside the Deku Tree}} from {{OoT|-}} | ||
File: | File:OoT3D Link Climbing Vines.jpg|{{Term|OoT3D|Link}} climbing {{Plural|OoT3D|Vine}} {{Term|OoT3D|Inside the Deku Tree}}<br/>{{Small|{{3D Image}}}} | ||
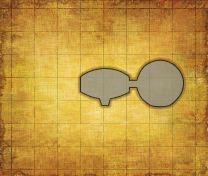
File:OoT3D Inside the Deku Tree Map 2.png|Map of the basements of the {{Term|OoT3D|Inside the Deku Tree}} from {{OoT3D|-}} | |||
</gallery> | </gallery> | ||
{{Notes}} | |||
{{Ref}} | {{Ref}} | ||
{{DungeonNav2|OoT}} | {{DungeonNav2|OoT}} | ||
{{Categories | {{Categories | ||
|dungeons= OoT, OoT3D | |dungeons= OoT, OoT3D | ||
}} | }} | ||
[[de:Im Deku-Baum]] | |||
Latest revision as of 21:47, 19 October 2023
Inside the Deku Tree is the first Dungeon of Ocarina of Time.[1] It is the first Dungeon in the game. Its Dungeon Item is the Fairy Slingshot and its boss is Gohma.
Features and Overview
The Great Deku Tree is located inside his Meadow in Kokiri Forest. The entrance to the Great Deku Tree's Meadow is blocked by Mido, who refuses entry to anyone without both a Sword and Shield. Once Link equips both the Kokiri Sword and Deku Shield, Mido will begrudgingly allow him to visit the Great Deku Tree. Inside the Great Deku Tree's Meadow, the Great Deku Tree explains that he has been cursed and requires Link's help to break his curse.[2] If Link agrees to help, the Great Deku Tree opens his mouth, granting Link passage inside.[3][note 1]

The Dungeon is designed to teach Link how to navigate in three-dimensional space and how basic Objects like Doors,[5] Ladders and Vines,[6] Switches, and Blocks function.[7] As Link enters the Dungeon, the camera shifts to focus on a Ladder, giving a hint for where Link must go first.
Most of the Enemies within the Dungeon are stationary and will not move around, teaching Link how to engage Enemies in combat. Some Enemies cling to the ceiling and will drop down onto Link if he approaches their positions, encouraging Link to be aware of his surroundings. Inside the Deku Tree is a forgiving Dungeon as a large number of Hearts can be found floating in various parts of it, as well as inside many of its Treasure Chests. Several patches of Grass grow within the Dungeon and provide Hearts as well as Rupees and Deku Seeds when cut. These patches of Grass typically regrow after being cut, allowing Link to retrieve an infinite stock of supplies.
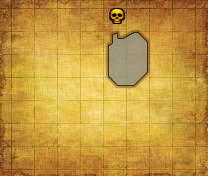
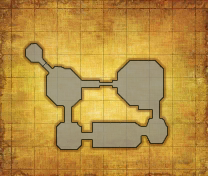
The vertical design of the Dungeon challenges Link's spatial awareness and is also the key to entering the depths of the Deku Tree. The first room of the Dungeon is a large, three-story chamber that branches into various rooms. In the center of the first room there is a large Web covering a pit leading to the depths of the Dungeon, though it cannot be bypassed from the first floor. The second floor holds the Dungeon's primary Item, the Fairy Slingshot, which gives greater freedom to manipulate Puzzles and fight Enemies from a safe distance. Link is taught how to carry Fire from one Torch to another with Deku Sticks and to temporarily manipulate rooms with timed Floor Switches while ascending the Deku Tree. A cowardly Deku Scrub can also be found on the second floor, who in return for his freedom teaches Link how to safely land after jumping from high elevations.[8] From the third floor, Link is able to jump down onto the Web and break it with the force of Gravity to land in a pool of water in the bottom first floor.
A Floor Switch on the bottom first floor activates a nearby Torch, which in turn burns the Web covering it and teaches Link about the flammability of Webs. To advance further, Link must combine this and the knowledge gained on the third floor and carry Fire to burn the Web covering a nearby Door. A second cowardly Deku Scrub is found after this, who teaches Link the secret to advancing beyond a group of Deku Scrubs by defeating them in the proper order.[9] Another room along this path tests Link's ability to pass under a Spiketrap, which can be done by either Swimming and Diving to press an underwater Floor Switch that lowers the room's water level, or by crouching and holding his Deku Shield to pass underneath the Spiketrap. A room along this path features a Cracked Wall, which can only be destroyed with Bombs, which are obtained in Dodongo's Cavern. At the end of this path is another Web covering a pit to the bottom second floor where a group of three Deku Scrubs guard the Door to the Boss, Gohma. By stunning the middle one first, the right one second, and the left one first, Link will defeat them and gain entry. Out of frustration, one of the Deku Scrubs reveals Gohma's weakness before disappearing.[10]

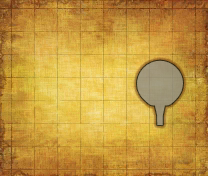
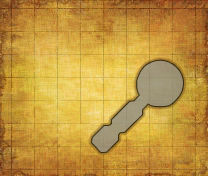
The Boss Arena is a large room with four pillars. When Link enters, Gohma can be heard walking along its ceiling. By making eye contact with the Boss, Link will begin the fight with her. Upon her defeat, Gohma will leave behind a Heart Container that increases Link's Life Gauge and a Warp Point will appear to take Link back to the Great Deku Tree's Meadow. With the curse broken, the Great Deku Tree congratulates him and shares more information about the origin of his curse.[11]
According to the Great Deku Tree, he was cursed by an evil sorcerer named Ganondorf who is looking for the entrance to the Sacred Realm that houses the divine Triforce.[12] Because he refused to give one of the keys to the Sacred Realm, a curse was placed on the Great Deku Tree to drain his power and ultimately kill him.[13] After giving Link the Spiritual Stone of the Forest, one of the keys to the Sacred Realm, the Great Deku Tree tells him to travel to Hyrule Castle and meet with its Princess.[14] With his duty to protect the Triforce completed, he passes away.
During the Child Era, Link is still able to enter Inside the Deku Tree. This passage becomes blocked in the Adult Era. In order to fully explore the Dungeon, Link must return with Bombs and the Boomerang.
The design of the Dungeon is altered slightly in Master Quest. It features a different array of Monsters such as Big Deku Babas and Keese. Different Puzzles can be found within, though they largely follow the same concepts such as carrying Fires. Unlike in the normal mode, Link must carry Fire through one room into another to activate two Torches as well as under the Spiketrap without the use of the underwater Floor Switch to light a Torch across the pool of water. The cowardly Deku Scrubs can no longer be found, though the three guarding the Boss Arena remain. The locations of Gold Skulltulas and the contents of Treasure Chests have also been changed. In order to fully explore the Dungeon, Link must have Bombchus, the Boomerang, and the "Song of Time".
A Business Scrub appears near the lowest pit selling Deku Shields to replace Link's if his is burned by the Keese. However, these cost 10 Rupees more than those in the Kokiri Shop.
Areas
Business Scrub's Shop
- Master Quest only
| Item | |
|---|---|
| Price |

| Item | Price |
|---|---|
Enemies


![Deku Baba ×5[a]](/wiki/File:OoT_Deku_Baba_Model_2.png)
![Deku Scrub ×5[b]](/wiki/File:OoT_Deku_Scrub_Model.png)

![Gold Skulltula ×4[c]](/wiki/File:OoT_Gold_Skulltula_Model.png)


![Deku Baba ×5[a]](/wiki/File:OoT3D_Deku_Baba_Model_2.png)
![Deku Scrub ×5[b]](/wiki/File:OoT3D_Deku_Scrub_Model.png)

![Gold Skulltula ×4[c]](/wiki/File:OoT3D_Gold_Skulltula_Model.png)


- Master Quest
-

-
-
![Deku Baba ×7[a]](//cdn.wikimg.net/en/zeldawiki/images/thumb/7/74/OoT_Deku_Baba_Model.png/88px-OoT_Deku_Baba_Model.png)
-
![Deku Baba ×5[b]](//cdn.wikimg.net/en/zeldawiki/images/thumb/7/77/OoT_Deku_Baba_Model_2.png/53px-OoT_Deku_Baba_Model_2.png)
-
![Deku Scrub ×3[c]](//cdn.wikimg.net/en/zeldawiki/images/thumb/9/93/OoT_Deku_Scrub_Model.png/120px-OoT_Deku_Scrub_Model.png)
-
![Gohma Egg ×26[d]](//cdn.wikimg.net/en/zeldawiki/images/thumb/7/71/OoT_Gohma_Egg_Model.png/108px-OoT_Gohma_Egg_Model.png)
-
![Gold Skulltula ×4[e]](//cdn.wikimg.net/en/zeldawiki/images/thumb/a/a7/OoT_Gold_Skulltula_Model.png/120px-OoT_Gold_Skulltula_Model.png)
-
![Keese ×6[f]](//cdn.wikimg.net/en/zeldawiki/images/thumb/f/f6/OoT_Keese_Model.png/120px-OoT_Keese_Model.png)
-
![Mad Scrub ×2[g]](//cdn.wikimg.net/en/zeldawiki/images/thumb/c/cb/OoT_Mad_Scrub_Model.png/112px-OoT_Mad_Scrub_Model.png)
-

Skulltula ×2
-

-


![Keese ×6[f]](/wiki/File:OoT_Keese_Model.png)
![Mad Scrub ×2[g]](/wiki/File:OoT_Mad_Scrub_Model.png)


![Keese ×6[f]](/wiki/File:OoT3D_Keese_Model.png)
![Mad Scrub ×2[g]](/wiki/File:OoT3D_Mad_Scrub_Model.png)
- ↑ One does not reappear.
- ↑ Five respawn indefinitely.
- ↑ Three do not reappear. These Deku Scrubs will not be defeated unless Link defeats them in the inverse order of Ocarina of Time's normal mode: 1, 3, 2. Despite the mirroring in Ocarina of Time 3D's Master Quest, the leftmost Deku Scrub is counted as "1".
- ↑ 17 do not reappear.
- ↑ Four do not reappear.
- ↑ One does not reappear.
- ↑ Two do not reappear.
Bosses


Treasure Chests
| Treasure Chest | |
|---|---|
| Contents | |
| Coordinates | 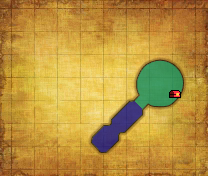 |
| Notes | Between the Vines near the top of the spiral ramp in the first room |
| Treasure Chest | |
| Contents | |
| Coordinates | 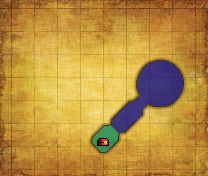 |
| Notes | Atop the far ledge in 2F's southwestern room |
| Treasure Chest | |
| Contents | |
| Coordinates | 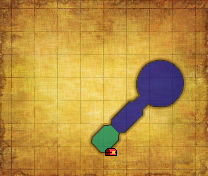 |
| Notes | Atop a ledge accessible by Vines in 2F's southwestern room |
| Treasure Chest | |
| Contents | |
| Coordinates | 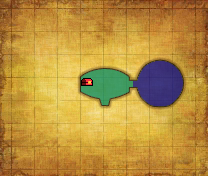 |
| Notes | Atop a ledge in 3F's western room |
| Treasure Chest | |
| Contents | |
| Coordinates | 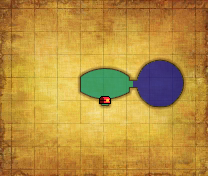 |
| Notes | Atop the ledge along the south wall in 3F's western room |
| Treasure Chest | |
| Contents | |
| Coordinates | 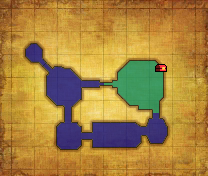 |
| Notes |


| Treasure Chest | Contents | Coordinates | Notes |
|---|---|---|---|
| Between the Vines near the top of the spiral ramp in the first room | ||
| Atop the far ledge in 2F's southwestern room | ||
| Atop a ledge accessible by Vines in 2F's southwestern room | ||
| Atop a ledge in 3F's western room | ||
| Atop the ledge along the south wall in 3F's western room | ||
|
- Master Quest
| Treasure Chest | |
|---|---|
| Contents | |
| Coordinates | 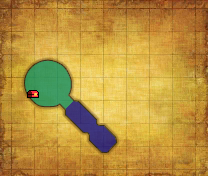 |
| Notes | Between the Vines near the top of the spiral ramp in the first room |
| Treasure Chest | |
| Contents | |
| Coordinates |  |
| Notes | Appears atop a ledge after lighting the Torch in the center of 3F's eastern room |
| Treasure Chest | |
| Contents | |
| Coordinates | 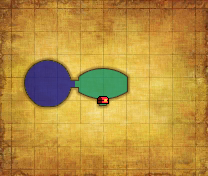 |
| Notes | Appears atop a ledge in 3F's eastern room after all of the Enemies have been defeated |
| Treasure Chest | |
| Contents | |
| Coordinates | 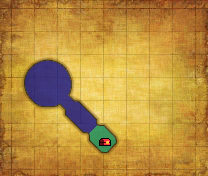 |
| Notes | Atop the far ledge in 2F's southeastern room |
| Treasure Chest | |
| Contents | |
| Coordinates | 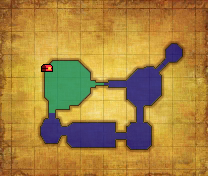 |
| Notes | Appears in B1's northwestern room after pressing the Floor Switch behind the Web |
| Treasure Chest | |
| Contents | |
| Coordinates | 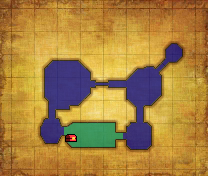 |
| Notes | Beside the entrance in B1's south-central room |

| Treasure Chest | Contents | Coordinates | Notes |
|---|---|---|---|
| Between the Vines near the top of the spiral ramp in the first room | ||
| Appears atop a ledge after lighting the Torch in the center of 3F's eastern room | ||
| Appears atop a ledge in 3F's eastern room after all of the Enemies have been defeated | ||
| Atop the far ledge in 2F's southeastern room | ||
| Appears in B1's northwestern room after pressing the Floor Switch behind the Web | ||
| Beside the entrance in B1's south-central room |
Golden Skull Tokens
| Gold Skulltula |  |
|---|---|
| Location | On the wall behind the small Treasure Chest in 3F's western room |
| Gold Skulltula |  |
| Location | Clinging to the Vines connecting B1 and 1F |
| Gold Skulltula |  |
| Location | On the bars in B1's northeastern room |
| Gold Skulltula |  |
| Location |
| Gold Skulltula | Location |
|---|---|
| On the wall behind the small Treasure Chest in 3F's western room |
| Clinging to the Vines connecting B1 and 1F |
| On the bars in B1's northeastern room |
|
- Master Quest
| Gold Skulltula |  |
|---|---|
| Location | Inside the Wooden Box beside the Vines near the top of the spiral ramp in the first room |
| Gold Skulltula |  |
| Location | Behind the Bomb Rocks in 2F's southeastern room |
| Gold Skulltula |  |
| Location | High on the wall in B1's northeastern room |
| Gold Skulltula |  |
| Location | On the ceiling in B1's middle-northeastern room |
| Gold Skulltula | Location |
|---|---|
| Inside the Wooden Box beside the Vines near the top of the spiral ramp in the first room |
| Behind the Bomb Rocks in 2F's southeastern room |
| High on the wall in B1's northeastern room |
| On the ceiling in B1's middle-northeastern room |
Trivia
- The sealed room in B1 of the Dungeon containing the final Gold Skulltula does not appear on the Map until it is visited, even after Link collects the Dungeon Map. This issue was fixed in Ocarina of Time 3D.
Nomenclature
| Language | Names | Meanings |
|---|---|---|
Japanese | デクの樹サマの中 (Deku no Ki-sama no Naka) (OoT)[17] | Inside the Great Deku Tree |
ChineseSI | 德库树的里面 (Dékù shù de lǐmiàn) (OoT)[18] | Inside the Dékù Tree |
Italian | Interno dell'Albero Deku (OoT | OoT3D)[15][16] | Inside the Deku Tree |
| This table was generated using translation pages. To request an addition, please contact a staff member with a reference. | ||
Other Names
| Name | Inside the Great Deku Tree[19] |
|---|---|
| Applies to | |
| Source | |
| Superseded by |
| Name | Applies to | Source | Superseded by |
|---|---|---|---|
Inside the Great Deku Tree[19] |
Gallery
-
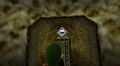
An Eye Switch Inside the Deku Tree from Ocarina of Time
-
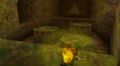
Activating a Floor Switch Inside the Deku Tree from Ocarina of Time
-
Link climbing Vines Inside the Deku Tree
This image can be viewed in 3D on a Nintendo 3DS system. -
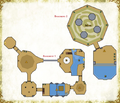
Map of the basements of the Inside the Deku Tree from Ocarina of Time 3D


Notes
References
- ↑ Encyclopedia, Dark Horse Books, pg. 149
- ↑ "Link... Welcome... Listen carefully to what I, the Deku Tree, am about to tell thee... Thy slumber these past moons must have been restless and full of nightmares... As the servants of evil gain strength, a vile climate pervades the land and causes nightmares to those sensitive to it... Verily, thou hast felt it... Link... The time has come to test thy courage..." — Great Deku Tree (Ocarina of Time 3D)
"I have been cursed... I need thee to break the curse with thy wisdom and courage. Dost thou have courage enough to undertake this task?" — Great Deku Tree (Ocarina of Time 3D) - ↑ "[Yes] Then enter, brave Link, and thou too, Navi... Navi the fairy... Thou must aid Link... And, Link... When Navi speaks, use
 to listen well to her words of wisdom..." — Great Deku Tree (Ocarina of Time 3D)
- ↑ "[No] Perhaps thou dost not yet have confidence in thy abilities... Return to the Kokiri Forest to learn the skills of combat... When thou art ready, return here and speak with me by using
 ..." — Great Deku Tree (Ocarina of Time 3D)
- ↑ "You can open a door by standing in front of it and pressing
 . Pay attention to what the Action Icon says. That's the A Button icon on the upper screen!" — Navi (Ocarina of Time 3D)
- ↑ "Look at this wall! The vines growing on it give it a rough surface... Maybe you can climb it, Link!" — Navi (Ocarina of Time 3D)
- ↑ "Stand next to this block and grab hold of it with . While holding , you can push or pull it. If you stand next to the block and press while pressing
 toward the block, you can climb on top of it. Pay attention to what the Action Icon says!" — Navi (Ocarina of Time 3D)
- ↑ "Ow-ow-ow! Forgive me, master! If I give you a tip, will you let me go? When you jump off a high cliff, if you hold forward, you will roll on the ground when you land and won't get hurt from the fall. I can't guarantee it will work, though, if the cliff is really, really high, heh heh! Well, try it if you are feeling bold! Wah ha hah!" — Deku Scrub (Ocarina of Time 3D)
- ↑ "Please forgive me, master! I'll never do it again! If you spare me, I'll teach you something cool. You will never beat my brothers up ahead unless you punish them in the proper order. The order is...
2 3 1
Twenty-three is number one! Do you think I'm a traitor?" — Deku Scrub (Ocarina of Time 3D) - ↑ "How did you know our secret? How irritating! It's so annoying that I'm going to reveal the secret of Queen Gohma to you! In order to administer the coup de grâce to Queen Gohma, strike with your sword while she's stunned. Oh, Queenie... Sorry about that!" — Deku Scrub (Ocarina of Time 3D)
- ↑ "Well done, Link..." — Great Deku Tree (Ocarina of Time 3D)
"Thou has verily demonstrated they courage... I knew that thou wouldst be able to carry out my wishes..." — Great Deku Tree (Ocarina of Time 3D)
"Now I have yet more to tell thee, wouldst thou listen..." — Great Deku Tree (Ocarina of Time 3D) - ↑ "Now...listen carefully... A wicked man of the desert cast this dreadful curse upon me..." — Great Deku Tree (Ocarina of Time 3D)
"This evil man ceaselessly uses his vile, sorcerous powers in his search for the Sacred Realm that is connected to Hyrule... For it is in that Sacred Realm that one will find the divine relic, the Triforce, which contains the essence of the gods..." — Great Deku Tree (Ocarina of Time 3D) - ↑ "Thou must never allow the desert man in black armor to lay his hands on the sacred Triforce... Thou must never suffer that man, with his evil heart, to enter the Sacred Realm of legend... That evil man who cast the death curse upon me and sapped my power... Because of that curse, my end is nigh... Though your valiant efforts to break the curse were successful, I was doomed before you started... Yes, I will pass away soon... But do not grieve for me... I have been able to tell you of these important matters... This is Hyrule's final hope..." — Great Deku Tree (Ocarina of Time 3D)
- ↑ "Link... Go now to Hyrule Castle... There thou wilt surely meet the Princess of Destiny... Take this stone with thee, the stone that man wanted so much that he cast the curse upon me..." — Great Deku Tree (Ocarina of Time 3D)
- ↑ Enciclopedia di Hyrule, Magazzini Salani, pg. 149
- ↑ "Interno dell'Albero Deku" — N/A (Ocarina of Time 3D, Italian localization)
- ↑ Nintendo Official Guidebook—The Legend of Zelda: Ocarina of Time, Shogakukan, pg. 155
- ↑ "德库树的里面" — N/A (Ocarina of Time, iQue version)
- ↑ "{{{quote}}}" (The Legend of Zelda: Ocarina of Time 3D—Prima Official Game Guide by Prima Games, pg. 23)
Dungeons in The Legend of Zelda
Level 1 • Level 2 • Level 3 • Level 4 • Level 5 • Level 6 • Level 7 • Level 8 • Level 9
Dungeons in The Adventure of Link
Parapa Palace • Midoro Palace • Island Palace • Maze Island Palace • Palace on the Sea • Three-Eye Rock Palace • Great Palace
Dungeons in A Link to the Past
Hyrule Castle • Castle Dungeon • Eastern Palace • Desert Palace • Tower of Hera
Palace of Darkness • Swamp Palace • Skull Woods • Thieves' Town • Ice Palace • Misery Mire • Turtle Rock • Ganon's Tower • Palace of the Four Sword![]()
Tail Cave • Bottle Grotto • Key Cavern • Angler's Tunnel • Catfish's Maw • Face Shrine • Eagle's Tower • Turtle Rock • Wind Fish's Egg
Color Dungeon (LADX | LANS) • Chamber Dungeon (LANS)
Inside the Deku Tree • Dodongo's Cavern • Inside Jabu-Jabu's Belly
Forest Temple • Fire Temple • Water Temple • Shadow Temple • Spirit Temple • Ganon's Castle
Woodfall Temple • Snowhead Temple • Great Bay Temple • Stone Tower Temple
Swamp Spider House • Pirates' Fortress • Oceanside Spider House • Beneath the Well • Ancient Castle of Ikana • Moon Dungeons
Gnarled Root Dungeon • Snake's Remains • Poison Moth's Lair • Dancing Dragon Dungeon • Unicorn's Cave • Ancient Ruins • Explorer's Crypt • Sword & Shield Maze • Onox's Castle • Room of Rites
Spirit's Grave • Wing Dungeon • Moonlit Grotto • Skull Dungeon • Crown Dungeon • Mermaid's Cave • Jabu-Jabu's Belly • Ancient Tomb • Black Tower • Room of Rites
Maku Road • Great Moblin's Keep • Ambi's Palace • Hero's Cave
Chambers of Insight • Sea of Trees • Talus Cave • Death Mountain • Vaati's Palace
Dragon Roost Cavern • Forbidden Woods • Tower of the Gods • Forsaken Fortress • Earth Temple • Wind Temple • Ganon's Castle
Fire Mountain • Ice Ring Isle • Ghost Ship • Savage Labyrinth
Stages in Four Swords Adventures
Whereabouts of the Wind
Lake Hylia • Cave of No Return • Hyrule Castle
Eastern Hyrule
The Coast • Village of the Blue Maiden • Eastern Temple
Death Mountain
Death Mountain Foothills • The Mountain Path • Tower of Flames
Near the Fields
The Field • The Swamp • Infiltration of Hyrule Castle
The Dark World
Lost Woods • Kakariko Village • Temple of Darkness
The Desert of Doubt
Desert of Doubt • Desert Temple • Pyramid
Frozen Hyrule
Frozen Hyrule • Temple of Ice • Tower of Winds
Realm of the Heavens • The Dark Cloud • Palace of Winds
Deepwood Shrine • Cave of Flames • Fortress of Winds • Temple of Droplets • Palace of Winds • Dark Hyrule Castle
Forest Temple • Goron Mines • Lakebed Temple • Arbiter's Grounds • Snowpeak Ruins • Temple of Time • City in the Sky • Palace of Twilight • Hyrule Castle
Lantern Caverns • Cave of Ordeals • Cave of Shadows (TPHD)
Temple of the Ocean King • Temple of Fire • Temple of Wind • Temple of Courage • Ghost Ship • Goron Temple • Temple of Ice • Mutoh's Temple
Tower of Spirits • Forest Temple • Snow Temple • Ocean Temple • Fire Temple • Sand Temple
Skyview Temple • Earth Temple • Lanayru Mining Facility • Ancient Cistern • Sandship • Fire Sanctuary • Sky Keep
Dungeons in A Link Between Worlds
Eastern Palace • Tower of Hera • House of Gales • Inside Hyrule Castle • Desert Palace
Ice Ruins • Swamp Palace • Thieves' Hideout • Dark Palace • Skull Woods • Turtle Rock • Lorule Castle
Woodlands
Deku Forest • Buzz Blob Cave • Moblin Base • Forest Temple
Riverside
Secret Fortress • Abyss of Agony • Cove of Transition • Water Temple
Volcano
Blazing Trail • Hinox Mine • Den of Flames • Fire Temple
Ice Cavern
Frozen Plateau • Snowball Ravine • Silver Shrine • Ice Temple
Fortress
Sealed Gateway • Bomb Storage • Training Ground • The Lady's Lair
The Dunes
Infinity Dunes • Stone Corridors • Gibdo Mausoleum • Desert Temple
The Ruins
Illusory Mansion • Palace Noir • Lone Labyrinth • Grim Temple
Sky Realm
Floating Garden • Deception Castle • Dragon Citadel • Sky Temple
Forest Zone • Flooded Zone • Scorching Zone • Frozen Zone • Fortified Zone • Desert Zone • Shadow Zone • Baneful Zone
Dungeons in Breath of the Wild
Divine Beast Vah Ruta • Divine Beast Vah Rudania • Divine Beast Vah Medoh • Divine Beast Vah Naboris • Hyrule Castle
Sword Monk's Shrine (TMT) • Final Trial (TCB)
Akh Va'quot • Bareeda Naag • Bosh Kala • Chaas Qeta • Daag Chokah • Dagah Keek • Dah Kaso • Dah Hesho • Daka Tuss • Dako Tah • Daqa Koh • Daqo Chisay • Dila Maag • Dow Na'eh • Dunba Taag • Gee Ha'rah • Goma Asaagh • Gorae Torr • Ha Dahamar • Hawa Koth • Hia Miu • Hila Rao • Ishto Soh • Ja Baij • Jee Noh • Jitan Sa'mi • Joloo Nah • Ka'o Makagh • Kaam Ya'tak • Kah Mael Shrine • Kah Okeo Shrine • Kah Yah Shrine • Kam Urog Shrine • Katah Chuki • Katosa Aug • Kay Noh • Kaya Wan • Kayra Mah • Ke'nai Shakah • Keeha Yoog • Keh Namut • Kema Kosassa • Kema Zoos • Keo Ruug • Ketoh Wawai • Korgu Chideh • Korsh O'hu • Kuh Takkar • Kuhn Sidajj • Lakna Rokee • Lanno Kooh • Maag Halan • Maag No'rah • Maka Rah • Mezza Lo • Mijah Rokee • Mirro Shaz • Misae Suma • Mo'a Keet • Mogg Latan • Monya Toma • Mozo Shenno • Muwo Jeem • Myahm Agana • Namika Ozz • Ne'ez Yohma • Noya Neha • Oman Au • Owa Daim • Pumaag Nitae • Qua Raym • Qaza Tokki • Qukah Nata • Raqa Zunzo • Ree Dahee • Rin Oyaa • Ritaag Zumo • Rok Uwog • Rona Kachta • Rota Ooh • Rucco Maag • Saas Ko'sah • Sah Dahaj • Sasa Kai • Sha Gehma • Sha Warvo • Shada Naw • Shae Katha • Shae Loya • Shae Mo'sah • Shai Utoh • Shai Yota • Shee Vaneer • Shee Venath • Sheem Dagoze • Sheh Rata • Sho Dantu • Shoda Sah • Shoqa Tatone • Shora Hah • Soh Kofi • Suma Sahma • Ta'loh Naeg • Tah Muhl • Tahno O'ah • Tawa Jinn • Tena Ko'sah • Tho Kayu • To Quomo • Toh Yahsa • Toto Sah • Tu Ka'loh • Tutsuwa Nima • Voo Lota • Wahgo Katta • Ya Naga • Yah Rin • Zalta Wa • Ze Kasho • Zuna Kai
Etsu Korima • Kamia Omuna • Kee Dafunia • Keive Tala • Kiah Toza • Kihiro Moh • Mah Eliya • Noe Rajee • Rinu Honika • Rohta Chigah • Ruvo Korbah • Sato Koda • Sharo Lun • Shira Gomar • Takama Shiri • Yowaka Ita
Dungeons in Tears of the Kingdom
Wind Temple • Fire Temple • Water Temple • Lightning Temple • Hyrule Castle • Spirit Temple • Beneath Hyrule Castle
Anedamimik • Apogek • Bamitok • Chichim • Domizuin • Ekochiu • En-oma • Eshos • Eutoum • Ga-ahisas • Ganos • Gasas • Gatakis • Gatanisis • Gemimik • Gikaku • Gutanbac • Igashuk • Igoshon • Ihen-a • Ijo-o • Ikatak • In-isa • Irasak • Ishodag • Ishokin • Isisim • Iun-orok • Jikais • Jinodok • Jiosin • Jiotak • Jirutagumac • Jiukoum • Jochi-ihiga • Jochi-iu • Jochisiu • Jogou • Jojon • Joju-u-u • Joku-u • Joku-usin • Joniu • Jonsau • Josiu • Kadaunar • Kahatanaum • Kamatukis • Kamizun • Karahatag • Kikakin • Kimayat • Kisinona • Kitawak • Kiuyoyou • Kudanisar • Kumamayn • Kurakat • Kyokugon • Kyononis • Makasura • Makurukis • Maoikes • Marakuguc • Marari-in • Mayachideg • Mayachin • Mayahisik • Mayak • Mayam • Mayamats • Mayanas • Mayaotaki • Mayasiar • Mayatat • Mayaumekis • Mayausiy • Minetak • Miryotanog • Mogawak • Mogisari • Momosik • Morok • Moshapin • Motsusis • Musanokir • Nachoyah • Natak • Ninjis • Nouda • O-ogim • Orochium • Oromuwak • Oshozan-u • Otak • Otutsum • Pupunke • Rakakudaj • Rakashog • Rasitakiwak • Rasiwak • Ren-iz • Riogok • Rotsumamu • Runakit • Rutafu-um • Sahirow • Sakunbomar • Sepapa • Serutabomac • Sibajitak • Sifumim • Sihajog • Sikukuu • Simosiwak • Sinakawak • Sinatanika • Sisuran • Sitsum • Siwakama • Sonapan • Soryotanog • Suariwak • Susub • Susuyai • Tadarok • Tajikats • Taki-ihaban • Taninoud • Taunhiy • Tauyosipun • Tenbez • Teniten • Tenmaten • Timawak • Tokiy • Tsutsu-um • Tukarok • Turakamik • Turakawak • Ukoojisi • Ukouh • Usazum • Utojis • Utsushok • Wao-os • Yamiyo • Yansamin • Yomizuk • Zakusu • Zanmik
Dungeons in Freshly-Picked Tingle's Rosy Rupeeland
Hero's Shrine • Pirate Hideaway • Deku Temple • Insect Cavern • Desma's Labyrinth
Stages in Link's Crossbow Training
Level 1
Ordon Target Practice • Gerudo Stalfos: Defender • Arbiter's Grounds: Ranger
Level 2
Goron Target Practice • Zora River: Defender • Skull Shooting
Level 3
Kakariko Target Practice • Fruit Balloons • The Great Bridge: Defender
Level 4
Zora River Target Practice • Hyrule Castle: Defender • Skulltula Forest: Ranger
Level 5
Oocca Target Practice • Gerudo Moldorm: Defender • The Shootout
Level 6
Ordon Target Practice 2 • Bridge of Eldin: Defender • Snowpeak Ruins: Ranger
Level 7
Underground Target Practice • City in the Sky: Defender • Temple of Time: Ranger
Level 8
Horseback Target Practice • Snowpeak Ruins: Defender • Darknut Battle
Ranch Target Practice • Sacred Grove: Defender • Fossil Stallord Battle
Hyrule Field • Eldin Caves • Faron Woods • Valley of Seers • Death Mountain • Lake Hylia • Twilight Field • Palace of Twilight • Skyloft • Sealed Grounds • Temple of the Sacred Sword • Temple of Souls • Gerudo Desert • Ganon's Tower • Forsaken Fortress • Wind and Earth Temples
Frozen Grotto • Gerudo Ruins • Lost Swamp • Temple of Storms • Hyrule Castle • Future World