Water Temple: Difference between revisions
MannedTooth (talk | contribs) m (Text replacement - "Ice Cavern" to "{{Term|OoT3D|Ice Cavern|link}}") |
|||
| (37 intermediate revisions by 12 users not shown) | |||
| Line 3: | Line 3: | ||
|image= | |image= | ||
{{Media | {{Media | ||
|defaultTypeTab= Screenshot | |||
|Artwork OoT= File:OoT Water Temple Artwork.png | |Artwork OoT= File:OoT Water Temple Artwork.png | ||
|Sprite TotK= File:TotK Water Temple Icon.png | |||
|Screenshot OoT= File:OoT Water Temple.png | |Screenshot OoT= File:OoT Water Temple.png | ||
|Screenshot OoT3D= File:OoT3D Water Temple.png | |Screenshot OoT3D= File:OoT3D Water Temple.png | ||
|Screenshot TFH= File:TFH Water Temple.png | |Screenshot TFH= File:TFH Water Temple.png | ||
|Screenshot TotK= File:TotK Water Temple.png | |||
}} | }} | ||
|caption= | |caption= | ||
| Line 14: | Line 17: | ||
|OoT= {{Term|OoT3D|Lake Hylia|link}} | |OoT= {{Term|OoT3D|Lake Hylia|link}} | ||
|TFH= {{Term|TFH|Riverside|link}} | |TFH= {{Term|TFH|Riverside|link}} | ||
|TotK= {{Term|TotK|Wellspring Island|link}} | |||
}} | }} | ||
|game= | |game= OoT, TFH, TotK | ||
|other= | |other= HW, DotT | ||
|item= | |item= | ||
{{Infobox Game Blocks | {{Infobox Game Blocks | ||
|OoT= {{Term|OoT3D|Longshot|link}} | |OoT= {{Term|OoT3D|Longshot|link}} | ||
|TFH= | |TFH= {{List | ||
|{{Term|TFH|Gripshot|link}} ×2 | |||
,{{Term|TFH|Water Rod|link}} | |||
}} | |||
|TotK= | |||
}} | }} | ||
|quest= | |quest= | ||
{{Infobox Game Blocks | {{Infobox Game Blocks | ||
|OoT= {{Term|OoT3D|Heart Container|link}} | |OoT= {{Term|OoT3D|Heart Container|link}}, {{Term|OoT3D|Water Medallion|link}} | ||
|TFH= | |TFH= | ||
|TotK= {{Term|TotK|Heart Container|link}}, {{Term|TotK|Vow of Sidon, Sage of Water|link}} | |||
}} | }} | ||
|mini-boss= | |mini-boss= | ||
| Line 31: | Line 40: | ||
|OoT= {{Term|OoT3D|Dark Link|link}} | |OoT= {{Term|OoT3D|Dark Link|link}} | ||
|TFH= | |TFH= | ||
|TotK= | |||
}} | }} | ||
|boss= | |boss= | ||
| Line 36: | Line 46: | ||
|OoT= {{Term|OoT3D|Morpha|link}} | |OoT= {{Term|OoT3D|Morpha|link}} | ||
|TFH= {{Term|TFH|Arrghus|link}} | |TFH= {{Term|TFH|Arrghus|link}} | ||
|TotK= {{Term|TotK|Mucktorok|link}} | |||
}} | }} | ||
|temperature= | |temperature= | ||
|theme= | |theme= | ||
|strategy= | |strategy= | ||
{{Infobox Game Blocks | |||
|OoT= {{StrategyWiki|The Legend of Zelda: Ocarina of Time/Water Temple|Water Temple}} | |||
|TFH= {{StrategyWiki|The Legend of Zelda: Tri Force Heroes/Water Temple|Water Temple}} | |||
|TotK= | |||
}} | }} | ||
{{Term/Store|Water Temple|Water Temples|Series, OoT, OoT3D, TFH}} is a recurring {{Term|Series|Dungeon|link}} in {{TLoZ|Series}}. | }} | ||
{{Term/Store|Water Temple|Water Temples|Series, OoT, OoT3D, TFH, TotK, DotT}} is a recurring {{Term|Series|Dungeon|link}} and location in {{TLoZ|Series}}.<ref>{{Cite Book|quote= |book= E |publisher= |page= 149 {{Exp Game|OoT}} & 160 {{Exp Game|TFH}}}}</ref><ref>{{Cite|{{Big|Water Temple}}<br/>The Great Wellspring of Hyrule|Game Screen|TotK}}</ref><ref name="DotT Sign">{{Cite|Easier than the Water Temple!|Sign|DotT}}</ref>{{Name Ref|HWDE}} | |||
==Overview== | ==Overview== | ||
| Line 57: | Line 73: | ||
In the [[Nintendo GameCube|GameCube]] version of the {{MQ|-}}, Link can complete the dungeon with an extra [[Small Key]] remaining. This is because one of the doors that Link is meant to unlock with a key unlocks itself, specifically when defeating the Stalfos prior to Dark Link and causing the dragon heads to rise. The only way to reach this door and unlock it normally is by using glitches. In {{OoT3D|-}} this glitch was fixed. | In the [[Nintendo GameCube|GameCube]] version of the {{MQ|-}}, Link can complete the dungeon with an extra [[Small Key]] remaining. This is because one of the doors that Link is meant to unlock with a key unlocks itself, specifically when defeating the Stalfos prior to Dark Link and causing the dragon heads to rise. The only way to reach this door and unlock it normally is by using glitches. In {{OoT3D|-}} this glitch was fixed. | ||
[[Eiji Aonuma]] apologized for the design of the Water Temple in a 2009 interview.<ref>{{Cite | [[Eiji Aonuma]] apologized for the design of the Water Temple in a 2009 interview.<ref>{{Cite Web|url=http://gameinformer.com/b/news/archive/2009/11/29/aonuma-apologizes-for-water-temple.aspx|title=Zelda Director Apologizes for Ocarina Water Temple, Hints at Link Taking Flight|site=Game Informer}}</ref> Due to the confusing layout and controls for the [[Nintendo 64]] version of {{OoT|-}}, several changes were in {{OoT3D}}. The Iron Boots were changed into an item rather than a piece of equipment, the dungeon received glowing markings on various walls and corridors to mark where the player must go and to make changing the water level more clear,<ref>{{Cite Web|quote=-Three colors paths have been added to the Water Temple<br/>- These paths line the walls of the temple, leading to one of the locations where Link can raise/lower the water level<br/>- Some key doors are emphasised with a colorful border surrounding them|url=http://nintendoeverything.com/64645/|site=Nintendo Everything.com; retrieved May 12, 2011}}</ref><ref>{{Cite Web|quote=But that’s not the only improvement. Navigating the confusing temple has also been greatly simplified with the addition of three colored paths that line the walls, each leading to one of the locations where Link can raise or lower the water level. You'll be visiting those locations often, so the directions are much appreciated (it’s not like there’s a gas station Link can stop and ask at!). We also noticed some key doors were also emphasised with a colorful border surrounding them.|url=http://www.gamexplain.com/article-424-1305158680-the-legend-of-zelda-ocarina-of-time-3d-hands-on-boss-rush-water-temple-super-guide.html|site=GameXplain; retrieved May 12, 2011}}</ref> and an additional camera scene was added in the central tower of the dungeon to make the location of a commonly and easily missed Small Key more obvious. | ||
=====Small Keys===== | |||
*In the original, there are six small keys. | |||
*In Master Quest, there are two. Notice however that the second locked door is only in the 3DS version in its mirrored form. | |||
=====Minor {{Plural|OoT3D|Enemy}}===== | =====Minor {{Plural|OoT3D|Enemy}}===== | ||
{{ | {{Gallery List|Enemies | ||
|OoT= Blade Trap, Blue Tektite, Floor Spikes [2], Gold Skulltula, Keese, Like Like, Shell Blade, Spike, Stinger, Vortex | |||
}} | }} | ||
;{{MQ|-}} | |||
{{ | {{Gallery List|Enemies | ||
| | |OoT= Dodongo, Lizalfos, Stalfos | ||
| | |||
}} | }} | ||
==={{TFH|-}}=== | ==={{TFH|-}}=== | ||
The {{Term|TFH|Water Temple}} is a {{Term|TFH|Level|link}} in {{TFH}}. It is the fourth and last {{Term|TFH|Level}} of the {{Term|TFH|Riverside|link}} {{Term|TFH|Area}}, and is preceded by {{Term|TFH|Cove of Transition|link}}. | |||
====Themes and Navigation==== | ====Themes and Navigation==== | ||
The Water Temple is a large, flooded palace filled with many pools | [[File:TFH Water Temple Promotional Screenshot.png|250px|right|thumb|Stage 1]] | ||
The {{Term|TFH|Water Temple}} is a large, flooded palace filled with many pools. As it involves a lot of swimming and traversing {{Term|TFH|Water (Terrain)|link}}, the {{Term|TFH|Zora Costume|link}} and the {{Term|TFH|Torrent Robe|link}} become very useful here. | |||
In '''Stage 1''', the | In '''Stage 1''', the {{Plural|TFH|Links|link}} enter the Temple from its entrance, where further ahead and down a ramp is a large pool. The {{Plural|TFH|Links}} can find two {{Plural|TFH|Gripshot|link}} on ledges to the sides. By firing each {{Term|TFH|Gripshot}} to the north of where they are found, the {{Plural|TFH|Links}} can attach themselves to fences, crossing a small portion of the pool and dropping down onto platforms. A {{Term|TFH|Water Rod|link}} can be found on top of a tall platform in the middle of the pool, but cannot be reached at that point. Inside the the pool are two {{Plural|TFH|Shock Switch|link}}, which are guarded off by railings on particular sides; using the {{Plural|TFH|Gripshot}}, the {{Plural|TFH|Links}} can hit the right {{Term|TFH|Switch}} from the left platform, and the left {{Term|TFH|Switch}} from the right platform. Activating both {{Plural|TFH|Shock Switch}} at the same time causes a small platform to appear in the center of the pool. From there, one of the {{Plural|TFH|Links}} can fire the {{Term|TFH|Gripshot}} at a {{Term|TFH|Crank|link}} to the north; doing so will open the {{Term|TFH|Crank}} and flood the room, allowing the {{Plural|TFH|Links}} to reach the {{Term|TFH|Water Rod}}. The {{Term|TFH|Links}} with the {{Term|TFH|Water Rod}} then has to create pillars of water for the heroes to reach the {{Term|TFH|Triforce Gateway}} on the north end of the pool. | ||
{{Clear}} | |||
In '''Stage 2''', the Links appear on a caged floor | [[File:TFH Water Temple Stage 2.png|250px|right|thumb|The beginning of Stage 2]] | ||
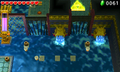
In '''Stage 2''', the {{Plural|TFH|Links}} appear on a caged floor above a pool of {{Term|TFH|Water (Terrain)}}. A {{Term|TFH|Big Switch|link}} in the center must be pressed down by all three {{Plural|TFH|Links}}, which automatically opens a {{Term|TFH|Crank}} in the northeast corner and floods the room, as {{Plural|TFH|Tektite|link}}, {{Plural|TFH|Water Tektite|link}} and {{Plural|TFH|Skullfish|link}} appear. The {{Plural|TFH|Links}} must swim onto small platforms to be able to attack them, or use the {{Term|TFH|Water Rod}} to stun them. Optionally, by using the {{Term|TFH|Water Rod}} from the northeast platform, or by forming a {{Term|TFH|Totem|link}} there, one of the {{Plural|TFH|Links}} with a {{Term|TFH|Gripshot}} can pull the {{Term|TFH|Crank}} to drain the room, making the enemies easier to defeat. After all enemies have been defeated, a steel grate in the northwest corner rises, opening to passage. To continue through it, the room needs to be drained if it has not already been. The {{Plural|TFH|Links}} can then walk under the grate and come to a platform that can be reached using the {{Term|TFH|Water Rod}}. Another {{Term|TFH|Crank}} can be seen on the wall high above, which can only be opened by using the {{Term|TFH|Water Rod}} and forming a full {{Term|TFH|Totem}} on top of the pillar. Pulling this {{Term|TFH|Crank}} floods the room again, allowing the {{Plural|TFH|Links}} to reach the {{Term|TFH|Triforce Gateway}} and a {{Term|TFH|Squiddy|link}}. | |||
{{Clear}} | |||
In '''Stage 3''', the Links find themselves trapped in a caged enclosure with | [[File:TFH Water Temple Stage 3.png|250px|right|thumb|The beginning of Stage 3]] | ||
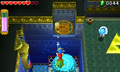
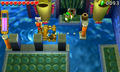
In '''Stage 3''', the {{Plural|TFH|Links}} find themselves trapped in a caged enclosure with a {{Term|TFH|Water Octorok|link}}. Two of the {{Plural|TFH|Links}} can escape the enclosure by using the {{Term|TFH|Gripshot}} on a panel on the cage wall, which will flip around and drop the {{Plural|TFH|Links}} outside. Those {{Plural|TFH|Links}} then stand on two {{Plural|TFH|Floor Switch|link}}, opening the cage door so the third {{Term|TFH|Links}} can escape. Outside the cage, the Links enter a room with platforms at several elevations and {{Term|TFH|Water (Terrain)}} at a low level. To the northeast is a locked gate leading to the {{Term|TFH|Triforce Gateway}}, and in the northwest is another section of the room behind a fence wall. Nearby is a platform reachable only with the {{Term|TFH|Water Rod}}, from which the {{Plural|TFH|Links}} can open another {{Term|TFH|Crank}}, raising the {{Term|TFH|Water (Terrain)}} level. The {{Plural|TFH|Links}} with {{Plural|TFH|Gripshot}} can then reach another cage panel by having the other {{Term|TFH|Links}} lead them with the {{Term|TFH|Water Rod}}, while avoiding rocks fired at them by nearby {{Plural|TFH|Water Octorok}}. On the other side of the fence, the {{Plural|TFH|Links}} can find a {{Term|TFH|Treasure Chest|link}} containing a {{Term|TFH|Red Rupee|link}}, and a {{Term|TFH|Raft|link}} that can be pulled toward another platform by using the {{Term|TFH|Gripshot}} on a {{Term|TFH|Stake|link}}. On this platform is a {{Term|TFH|Treasure Chest|display=Chest}} containing a {{Term|TFH|Small Key|link}}, and a {{Term|TFH|Floor Switch}} that opens the cage door back to the main room. As the locked gate is now submerged underwater, the {{Plural|TFH|Links}} cannot use the {{Term|TFH|Small Key}} just yet; two of them are required to turn the {{Term|TFH|Crank}} again to lower the {{Term|TFH|Water (Terrain)}}, after which the {{Plural|TFH|Links}} can board the {{Term|TFH|Raft}} and use the {{Term|TFH|Gripshot}} to transport themselves and the {{Term|TFH|Small Key}} to where the {{Term|TFH|Triforce Gateway}} is. | |||
{{Clear}} | |||
'''Stage 4''' is where | [[File:TFH Arrghus Battle.png|250px|right|thumb|Battling Arrghus in Stage 4]] | ||
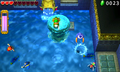
'''Stage 4''' is where {{Term|TFH|Arrghus|link}} is fought in a pool. The {{Plural|TFH|Links}} first need to defeat its eyes, using several platforms around the pool's edge to get closer. Once they succeed, the platforms automatically retract and the pool is completely drained. At the bottom of the pool, they battle {{Term|TFH|Arrghus}} proper, with several {{Plural|TFH|Pot|link}} containing {{Plural|TFH|Heart|link}} and {{Plural|TFH|Energy Potion|link}} strewn around the floor. After {{Term|TFH|Arrghus}} is defeated, a door opens in an alcove at the north end leading to the {{Term|TFH|Triforce Gateway}}. | |||
{{Clear}} | |||
=====Drablands | ====={{Plural|TFH|Drablands Challenge}}===== | ||
Once the {{Term|TFH|Boss|link}} of the {{Term|TFH|Riverside|link}} has been defeated, the {{Term|TFH|Water Temple}} can be replayed with the following {{Plural|TFH|Drablands Challenge|link}}: "[[Drablands Challenge#Few Heart Containers!|Fewer Heart Containers!]]", "[[Drablands Challenges#Clear with halved energy!|Clear with halved energy!]]", and "[[Drablands Challenges#Transport the orb quickly!|Transport the orb quickly!]]". | |||
In "Transport the orb quickly!", the {{Plural|TFH|Links|link}} are given a timer of 30 seconds in [[Multiplayer]], or two minutes and 10 seconds in single-player. This timer can be increased by collecting {{Plural|TFH|Hourglass|link}} or wearing {{Term|TFH|Linebeck's Uniform|link}}. As dropping the orb in {{Term|TFH|Water (Terrain)|link}} will cause it to respawn at an earlier location, it is advisable to place the orb on safe ground before using a {{Term|TFH|Crank|link}} to flood a room. | |||
====={{Plural|TFH|Magical Material}}===== | |||
At the end of the {{Term|TFH|Level}}, three {{Plural|TFH|Treasure Chest|link}} can be opened. Two contain the same {{Term|TFH|Material|link}}, and one contains another, more valuable {{Term|TFH|Material}}. | |||
{{Data Table | |||
|game= TFH | |||
|columns= {{Term|TFH|Drablands Challenge}}, {{Plural|TFH|Magical Material}} [Amounts] | |||
|- | |||
| N/A | |||
| 2 Hytopian Silk, 1 Octorok Sucker | |||
|- | |||
| [[File:TFH Fewer Heart Containers Icon.png]]<br/>'''Fewer Heart Containers!''' | |||
| 2 Aqua Crown, 1 Fairy Dust | |||
|- | |||
| [[File:TFH Halved Energy Icon.png]]<br/>'''Clear with halved energy!''' | |||
| 2 Octorok Sucker, 1 Rainbow Coral | |||
|- | |||
| [[File:TFH Transport the Orb Icon.png]]<br/>'''Transport the orb quickly!''' | |||
| 2 Fairy Dust, 1 Rainbow Coral | |||
}} | |||
====={{Plural|TFH|Enemy}} and Traps===== | |||
{{Tabs | |||
|tab1= No Challenge | |||
|content1= | |||
;{{Term|TFH|Stage}} 1 | |||
There are no {{Plural|TFH|Enemy}} in this {{Term|TFH|Stage}}. | |||
; | ;{{Term|TFH|Stage}} 2 | ||
{{Gallery List|Enemies | |||
|TFH= Skullfish [Qty:2]{{List Note|name= Switch|These appear when the three {{Plural|TFH|Links|link}} stand on the {{Term|TFH|Big Switch|link}}.}}, Squiddy, Tektite [Qty:2]{{List Note|name= Switch}}, Water Tektite [Qty:2]{{List Note|name= Switch}} | |||
}} | |||
{{List Notes}} | |||
; | ;{{Term|TFH|Stage}} 3 | ||
{{Gallery List|Enemies | |||
|TFH= Water Octorok [Qty:3] | |||
}} | |||
===== | ;{{Term|TFH|Stage}} 4 | ||
{{Gallery List|Enemies | |||
|TFH= Arrghus | |||
}} | |||
File:TFH | |||
|tab2= "Fewer Heart Containers!" | |||
|content2= | |||
</ | ;{{Term|TFH|Stage}} 1 | ||
{{Gallery List|Enemies | |||
|TFH= Tektite [Qty:3]{{List Note|These appear after the {{Term|TFH|Crank|link}} is used.}}, Water Octorok [Qty:2] | |||
}} | |||
{{List Notes}} | |||
;{{Term|TFH|Stage}} 2 | |||
{{Gallery List|Enemies | |||
|TFH= Skullfish [Qty:2]{{List Note|name= Switch|These appear when the three {{Plural|TFH|Links|link}} stand on the {{Term|TFH|Big Switch|link}}.}}, Squiddy, Tektite [Qty:2]{{List Note|name= Switch}}, Water Tektite [Qty:2]{{List Note|name= Switch}} | |||
}} | |||
{{List Notes}} | |||
;{{Term|TFH|Stage}} 3 | |||
{{Gallery List|Enemies | |||
|TFH= Water Octorok [Qty:5] | |||
}} | |||
;{{Term|TFH|Stage}} 4 | |||
{{Gallery List|Enemies | |||
|TFH= Arrghus | |||
}} | |||
|tab3= "Clear with halved energy!", "Transport the orb quickly!" | |||
|content3= | |||
;{{Term|TFH|Stage}} 1 | |||
{{Gallery List|Enemies | |||
|TFH= Water Octorok [Qty:2] | |||
}} | |||
;{{Term|TFH|Stage}} 2 | |||
{{Gallery List|Enemies | |||
|TFH= Skullfish [Qty:2]{{List Note|name= Switch|These appear when the three {{Plural|TFH|Links|link}} stand on the {{Term|TFH|Big Switch|link}}.}}, Squiddy, Tektite [Qty:2]{{List Note|name= Switch}}, Water Tektite [Qty:2]{{List Note|name= Switch}} | |||
}} | |||
{{List Notes}} | |||
;{{Term|TFH|Stage}} 3 | |||
{{Gallery List|Enemies | |||
|TFH= Water Octorok [Qty:3] | |||
}} | |||
;{{Term|TFH|Stage}} 4 | |||
{{Gallery List|Enemies | |||
|TFH= Arrghus | |||
}} | |||
}} | |||
====={{Plural|TFH|Treasure Chest}}===== | |||
{{Treasure Chests|game= TFH | |||
|- | |||
| Treasure Chest | |||
| Red Rupee | |||
| On the left ledge in the northern section of {{Term|TFH|Stage}} 3 | |||
|- | |||
| Treasure Chest | |||
| Small Key [File:TFH Key Icon.png] | |||
| On the right ledge in the northern section of {{Term|TFH|Stage}} 3 | |||
}} | |||
==={{TotK|-}}=== | |||
{{TotK Quest/Container| | |||
{{TotK Quest | |||
|name= Regional Phenomena | |||
|type= Main Quest | |||
|giver= [[Purah]] | |||
|location= [[Lookout Landing]] | |||
}} | |||
{{TotK Quest | |||
|name= Sidon of the Zora | |||
|type= Main Quest | |||
|giver= [[Yona]] | |||
|location= [[Zora's Domain]] | |||
}} | |||
}} | |||
{{Stub|TotK}} | |||
====Areas==== | |||
{{Gallery List|Locations | |||
|TotK= Water Temple 1F, Water Temple B1 | |||
}} | |||
===={{Plural|TotK|Enemy}}==== | |||
{{Gallery List|Enemies | |||
|TotK= | |||
Chuchu [2][Qty:2][Sublocation:Water Temple 1F], | |||
Chuchu [3][Qty:3][Sublocation:Water Temple 1F], | |||
Flame Fountain [Qty:10][Sublocation:Water Temple B1]{{List Note|10 will not reappear after the nearby {{Term|TotK|Floor Switch|link}} has been pressed.}}, | |||
Fire Like [Qty:1][Sublocation:Water Temple 1F], | |||
Soldier Construct II [Qty:1][Sublocation:Water Temple 1F]{{Equipment|TotK|Strong Construct Bow}}{{Equipment|TotK|Fire Fruit}}, | |||
Soldier Construct III [Qty:1][Sublocation:Water Temple 1F]{{Equipment|TotK|Mighty Construct Bow}}{{Equipment|TotK|Ice Fruit}}. | |||
Soldier Construct III [Qty:1][Sublocation:Water Temple 1F]{{Equipment|TotK|Soldier Blade}}<!-- Strong Zonaite Longsword + Soldier Construct Horn -->, | |||
Soldier Construct III [Qty:1][Sublocation:Water Temple 1F]{{Equipment|TotK|Soldier Spear}}<!-- Zonaite Spear + Soldier Construct Horn -->, | |||
Soldier Construct III [Qty:1][Sublocation:Water Temple 1F]{{Equipment|TotK|Mighty Construct Bow}}{{Equipment|TotK|Fire Fruit}}, | |||
Soldier Construct III [Qty:1][Sublocation:Water Temple 1F]{{Equipment|TotK|Mighty Construct Bow}}{{Equipment|TotK|Fire Fruit}}, | |||
Spikes [3][Qty:46][Sublocation:Water Temple B1] | |||
}} | |||
{{List Notes}} | |||
;With {{Term|TotK|Sidon}} during "{{Term|TotK|Sidon of the Zora}}" | |||
{{Gallery List|Enemies | |||
|TotK= | |||
Chuchu [Qty:1][Sublocation:Water Temple 1F], | |||
Chuchu [2][Qty:5][Sublocation:Water Temple 1F], | |||
Chuchu [3][Qty:1][Sublocation:Water Temple 1F], | |||
Fire Like [Qty:1][Sublocation:Water Temple 1F], | |||
Flame Fountain [Qty:10][Sublocation:Water Temple B1]{{List Note|10 will not reappear after the nearby {{Term|TotK|Floor Switch|link}} has been pressed.}}, | |||
Soldier Construct II [Qty:1][Sublocation:Water Temple 1F]{{Equipment|TotK|Strong Construct Bow}}{{Equipment|TotK|Fire Fruit}}, | |||
Soldier Construct III [Qty:1][Sublocation:Water Temple 1F]{{Equipment|TotK|Soldier Blade}}<!-- Strong Zonaite Longsword + Soldier Construct Horn -->, | |||
Soldier Construct III [Qty:1][Sublocation:Water Temple 1F]{{Equipment|TotK|Soldier Spear}}<!-- Zonaite Spear + Soldier Construct Horn -->, | |||
Soldier Construct III [Qty:1][Sublocation:Water Temple 1F]{{Equipment|TotK|Mighty Construct Bow}}{{Equipment|TotK|Ice Fruit}}, | |||
Soldier Construct III [Qty:1][Sublocation:Water Temple 1F]{{Equipment|TotK|Mighty Construct Bow}}{{Equipment|TotK|Fire Fruit}}, | |||
Spikes [3][Qty:46][Sublocation:Water Temple B1] | |||
}} | |||
{{List Notes}} | |||
====={{Plural|TotK|Boss}}===== | |||
{{Gallery List|Enemies | |||
|TotK= Mucktorok [Qty:1]<br/>''Scourge of the Water Temple'' | |||
}} | |||
===={{Plural|TotK|Treasure Chest}}==== | |||
{{Treasure Chests|game= TotK | |||
|- | |||
| Treasure Chest | |||
| Arrow x 5 | |||
| 3441, 0819, 1776 | |||
| Inside a pool of {{Term|TotK|Sludge}} on the northeast {{Term|TotK|Sky Island|link}} of {{Term|TotK|Water Temple 1F|link}} | |||
|- | |||
| Treasure Chest | |||
| Opal | |||
| 3498, 0752, 1786 | |||
| Below an arch under the water on the southeast {{Term|TotK|Sky Island|link}} of {{Term|TotK|Water Temple 1F|link}} | |||
|- | |||
| Stone Chest | |||
| Large Zonai Charge | |||
| 3524, 0643, 1810 | |||
| Atop the southeast islet of {{Term|TotK|Water Temple 1F|link}} | |||
|- | |||
| Stone Chest | |||
| Zora Shield | |||
| 3280, 0577, 1790 | |||
| Atop the southwest islet of {{Term|TotK|Water Temple 1F|link}} | |||
|- | |||
| Treasure Chest | |||
| Sapphire | |||
| 3310, 0671, 1717 | |||
| Below the {{Term|TotK|Water (Terrain)|link}} in the southwestern pool of {{Term|TotK|Water Temple B1|link}} | |||
|- | |||
| Treasure Chest | |||
| Large Zonaite | |||
| 3379, 0715, 1720 | |||
| Fused to the {{Term|TotK|Hover Stone|link}} above the {{Plural|TotK|Spikes|link}} in the inner room of the {{Term|TotK|Water Temple B1|link}} | |||
}} | |||
===Equipment=== | |||
{{Gallery List|Equipment | |||
|TotK= Strong Zonaite Spear | |||
}} | |||
==={{Plural|TotK|Zonai Device}}=== | |||
{{Gallery List|Zonai Devices | |||
|TotK= Hover Stone | |||
}} | |||
==Other Appearances== | ==Other Appearances== | ||
==={{HW|-}}=== | ==={{HW|-}}=== | ||
{{Noncanon|Start}} | {{Noncanon|Start}} | ||
The Water Temple appears as part of the {{Term|HWDE|Lake Hylia (Stage)|link}} {{Term|HWDE|Stage|link}} in {{HW}}. This stage is a part of [[Sheik]] and [[Impa]]'s quest to close the [[Gate of Souls]] located inside the temple. An updated version of [[Dark Link]]'s chamber appears, where [[Wizzro]], disguised as Zelda, is fought.<ref>{{Cite | The Water Temple appears as part of the {{Term|HWDE|Lake Hylia (Stage)|link}} {{Term|HWDE|Stage|link}} in {{HW}}. This stage is a part of [[Sheik]] and [[Impa]]'s quest to close the [[Gate of Souls]] located inside the temple. An updated version of [[Dark Link]]'s chamber appears, where [[Wizzro]], disguised as Zelda, is fought.<ref>{{Cite Web|url= http://www.zeldainformer.com/news/new-hyrule-warriors-screenshots-preview-ocarina-of-time-stages-characters#comment-1501981758}}</ref> | ||
{{Noncanon|End}} | {{Noncanon|End}} | ||
==={{DotT|-}}=== | ==={{DotT|-}}=== | ||
{{Noncanon|Start}} | {{Noncanon|Start}} | ||
Though the Water Temple is never seen during {{DotT}}, a [[Sign]] stating that the Real Escape Game was "Easier than the Water Temple" was used as a prop during photo shoots with the [[Master Sword]] at {{DotT|-}} events.<ref | Though the Water Temple is never seen during {{DotT}}, a [[Sign]] stating that the Real Escape Game was "Easier than the Water Temple" was used as a prop during photo shoots with the [[Master Sword]] at {{DotT|-}} events.<ref name="DotT Sign"/> | ||
{{Noncanon|End}} | {{Noncanon|End}} | ||
==Trivia== | |||
*As alluded to in Vol. 2 of the {{Term|TFH|Drablands Diary|link}}, a "[[Turtle Rock (Disambiguation)|Turtle Rock]]"—a rock resembling a turtle shell—is hidden in each {{Term|TFH|Level|link}} of the {{Term|TFH|Riverside|link}} in {{TFH}}. One can be found under the grated floor in {{Term|TFH|Stage}} 2 of the {{Term|TFH|Water Temple}}, in the passage that opens when all {{Plural|TFH|Enemy|link}} are defeated. | |||
==Nomenclature== | ==Nomenclature== | ||
| Line 171: | Line 341: | ||
==Gallery== | ==Gallery== | ||
<gallery> | <gallery> | ||
File:WaterTemple. | File:WaterTemple.png|Link at the temple's entrance from {{OoT|-}} | ||
File:Wallmark. | File:Wallmark.png|A Switch used to manipulate the water levels from {{OoT|-}} | ||
File: | File:OoT Water Temple Map.jpg|Dungeon Map from {{OoT|-}} | ||
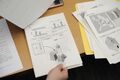
File:OoT Water Temple Development Plan 1.jpg|Water Temple development plan from {{OoT|-}} | File:OoT Water Temple Development Plan 1.jpg|Water Temple development plan from {{OoT|-}} | ||
File:OoT Water Temple Development Plan 2.jpg|Water Temple development plan from {{OoT|-}} | File:OoT Water Temple Development Plan 2.jpg|Water Temple development plan from {{OoT|-}} | ||
File:OoT Water Temple Development Plan 3.jpg|Water Temple development plan from {{OoT|-}} | File:OoT Water Temple Development Plan 3.jpg|Water Temple development plan from {{OoT|-}} | ||
File:Water Temple OoT3D.png|The Water Temple from {{OoT3D|-}} | File:Water Temple OoT3D.png|The Water Temple from {{OoT3D|-}} | ||
File:TFH Water Temple Stage 2 2.png|Battling {{Plural|TFH|Enemy}} in the flooded {{Term|TFH|Stage}} 2 from {{TFH|-}} | |||
File:TFH Water Temple Stage 2 3.png|Toteming to reach a {{Term|TFH|Crank}} in {{Term|TFH|Stage}} 2 from {{TFH|-}} | |||
File:TFH Water Temple Stage 3 3.png|Flooding {{Term|TFH|Stage}} 3 from {{TFH|-}} | |||
File:TFH Water Temple Stage 3 4.png|Reaching the northern room in {{Term|TFH|Stage}} 3 from {{TFH|-}} | |||
File:TFH Water Temple Stage 3 5.png|Recovering the {{Term|TFH|Small Key}} in {{Term|TFH|Stage}} 3 from {{TFH|-}} | |||
<!--File:TotK Water Temple Found Icon.png|Pre-completion icon of the {{Term|TotK|Water Temple}} before its {{Term|TotK|Travel Gate}} has been activated from {{TotK|-}}--> | |||
File:TotK Water Temple Incomplete Icon.png|Pre-completion icon of the {{Term|TotK|Water Temple}} once its {{Term|TotK|Travel Gate}} has been activated from {{TotK|-}} | |||
File:HW Water Temple.png|The Water Temple from {{HW|-}} | File:HW Water Temple.png|The Water Temple from {{HW|-}} | ||
</gallery> | </gallery> | ||
| Line 186: | Line 363: | ||
{{Ref}} | {{Ref}} | ||
{{DungeonNav2|TotK}} | |||
{{Categories | {{Categories | ||
|dungeons= OoT, OoT3D | |Lanayru Great Spring Sky, Temples | ||
|dungeons= OoT, OoT3D, TotK | |||
|levels= TFH | |levels= TFH | ||
| | |locations= OoT, OoT3D, TotK, HW, HWL, HWDE | ||
}} | }} | ||
Latest revision as of 03:35, 18 April 2024
Water Temple is a recurring Dungeon and location in The Legend of Zelda series.[1][2][3][name references needed]
Overview
Ocarina of Time
Entrance to the Temple
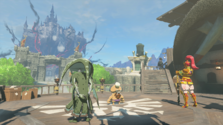
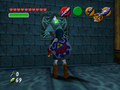
The ancient temple lies deep under the vast Lake Hylia. Guarded by the Zoras, it is considered a sacred temple that is used to worship the water spirits.[4] The Water Temple is accessible after the young hero finds the Iron Boots in Ice Cavern. Aided with the boots and the Hookshot, Link can access its entrance by shooting the target above the gate.
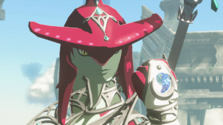
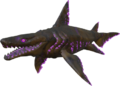
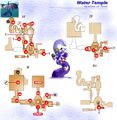
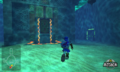
The Water Temple contains the source of the curse that has frozen Zora's Domain.[5] Various parts of the temple require Link to go underwater for substantial amounts of time, thus necessitating the Zora Tunic (though the Water Temple can be beaten without it by an experienced and resourceful player). Its enigmatic structure consists of various floors (four in total, one of them is a basement) and requires the use of playing Zelda's Lullaby at each of the special markings on the walls that manipulate the level of water, which give Link access to various parts of the temple from the hub room. Link will need to use all of his intellectual skills and cunning survival techniques to truly conquer this temple, as puzzles and obstacles are strategically varied: From the aforementioned water level manipulation, to swimming in presence of current flows, defeating enemy groups, climbing a waterfall with descending platforms, raise and lower pillars with a switch, etc.; the young hero will also come to confront his very own doppelgänger, Dark Link in the Water Temple. After defeating Dark Link, Link will find the Longshot which, once acquired, helps Link in the search for the Boss Key and enter the lair of the aquatic boss, Morpha.
This temple is infamous to Ocarina of Time fans for its difficulty and necessity for constantly pausing the game in order to switch to the Iron Boots and back. When the game was remade for the 3DS, the temple was altered in order to be completed easily. The Iron Boots are now a click-on item, glowing markings appear on the wall to show the way, and the entire temple was made brighter.
The Water Temple makes much use of Din's Fire in the Master Quest version of the game. The Hookshot is also used more often than in the original version. The infamous "serpent-shaped" room now has Hookshot targets over the wall, making it easy to simply bunny-hop through the vortex-filled gauntlet. The map, compass, and even the Longshot are obtained very early in the dungeon. The Longshot gives access to a lot of new areas and makes most puzzles easier than before. Most rooms are blocked with gates, so puzzles must be solved to be able to access them. Boulders and most enemies are no longer found, except for two Spikes and nine completely new Stalfos. Two new features include a room with several Dodongos, plus several crates that are found throughout the dungeon.
In the GameCube version of the Master Quest, Link can complete the dungeon with an extra Small Key remaining. This is because one of the doors that Link is meant to unlock with a key unlocks itself, specifically when defeating the Stalfos prior to Dark Link and causing the dragon heads to rise. The only way to reach this door and unlock it normally is by using glitches. In Ocarina of Time 3D this glitch was fixed.
Eiji Aonuma apologized for the design of the Water Temple in a 2009 interview.[6] Due to the confusing layout and controls for the Nintendo 64 version of Ocarina of Time, several changes were in Ocarina of Time 3D. The Iron Boots were changed into an item rather than a piece of equipment, the dungeon received glowing markings on various walls and corridors to mark where the player must go and to make changing the water level more clear,[7][8] and an additional camera scene was added in the central tower of the dungeon to make the location of a commonly and easily missed Small Key more obvious.
Small Keys
- In the original, there are six small keys.
- In Master Quest, there are two. Notice however that the second locked door is only in the 3DS version in its mirrored form.
Minor Enemies


- Master Quest


Tri Force Heroes
The Water Temple is a Level in Tri Force Heroes. It is the fourth and last Level of the Riverside Area, and is preceded by Cove of Transition.

The Water Temple is a large, flooded palace filled with many pools. As it involves a lot of swimming and traversing Water, the Zora Costume and the Torrent Robe become very useful here.
In Stage 1, the Links enter the Temple from its entrance, where further ahead and down a ramp is a large pool. The Links can find two Gripshots on ledges to the sides. By firing each Gripshot to the north of where they are found, the Links can attach themselves to fences, crossing a small portion of the pool and dropping down onto platforms. A Water Rod can be found on top of a tall platform in the middle of the pool, but cannot be reached at that point. Inside the the pool are two Shock Switches, which are guarded off by railings on particular sides; using the Gripshots, the Links can hit the right Switch from the left platform, and the left Switch from the right platform. Activating both Shock Switches at the same time causes a small platform to appear in the center of the pool. From there, one of the Links can fire the Gripshot at a Crank to the north; doing so will open the Crank and flood the room, allowing the Links to reach the Water Rod. The Link with the Water Rod then has to create pillars of water for the heroes to reach the Triforce Gateway on the north end of the pool.

In Stage 2, the Links appear on a caged floor above a pool of Water. A Big Switch in the center must be pressed down by all three Links, which automatically opens a Crank in the northeast corner and floods the room, as Tektites, Water Tektites and Skullfish appear. The Links must swim onto small platforms to be able to attack them, or use the Water Rod to stun them. Optionally, by using the Water Rod from the northeast platform, or by forming a Totem there, one of the Links with a Gripshot can pull the Crank to drain the room, making the enemies easier to defeat. After all enemies have been defeated, a steel grate in the northwest corner rises, opening to passage. To continue through it, the room needs to be drained if it has not already been. The Links can then walk under the grate and come to a platform that can be reached using the Water Rod. Another Crank can be seen on the wall high above, which can only be opened by using the Water Rod and forming a full Totem on top of the pillar. Pulling this Crank floods the room again, allowing the Links to reach the Triforce Gateway and a Squiddy.

In Stage 3, the Links find themselves trapped in a caged enclosure with a Water Octorok. Two of the Links can escape the enclosure by using the Gripshot on a panel on the cage wall, which will flip around and drop the Links outside. Those Links then stand on two Floor Switches, opening the cage door so the third Link can escape. Outside the cage, the Links enter a room with platforms at several elevations and Water at a low level. To the northeast is a locked gate leading to the Triforce Gateway, and in the northwest is another section of the room behind a fence wall. Nearby is a platform reachable only with the Water Rod, from which the Links can open another Crank, raising the Water level. The Links with Gripshots can then reach another cage panel by having the other Link lead them with the Water Rod, while avoiding rocks fired at them by nearby Water Octoroks. On the other side of the fence, the Links can find a Treasure Chest containing a Red Rupee, and a Raft that can be pulled toward another platform by using the Gripshot on a Stake. On this platform is a Chest containing a Key, and a Floor Switch that opens the cage door back to the main room. As the locked gate is now submerged underwater, the Links cannot use the Key just yet; two of them are required to turn the Crank again to lower the Water, after which the Links can board the Raft and use the Gripshot to transport themselves and the Key to where the Triforce Gateway is.

Stage 4 is where Arrghus is fought in a pool. The Links first need to defeat its eyes, using several platforms around the pool's edge to get closer. Once they succeed, the platforms automatically retract and the pool is completely drained. At the bottom of the pool, they battle Arrghus proper, with several Jars containing Hearts and Energy Potions strewn around the floor. After Arrghus is defeated, a door opens in an alcove at the north end leading to the Triforce Gateway.
Drablands Challenges
Once the Boss of the Riverside has been defeated, the Water Temple can be replayed with the following Drablands Challenges: "Fewer Heart Containers!", "Clear with halved energy!", and "Transport the orb quickly!".
In "Transport the orb quickly!", the Links are given a timer of 30 seconds in Multiplayer, or two minutes and 10 seconds in single-player. This timer can be increased by collecting Hourglasses or wearing Linebeck's Uniform. As dropping the orb in Water will cause it to respawn at an earlier location, it is advisable to place the orb on safe ground before using a Crank to flood a room.
Magical Materials
At the end of the Level, three Treasure Chests can be opened. Two contain the same Material, and one contains another, more valuable Material.
| Drablands Challenge | — |
|---|---|
| Magical Materials | |
| Drablands Challenge | Fewer Heart Containers! |
| Magical Materials | |
| Drablands Challenge | Clear with halved energy! |
| Magical Materials | |
| Drablands Challenge | Transport the orb quickly! |
| Magical Materials |
Enemies and Traps
- Stage 1
There are no Enemies in this Stage.
- Stage 2
![Skullfish ×2[a]](/wiki/File:TFH_Skullfish_Model.png)

![Tektite ×2[a]](/wiki/File:TFH_Tektite_Model.png)
![Water Tektite ×2[a]](/wiki/File:TFH_Water_Tektite_Model.png)
- ↑ 1.0 1.1 1.2 These appear when the three Links stand on the Big Switch.
- Stage 3

- Stage 4

- Stage 1
- Stage 2
- ↑ 1.0 1.1 1.2 These appear when the three Links stand on the Big Switch.
- Stage 3
- Stage 4
- Stage 1
- Stage 2
- ↑ 1.0 1.1 1.2 These appear when the three Links stand on the Big Switch.
- Stage 3
- Stage 4
Treasure Chests
| Treasure Chest | |
|---|---|
| Contents | |
| Notes | On the left ledge in the northern section of Stage 3 |
| Treasure Chest | |
| Contents | |
| Notes | On the right ledge in the northern section of Stage 3 |

Tears of the Kingdom
- Related Quests
|
Regional Phenomena | |||
| Main Quest | ||||
| Regional Phenomena | |
|
Sidon of the Zora | |||
| Main Quest | ||||
| Sidon of the Zora | |
|
|
Regional Phenomena | |||
| Main Quest | ||||
| Regional Phenomena | |
|
|
Sidon of the Zora | |||
| Main Quest | ||||
| Sidon of the Zora | |
Areas
Enemies

![Flame Fountain ×10[a]](/wiki/File:TotK_Flame_Fountain_Model.png)


- ↑ 10 will not reappear after the nearby Floor Switch has been pressed.
- With Sidon during "Sidon of the Zora"

- ↑ 10 will not reappear after the nearby Floor Switch has been pressed.
Bosses
-
Mucktorok ×1
Scourge of the Water Temple

Treasure Chests
| Treasure Chest | |
|---|---|
| Contents | |
| Coordinates | 3441, 0819, 1776 |
| Notes | Inside a pool of Sludge on the northeast Sky Island of Water Temple 1F |
| Treasure Chest | |
| Contents | |
| Coordinates | 3498, 0752, 1786 |
| Notes | Below an arch under the water on the southeast Sky Island of Water Temple 1F |
| Treasure Chest | |
| Contents | |
| Coordinates | 3524, 0643, 1810 |
| Notes | Atop the southeast islet of Water Temple 1F |
| Treasure Chest | |
| Contents | |
| Coordinates | 3280, 0577, 1790 |
| Notes | Atop the southwest islet of Water Temple 1F |
| Treasure Chest | |
| Contents | |
| Coordinates | 3310, 0671, 1717 |
| Notes | Below the Water in the southwestern pool of Water Temple B1 |
| Treasure Chest | |
| Contents | |
| Coordinates | 3379, 0715, 1720 |
| Notes | Fused to the Hover Stone above the Spikes in the inner room of the Water Temple B1 |


Equipment
Zonai Devices
Other Appearances
Hyrule Warriors
The Water Temple appears as part of the Lake Hylia Stage in Hyrule Warriors. This stage is a part of Sheik and Impa's quest to close the Gate of Souls located inside the temple. An updated version of Dark Link's chamber appears, where Wizzro, disguised as Zelda, is fought.[9]
Defenders of the Triforce
Though the Water Temple is never seen during Defenders of the Triforce, a Sign stating that the Real Escape Game was "Easier than the Water Temple" was used as a prop during photo shoots with the Master Sword at Defenders of the Triforce events.[3]
Trivia
- As alluded to in Vol. 2 of the Drablands Diary, a "Turtle Rock"—a rock resembling a turtle shell—is hidden in each Level of the Riverside in Tri Force Heroes. One can be found under the grated floor in Stage 2 of the Water Temple, in the passage that opens when all Enemies are defeated.
Nomenclature
| Language | Names | Meanings |
|---|---|---|
Japanese |
| |
ChineseTR | 水之神殿 (Shuǐ Zhī Shéndiàn) (TotK) | |
ChineseSI | 水之神殿 (Shuǐ Zhī Shéndiàn) (TotK) | |
FrenchCA |
| |
FrenchEU |
| |
German | Wassertempel (TFH | TotK)[17] | |
Italian |
| |
Korean | 물의 신전 (TotK) | |
SpanishLA | Templo del agua (TFH)[16] | |
SpanishEU |
| |
| This table was generated using translation pages. To request an addition, please contact a staff member with a reference. | ||
Gallery
-
Link at the temple's entrance from Ocarina of Time
-
A Switch used to manipulate the water levels from Ocarina of Time
-
Dungeon Map from Ocarina of Time
-

Water Temple development plan from Ocarina of Time
-

Water Temple development plan from Ocarina of Time
-
Water Temple development plan from Ocarina of Time
-
The Water Temple from Ocarina of Time 3D
-
Battling Enemies in the flooded Stage 2 from Tri Force Heroes
-
Toteming to reach a Crank in Stage 2 from Tri Force Heroes
-
Flooding Stage 3 from Tri Force Heroes
-

Reaching the northern room in Stage 3 from Tri Force Heroes
-
Recovering the Key in Stage 3 from Tri Force Heroes
-

Pre-completion icon of the Water Temple once its Travel Point has been activated from Tears of the Kingdom
-
The Water Temple from Hyrule Warriors


See Also
References
- ↑ Encyclopedia, Dark Horse Books, pg. 149 (OoT) & 160 (TFH)
- ↑ "Water Temple
The Great Wellspring of Hyrule" — Game Screen (Tears of the Kingdom) - ↑ 3.0 3.1 "Easier than the Water Temple!" — Sign (Defenders of the Triforce)
- ↑ "At the lake bottom there is a Water Temple used to worship the water spirits." — Kaepora Gaebora (Ocarina of Time)
- ↑ "This ice is created by an evil curse... The monster in the Water Temple is the source of the curse." — Sheik (Ocarina of Time 3D)
- ↑ Zelda Director Apologizes for Ocarina Water Temple, Hints at Link Taking Flight , Game Informer.
- ↑ "-Three colors paths have been added to the Water Temple
- These paths line the walls of the temple, leading to one of the locations where Link can raise/lower the water level
- Some key doors are emphasised with a colorful border surrounding them" — [1] , Nintendo Everything.com; retrieved May 12, 2011. - ↑ "But that’s not the only improvement. Navigating the confusing temple has also been greatly simplified with the addition of three colored paths that line the walls, each leading to one of the locations where Link can raise or lower the water level. You'll be visiting those locations often, so the directions are much appreciated (it’s not like there’s a gas station Link can stop and ask at!). We also noticed some key doors were also emphasised with a colorful border surrounding them." — [2] , GameXplain; retrieved May 12, 2011.
- ↑ [3] , .
- ↑ "Santuario dell'acqua" — Level Selection (Tri Force Heroes)
- ↑ Enciclopedia di Hyrule, Magazzini Salani, pg. 149
- ↑ "Ho salvato la principessa e lei si è diretta subito al Santuario dell'Acqua!" — Sheik (Ocarina of Time 3D, Italian localization)
- ↑ Nintendo Official Guidebook—The Legend of Zelda: Ocarina of Time, Shogakukan, pg. 155
- ↑ "水の神殿" — Level Selection (Tri Force Heroes)
- ↑ "Temple de l'eau" — Level Selection (Tri Force Heroes)
- ↑ "Templo del agua" — Level Selection (Tri Force Heroes)
- ↑ "Wassertempel" — Level Selection (Tri Force Heroes)
- ↑ "Templo del Agua" — Level Selection (Tri Force Heroes)
Dungeons in The Legend of Zelda
Level 1 • Level 2 • Level 3 • Level 4 • Level 5 • Level 6 • Level 7 • Level 8 • Level 9
Dungeons in The Adventure of Link
Parapa Palace • Midoro Palace • Island Palace • Maze Island Palace • Palace on the Sea • Three-Eye Rock Palace • Great Palace
Dungeons in A Link to the Past
Hyrule Castle • Castle Dungeon • Eastern Palace • Desert Palace • Tower of Hera
Palace of Darkness • Swamp Palace • Skull Woods • Thieves' Town • Ice Palace • Misery Mire • Turtle Rock • Ganon's Tower • Palace of the Four Sword![]()
Tail Cave • Bottle Grotto • Key Cavern • Angler's Tunnel • Catfish's Maw • Face Shrine • Eagle's Tower • Turtle Rock • Wind Fish's Egg
Color Dungeon (LADX | LANS) • Chamber Dungeon (LANS)
Inside the Deku Tree • Dodongo's Cavern • Inside Jabu-Jabu's Belly
Forest Temple • Fire Temple • Water Temple • Shadow Temple • Spirit Temple • Ganon's Castle
Woodfall Temple • Snowhead Temple • Great Bay Temple • Stone Tower Temple
Swamp Spider House • Pirates' Fortress • Oceanside Spider House • Beneath the Well • Ancient Castle of Ikana • Moon Dungeons
Gnarled Root Dungeon • Snake's Remains • Poison Moth's Lair • Dancing Dragon Dungeon • Unicorn's Cave • Ancient Ruins • Explorer's Crypt • Sword & Shield Maze • Onox's Castle • Room of Rites
Spirit's Grave • Wing Dungeon • Moonlit Grotto • Skull Dungeon • Crown Dungeon • Mermaid's Cave • Jabu-Jabu's Belly • Ancient Tomb • Black Tower • Room of Rites
Maku Road • Great Moblin's Keep • Ambi's Palace • Hero's Cave
Chambers of Insight • Sea of Trees • Talus Cave • Death Mountain • Vaati's Palace
Dragon Roost Cavern • Forbidden Woods • Tower of the Gods • Forsaken Fortress • Earth Temple • Wind Temple • Ganon's Castle
Fire Mountain • Ice Ring Isle • Ghost Ship • Savage Labyrinth
Stages in Four Swords Adventures
Whereabouts of the Wind
Lake Hylia • Cave of No Return • Hyrule Castle
Eastern Hyrule
The Coast • Village of the Blue Maiden • Eastern Temple
Death Mountain
Death Mountain Foothills • The Mountain Path • Tower of Flames
Near the Fields
The Field • The Swamp • Infiltration of Hyrule Castle
The Dark World
Lost Woods (Four Swords Adventures) • Kakariko Village (Four Swords Adventures) • Temple of Darkness
The Desert of Doubt
Desert of Doubt • Desert Temple • Pyramid
Frozen Hyrule
Frozen Hyrule • Temple of Ice • Tower of Winds
Realm of the Heavens • The Dark Cloud • Palace of Winds
Deepwood Shrine • Cave of Flames • Fortress of Winds • Temple of Droplets • Palace of Winds • Dark Hyrule Castle
Forest Temple • Goron Mines • Lakebed Temple • Arbiter's Grounds • Snowpeak Ruins • Temple of Time • City in the Sky • Palace of Twilight • Hyrule Castle
Lantern Caverns • Cave of Ordeals • Cave of Shadows (TPHD)
Temple of the Ocean King • Temple of Fire • Temple of Wind • Temple of Courage • Ghost Ship • Goron Temple • Temple of Ice • Mutoh's Temple
Tower of Spirits • Forest Temple • Snow Temple • Ocean Temple • Fire Temple • Sand Temple
Skyview Temple • Earth Temple • Lanayru Mining Facility • Ancient Cistern • Sandship • Fire Sanctuary • Sky Keep
Dungeons in A Link Between Worlds
Eastern Palace • Tower of Hera • House of Gales • Inside Hyrule Castle • Desert Palace
Ice Ruins • Swamp Palace • Thieves' Hideout • Dark Palace • Skull Woods • Turtle Rock • Lorule Castle
Woodlands
Deku Forest • Buzz Blob Cave • Moblin Base • Forest Temple
Riverside
Secret Fortress • Abyss of Agony • Cove of Transition • Water Temple
Volcano
Blazing Trail • Hinox Mine • Den of Flames • Fire Temple
Ice Cavern
Frozen Plateau • Snowball Ravine • Silver Shrine • Ice Temple
Fortress
Sealed Gateway • Bomb Storage • Training Ground • The Lady's Lair
The Dunes
Infinity Dunes • Stone Corridors • Gibdo Mausoleum • Desert Temple
The Ruins
Illusory Mansion • Palace Noir • Lone Labyrinth • Grim Temple
Sky Realm
Floating Garden • Deception Castle • Dragon Citadel • Sky Temple
Forest Zone • Flooded Zone • Scorching Zone • Frozen Zone • Fortified Zone • Desert Zone • Shadow Zone • Baneful Zone
Dungeons in Breath of the Wild
Divine Beast Vah Ruta • Divine Beast Vah Rudania • Divine Beast Vah Medoh • Divine Beast Vah Naboris • Hyrule Castle
Sword Monk's Shrine (TMT) • Final Trial (TCB)
Akh Va'quot • Bareeda Naag • Bosh Kala • Chaas Qeta • Daag Chokah • Dagah Keek • Dah Kaso • Dah Hesho • Daka Tuss • Dako Tah • Daqa Koh • Daqo Chisay • Dila Maag • Dow Na'eh • Dunba Taag • Gee Ha'rah • Goma Asaagh • Gorae Torr • Ha Dahamar • Hawa Koth • Hia Miu • Hila Rao • Ishto Soh • Ja Baij • Jee Noh • Jitan Sa'mi • Joloo Nah • Ka'o Makagh • Kaam Ya'tak • Kah Mael Shrine • Kah Okeo Shrine • Kah Yah Shrine • Kam Urog Shrine • Katah Chuki • Katosa Aug • Kay Noh • Kaya Wan • Kayra Mah • Ke'nai Shakah • Keeha Yoog • Keh Namut • Kema Kosassa • Kema Zoos • Keo Ruug • Ketoh Wawai • Korgu Chideh • Korsh O'hu • Kuh Takkar • Kuhn Sidajj • Lakna Rokee • Lanno Kooh • Maag Halan • Maag No'rah • Maka Rah • Mezza Lo • Mijah Rokee • Mirro Shaz • Misae Suma • Mo'a Keet • Mogg Latan • Monya Toma • Mozo Shenno • Muwo Jeem • Myahm Agana • Namika Ozz • Ne'ez Yohma • Noya Neha • Oman Au • Owa Daim • Pumaag Nitae • Qua Raym • Qaza Tokki • Qukah Nata • Raqa Zunzo • Ree Dahee • Rin Oyaa • Ritaag Zumo • Rok Uwog • Rona Kachta • Rota Ooh • Rucco Maag • Saas Ko'sah • Sah Dahaj • Sasa Kai • Sha Gehma • Sha Warvo • Shada Naw • Shae Katha • Shae Loya • Shae Mo'sah • Shai Utoh • Shai Yota • Shee Vaneer • Shee Venath • Sheem Dagoze • Sheh Rata • Sho Dantu • Shoda Sah • Shoqa Tatone • Shora Hah • Soh Kofi • Suma Sahma • Ta'loh Naeg • Tah Muhl • Tahno O'ah • Tawa Jinn • Tena Ko'sah • Tho Kayu • To Quomo • Toh Yahsa • Toto Sah • Tu Ka'loh • Tutsuwa Nima • Voo Lota • Wahgo Katta • Ya Naga • Yah Rin • Zalta Wa • Ze Kasho • Zuna Kai
Etsu Korima • Kamia Omuna • Kee Dafunia • Keive Tala • Kiah Toza • Kihiro Moh • Mah Eliya • Noe Rajee • Rinu Honika • Rohta Chigah • Ruvo Korbah • Sato Koda • Sharo Lun • Shira Gomar • Takama Shiri • Yowaka Ita
Dungeons in Tears of the Kingdom
Wind Temple • Fire Temple • Water Temple • Lightning Temple • Hyrule Castle • Spirit Temple • Beneath Hyrule Castle
Anedamimik • Apogek • Bamitok • Chichim • Domizuin • Ekochiu • En-oma • Eshos • Eutoum • Ga-ahisas • Ganos • Gasas • Gatakis • Gatanisis • Gemimik • Gikaku • Gutanbac • Igashuk • Igoshon • Ihen-a • Ijo-o • Ikatak • In-isa • Irasak • Ishodag • Ishokin • Isisim • Iun-orok • Jikais • Jinodok • Jiosin • Jiotak • Jirutagumac • Jiukoum • Jochi-ihiga • Jochi-iu • Jochisiu • Jogou • Jojon • Joju-u-u • Joku-u • Joku-usin • Joniu • Jonsau • Josiu • Kadaunar • Kahatanaum • Kamatukis • Kamizun • Karahatag • Kikakin • Kimayat • Kisinona • Kitawak • Kiuyoyou • Kudanisar • Kumamayn • Kurakat • Kyokugon • Kyononis • Makasura • Makurukis • Maoikes • Marakuguc • Marari-in • Mayachideg • Mayachin • Mayahisik • Mayak • Mayam • Mayamats • Mayanas • Mayaotaki • Mayasiar • Mayatat • Mayaumekis • Mayausiy • Minetak • Miryotanog • Mogawak • Mogisari • Momosik • Morok • Moshapin • Motsusis • Musanokir • Nachoyah • Natak • Ninjis • Nouda • O-ogim • Orochium • Oromuwak • Oshozan-u • Otak • Otutsum • Pupunke • Rakakudaj • Rakashog • Rasitakiwak • Rasiwak • Ren-iz • Riogok • Rotsumamu • Runakit • Rutafu-um • Sahirow • Sakunbomar • Sepapa • Serutabomac • Sibajitak • Sifumim • Sihajog • Sikukuu • Simosiwak • Sinakawak • Sinatanika • Sisuran • Sitsum • Siwakama • Sonapan • Soryotanog • Suariwak • Susub • Susuyai • Tadarok • Tajikats • Taki-ihaban • Taninoud • Taunhiy • Tauyosipun • Tenbez • Teniten • Tenmaten • Timawak • Tokiy • Tsutsu-um • Tukarok • Turakamik • Turakawak • Ukoojisi • Ukouh • Usazum • Utojis • Utsushok • Wao-os • Yamiyo • Yansamin • Yomizuk • Zakusu • Zanmik
Dungeons in Freshly-Picked Tingle's Rosy Rupeeland
Hero's Shrine • Pirate Hideaway • Deku Temple • Insect Cavern • Desma's Labyrinth
Stages in Link's Crossbow Training
Level 1
Ordon Target Practice • Gerudo Stalfos: Defender • Arbiter's Grounds: Ranger
Level 2
Goron Target Practice • Zora River: Defender • Skull Shooting
Level 3
Kakariko Target Practice • Fruit Balloons • The Great Bridge: Defender
Level 4
Zora River Target Practice • Hyrule Castle: Defender • Skulltula Forest: Ranger
Level 5
Oocca Target Practice • Gerudo Moldorm: Defender • The Shootout
Level 6
Ordon Target Practice 2 • Bridge of Eldin: Defender • Snowpeak Ruins: Ranger
Level 7
Underground Target Practice • City in the Sky: Defender • Temple of Time: Ranger
Level 8
Horseback Target Practice • Snowpeak: Defender • Darknut Battle
Ranch Target Practice • Sacred Grove: Defender • Fossil Stallord Battle
Hyrule Field • Eldin Caves • Faron Woods • Valley of Seers • Death Mountain • Lake Hylia • Twilight Field • Palace of Twilight • Skyloft • Sealed Grounds • Temple of the Sacred Sword • Temple of Souls • Gerudo Desert • Ganon's Tower • Forsaken Fortress • Wind and Earth Temples
Frozen Grotto • Gerudo Ruins • Lost Swamp • Temple of Storms • Hyrule Castle • Future World
